Quantcast
  • Contact
  • Portfolio
  • Subscribe
  • Recipes
Menu

Set the Table Photography

photography
  • Contact
  • Portfolio
  • Subscribe
  • Recipes
×

The Bloody Mummy

Rachael White October 27, 2015

And just like that, we have arrived at the last week of October. I can't tell you exactly how that happened so quickly, but lucky for you, I'm filling the last few days of the month with delicious, spooky cocktail recipes! How does one new recipe a day sound? Starting....NOW!

The Bloody Mummy is my Halloween take on a brunch staple: a Bloody Mary. Just add string cheese! It's a simple change that makes this mummified drink fit for any (adults only) Halloween party or perhaps a post-Halloween brunch.

Stay tuned for cocktail #2, coming up tomorrow!

The Bloody Mummy

Makes 2 large drinks

  • 2 cups tomato juice, low sodium
  • 1 1/2 teaspoons wasabi paste
  • 2 teaspoons soy sauce
  • 1 teaspoon shichimi togarashi
  • 2-3 tablespoons fresh lemon juice
  • 5 oz vodka or gin
  • celery salt
  • celery stalks
  • pickled green beans
  • carrot sticks
  • string cheese
  1. Put some celery salt on a plate. Using a lemon wedge, line the rims of two tall glasses. Gently dip the rims in the celery salt before filling each glass with ice.
  2. In a large glass measuring pitcher, combine the wasabi paste, soy sauce, shichimi togarashi and lemon juice. Whisk until combined.
  3. Pour the tomato juice over the wasabi mixture and stir to combine.
  4. Pull the string cheese apart in thin strips and carefully line each glass. This can be a little tedious but don’t worry about it being completely perfect. You will still get the mummy effect if a couple of the pieces fall out of place.
  5. Carefully add the ice in the glass, making sure not to disturb the cheese too much. The ice will work well to hold the strips in place.
  6. Put 1 1/2 oz of vodka in each ice-filled glass. Top with the tomato juice mixture and garnish with celery, carrots and pickled green beans.
In Entertaining, Cocktails and Appetizers Tags cocktail recipes, cocktail, halloween cocktail
Comment

Roasted Butternut Squash Risotto

Rachael White October 8, 2015

When we lived in Japan, Brad and I used to go grocery shopping nearly every day. We had a refrigerator the size of those tiny dorm room fridges so we couldn't fit too much in there. It didn't take long for us to realized that we needed to get used to walking to and from the grocery store on a daily basis. I really enjoyed having the freedom to decide what we would eat based solely on what I saw in the grocery store that afternoon. It forced me to think on my feet and helped me learn about new ingredients and cooking techniques. Plus, I was able to focus on seasonal produce and catch-of-the-day seafood. This time of year, hot pots would be nearly in season and kabocha squash and sweet potatoes were everywhere. Perhaps my favorite thing about our little Japanese market were the kitschy, artificial fall leaves on plastic branches that decorated the aisles.

It took me a while to realize that we couldn't operate on the same grocery shopping schedule here in the United States. With 2 kids and a husband who works long hours, I find that meal planning for the whole week and making just one shopping trip works best for us. However, we often end up with odds and ends in the cabinets and produce drawers: the last of a box of dry pasta, half an onion, a carton of chicken stock, and other bits and bobs sit around getting ignored. So, this week I challenged myself to cook our nightly dinners using only what we had in the pantry, freezer, and fridge that needed to be used up. This beautiful, vibrant risotto is one of my favorite ways to get creative with basic ingredients and helps use items that might otherwise end up in the trash.

This risotto is creamy, full of comforting flavors, and perfect for a simple weeknight dinner. We topped our risotto with poached eggs and a couple drops of white truffle oil but that is totally optional. This bowl of goodness can stand on its own two feet without any fancy flourishes. And the leftovers? Yeah. Almost better than the original. I like risotto that has been reheated in a hot skillet until crispy in places and topped with a fried egg and a drizzle of hot sauce. Rice and eggs...I might have a little bit of an addiction.

Roasted Butternut Squash Risotto

Makes 6-8 Servings

  • 1 small butternut squash, peeled, seeded and cubed
  • 1 tablespoon + 1 teaspoon olive oil
  • course salt
  • 1 teaspoon unsalted butter
  • 1 large garlic clove, minced
  • 1/2 a medium yellow onion, chopped
  • 1/2 cup white wine
  • 1 cup arborio rice
  • 4 cups chicken stock, warmed
  • 1/3 cup grated pecorino romano cheese
  • 1/4 cup flat leaf parsley leaves, roughly chopped
  • salt and pepper to taste
  1. Preheat the oven to 425 degrees Fahrenheit. Arrange the butternut squash cubes in a single layer on a parchment lined, rimmed baking sheet. Toss with 1 tablespoon olive oil and sprinkle with salt. Bake for 25-30 minutes or until golden and tender.
  2. While the squash roasts, heat the remaining 1 teaspoon olive oil and the butter in a large skillet over medium-high heat. Add the chopped onion and the garlic and stir, cooking until softened, about 3-4 minutes.
  3. Stir the rice into the onion mixture and cook, stirring often until the rice begins to take on a slight golden color.
  4. Increase the heat slightly and stir in the white wine, scraping the bottom of the skillet. Bring the wine to a steady simmer.
  5. When the rice has absorbed the liquid, begin adding the stock 1/2 cup at a time, stirring the liquid into the rice until almost completely absorbed before adding the next 1/2 cup. Continue until the rice is tender but not mushy.
  6. When the squash is done, mash it roughly with a potato masher or a large fork. Stir the squash into the skillet with the risotto and stir until combined. Add the pecorino, season with salt and pepper, and sprinkle with the fresh parsley. Serve immediately.
In Entertaining, No Added Sugar, Lunch & Dinner Tags dinner party, fall recipe, roasted vegetables, easy dinner recipes, Rice
4 Comments

Cocktail Friday: The Toasted Pear

Rachael White October 2, 2015

Brad and I started dating in September of 2004. I had seen him around campus before but never had a conversation with him. We sang in the choir together, had a class together, and had likely crossed paths dozens of times in between. Early on in our relationship, we confessed that we were relieved the timing worked out the way it did. In our early college years, we were busy making bad dating choices, getting our hearts broken, and piecing them back together. But in September of 2004, one simple act, which could have meant nothing just months earlier, caused a spark between us. I was walking across campus, headed to the music hall, when a rogue frisbee landed at my feet. Not being much of a frisbee player, I wasn't entirely sure what to do, but I bravely picked up the disc and made a once-in-a-lifetime perfect toss (is that even what it's called?) to this tall, skinny guy with dreamy blue-green eyes and lashes that went on for days. As I went on my way, quietly rejoicing that I didn't make myself look like an idiot, Brad was apparently already sure he wanted to ask me out. I unknowingly made it difficult for him. He tried and tried without any luck because he couldn't get me to stand still long enough to get to the asking-out part of our little chats. And then one day, like a jerk, I asked him out by complete accident like it was no big deal. I didn't even do it on purpose. Brad was understandably frustrated, especially since it wasn't clear that I knew this was going to be a date. It wasn't until I was getting ready to meet up with him that I realized it felt like more than just hanging out with a friend. So, I showered, did my hair, spritzed on some perfume (let's be honest: it was probably some fruity-scented body spray) and headed out the door. We went and saw the show I Love You, You're Perfect, Now Change (the perfect first-date ice-breaker) and showed up wearing identical outfits: black shirts and jeans. Embarrassingly endearing? Then we enjoyed a late night snack at the campus café and when we parted ways, we were both sporting giddy grins because we hoped this was the beginning of something great. 

That was where it all started. And now, when autumn brings that crisp, cool, clean air that I love so much, I remember those early days of falling in love with Brad. We sipped cinnamon-scented hot cider together while working on our homework, took walks around our little college town, and nervously admitted, just weeks after we began seeing each other, that this was love.

image.jpg

This year marks 10 years since Brad and I started dating and it seemed fitting to make a cocktail to celebrate the occasion. The Toasted Pear is simple and sweet with a hint of spice from classic fall flavors like cinnamon and clove. An elegant bruléed pear slice garnishes this playful fall cocktail, though you can use a plain pear slice if you don't have a torch.  

Toasted Pear Cocktail


If you can, sip this outside with crunchy leaves under your feet, sitting in front of a bonfire, or listening to your favorite fall music (I'm particularly fond of this right now). 

The Toasted Pear

Makes 2 Cocktails

For the Toasted Pear Simple Syrup:

  • 1 pear, cut into thick slices
  • 2 cinnamon sticks
  • 4 whole cloves
  • 1/4 cup sugar + 1 tablespoon
  • 1 cup water

For the cocktail:

  • 3 ounces rum
  • 1 1/2 ounces toasted pear simple syrup
  • 1/2 ounce fresh lemon juice
  • 2 slices of pear for garnish

For the Simple Syrup:

  1. To make the simple syrup, put the pear slices, cinnamon sticks, and cloves in a nonstick skillet over medium-high heat. Without disturbing the pear slices, toast them on one side for about 3 minutes or until they begin to turn golden brown. Flip and toast on the second side.
  2. Sprinkle 1/4 cup of the sugar over the pears and spices and stir until it begins to melt and caramelize just a bit. Carefully add the water and bring to a simmer, stirring until the sugar has dissolved. Continue to simmer for about 5 minutes or until the liquid reduces by about half.
  3. Pour the syrup through a strainer into a glass jar or liquid measuring cup. Set aside to cool.

For the cocktail:

  1. Begin by bruléeing the pear slices. Sprinkle with the remaining 1 tablespoon sugar. Using a torch, melt the sugar until it is golden and bubbly. Allow to cool slightly.
  2. While the slices cool, fill a cocktail shaker with ice. Add the rum, lemon juice and simple syrup and shake vigorously for 30 seconds. Pour into a cocktail glass and garnish with a bruléed pear slice.


In Entertaining, Cocktails and Appetizers Tags Cocktail Friday, cocktail recipes, rum cocktail, autumn cocktail
8 Comments
Sticky-Oven-Baked-Miso-Honey-Chicken-Wings-Set-the-Table.jpg

Miso-Honey Glazed Chicken Wings

Rachael White January 6, 2015

As my belly gets bigger, I am able to spend less time on my feet in the kitchen. Between my waddling from one counter to another and the belly bumping into things, I think it's safer for everyone if I just get out of the way. Still, I try to get in he kitchen here and there to make simple things like smoothies or oatmeal for breakfast. I have also been able to muster the strength to make these miso-honey glazed chicken wings a couple of times, much to my husband's delight. They are sticky, sweet, salty and oh-so-easy. And did I mention they are baked? Well, they are. And that makes them even better and healthier and more appealing.

Here's what happens: the wings get brown and crispy skin thanks to a 475 degree oven before being brushed with a flavor explosion of miso, honey and a touch of rice vinegar. They are baked for a few more minutes to make the glaze extra sticky before one last coating is brushed on before serving. Done and done.

Miso-Honey-Glazed-Wings-Set-the-Table.jpg

I've mentioned in previous posts that I'm not much of a football fan unless there is delicious food involved. These wings are helpful for getting anyone and everyone through a game. They are also delicious as an appetizer while playing a fierce game of Chutes & Ladders with a 3 year old.

Sticky-Miso-Honey-Glazed-Chicken-Wings-Set-the-Table.jpg

Now, if I could devise a plan to eat this entire plate of wings and suffer no pregnancy-heartburn-side-dish-of-tums, I'd really be winning at life.

NOTES:

  • As you can see, I did not break these wings down. You don’t have to! If you do want to, the recipe still works as written, so you do you! If you do break them down, save the wing tips in a freezer bag to use in homemade stock if you feel so inclined.

  • You can totally grill these. Just grill instead of putting them in the oven!

  • If you are struggling to get your miso paste to whisk into the honey and rice vinegar smoothly, pop the miso and the honey in the microwave for 10-15 seconds to soften it all up a bit. DO NOT add water- the glaze won’t be as sticky!

Miso-Honey Glazed Chicken Wings

Makes 6-8 servings

  • 3 pounds chicken wings

  • 2 teaspoons kosher salt

  • 2 tablespoons miso paste (anything you have is fine- I used shiro)

  • 3 tablespoons honey

  • 1 1/2 teaspoons rice vinegar

  1. Preheat the oven to 475˚F. Pat the chicken wings dry with paper towels and arrange them on two large, parchment-lined baking sheets. Brush them with some canola or avocado oil and season with salt.

  2. Bake for 15 minutes or until the skin is golden brown and crisp. Meanwhile, whisk the miso paste, honey and rice vinegar together in a bowl.

  3. Remove the wings from the oven, toss them in a large bowl with the glaze. Turn on the broiler so it can heat while you place the wings back on the baking sheets. This time, broil them for 3-5 minutes, turning occasionally. It is ok if the skin gets dark brown in places- that’s where you’ll get the most flavor.

  4. Serve as is immediately, or sprinkle with some mint leaves or sesame seeds to a little color and texture.

In Entertaining, Kid Friendly, Lunch & Dinner, No Added Sugar Tags chicken recipes, easy appetizer recipes, football food, miso
3 Comments
New-Years-Eve-Appetizers.jpg

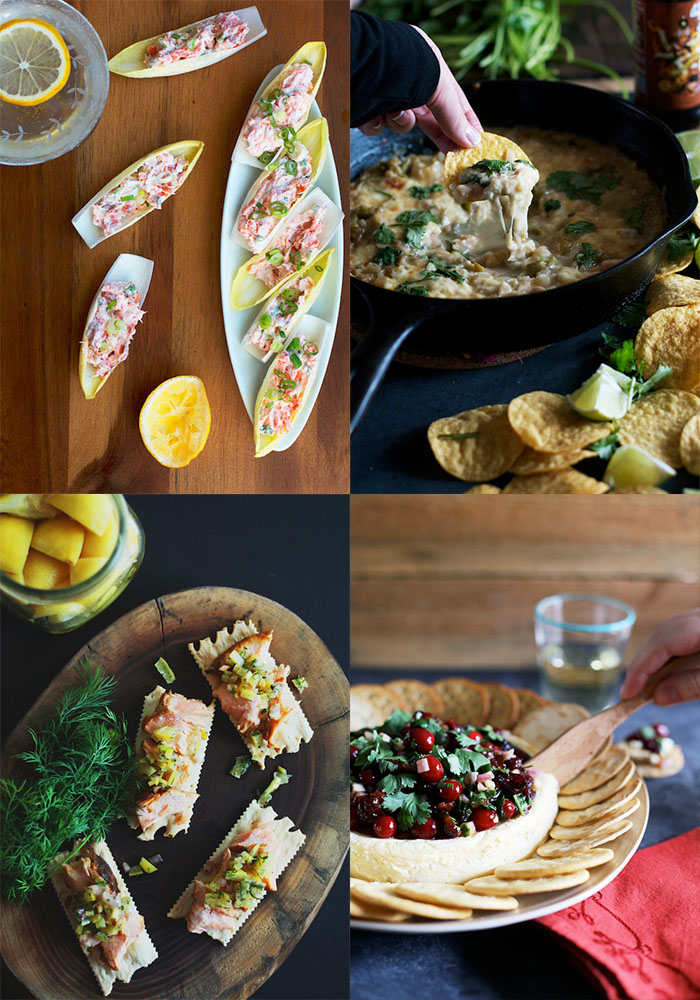
5 Perfect New Year's Eve Appetizers

Rachael White December 29, 2014

I've never been one to go out and party hard on New Year's Eve. In fact, nearly every year I prefer to stay in, play card games, and eat snacky foods washed down with sips of champagne. There is something about ringing in the New Year that way that feels cozy and comfy and it fits just right. Like a warm pair of slippers. When we lived in Japan, Brad and I went to the neighborhood shrine to celebrate with cloudy, white, unfiltered, delicious sake. The last year we lived in Tokyo, we attempted to venture out but our barely 1 month old little boy was not feeling it. I wrapped him in his baby wrap and he clawed at my neck and screamed at the top of his very tiny, extremely noisy lungs until we gave up and turned around to head back home. This year, we will be laying low. My bulging belly is not up for a night out and I'm pretty sure seeing a pregnant woman almost ready to pop is a buzz kill for most people who are out looking for a good time. Just a guess. In the spirit of keeping it cozy, I wanted to share 6 of my favorite New Year's Eve appetizers from the site that would be perfect for ringing in 2015.

And also, I would like to present the bulging belly I mentioned above. Just 2 1/2 more weeks to go!

553312_913768533963_2244318579386284168_n.jpg

OK- moving on to deliciousness...

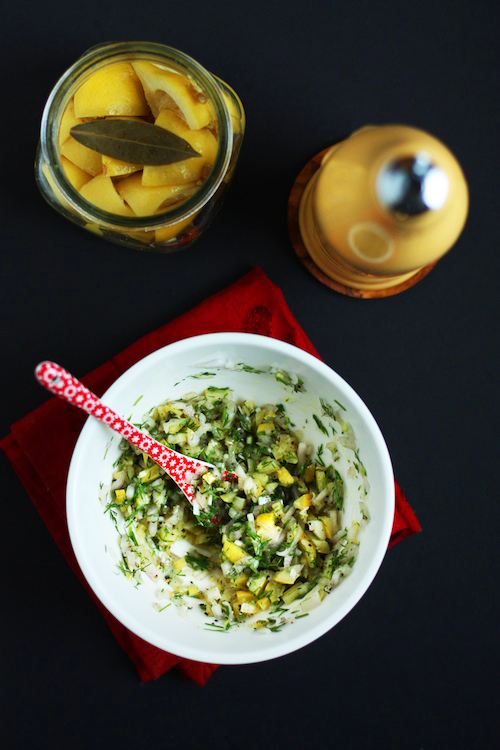
1. Preserved Lemon Relish

This is one of my all-time favorite condiments to have in the refrigerator. It's perfect with smoked salmon and crackers. The flavors are fresh and clean and provide a nice change from the typical richness of holiday appetizers.

Preserved-Lemon-Relish-copy.jpg

2.Smoked Salmon in Endive Cups

Endive leaves are the perfect vessel for hearty, flavorful dips and spreads. Their crispness is a welcome contrast to the creamy smoked salmon dip and helps satisfy that crunchy craving otherwise fulfilled by chips.

Holiday-Cocktail-Hour.jpg

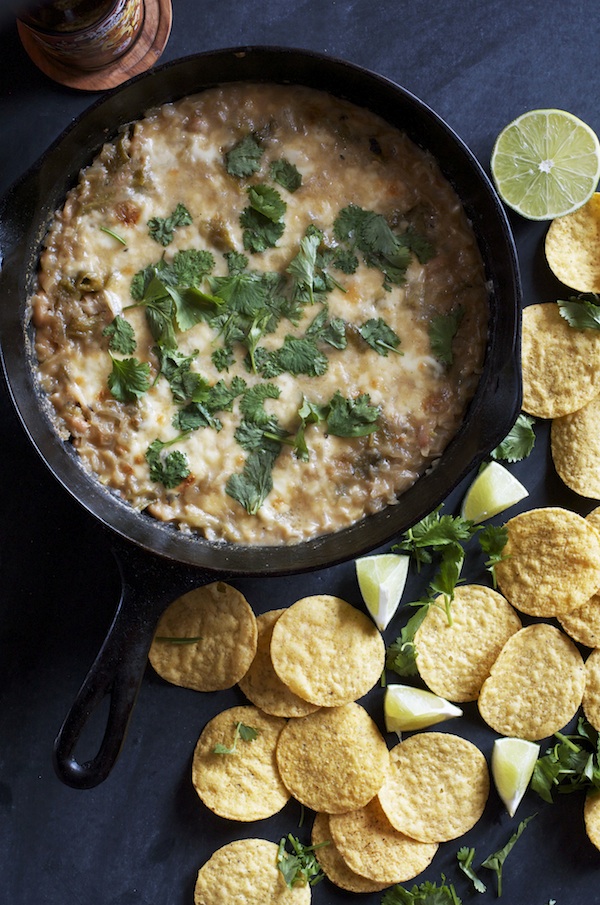
3. Skillet White Chili Dip

I'm a sucker for a good dip. This one has been a favorite since I first made it about a year ago. We love it on game days and for an easy, crowd-pleasing party appetizer.

Vegetarian-Cheesy-White-Chili-Dip-Set-the-Table1.jpg

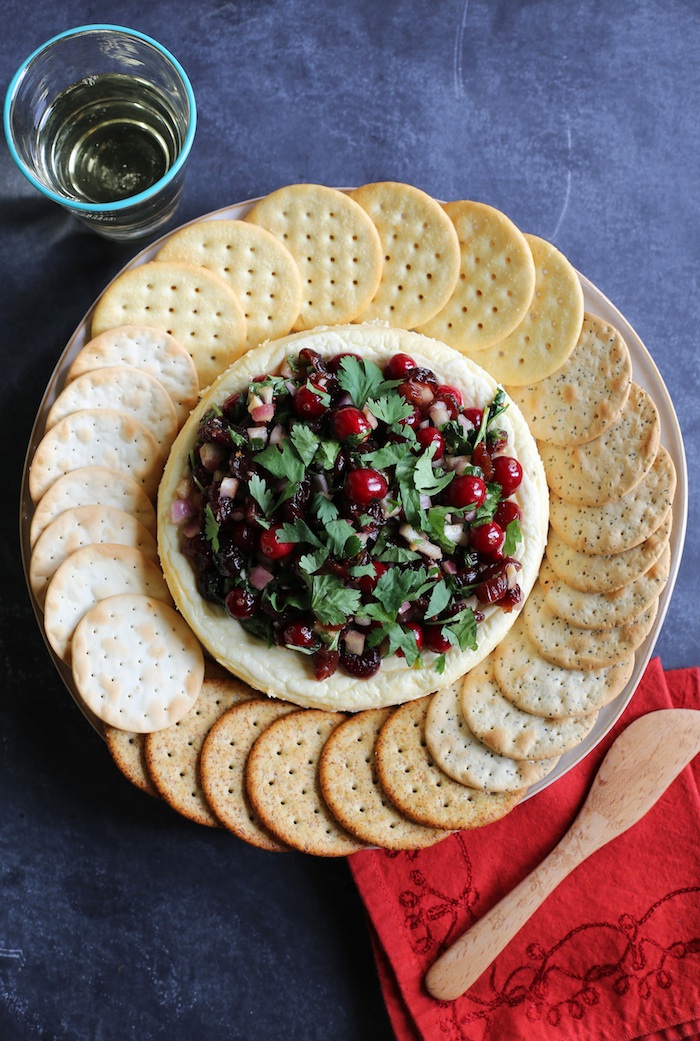
4. Cranberry-Jalapeño Relish with Savory Cheesecake

This is one of the most beautiful appetizers for the holidays. The vibrant color of the fresh and dried cranberries alongside the bright green cilantro is festive and a stunning dish to add to your appetizer line-up. The savory cheesecake is flavored with a little garlic and adds a nice, creamy contrast to the spicy-tart relish.

Cranberry-Jalapeno-Relish-Set-the-Table11.jpg

5. Tennessee Pimento Cheese Crostini

Pimento cheese + toast + slices of tart green apple. Perfection. And, lucky for all of  us, The Pioneer Woman just posted a fabulous looking recipe for pimento cheese that would be perfect for this party app!

pimento-crostini-with-green-apple01-1.jpg

And there you have it! The perfect selection of appetizers for snacking on during a cozy night in or with a group of your very favorite people on New Year's Eve.

Here's to a great New Year! Sending love to you all, wherever you may be and however you are celebrating. Cheers!

In Entertaining, Cocktails and Appetizers Tags easy appetizer recipe, holiday appetizers, New Year's Eve Menu, party food
2 Comments
Cranberry-Jalapeno-Relish-Appetizer-Set-the-Table.jpg

Cranberry-Jalapeño Relish with Savory Cheesecake

Rachael White December 17, 2014

Christmas is next week. NEXT WEEK. I don't know if it's the whole being pregnant thing or perhaps it's the typical hustle and bustle of the season that has made me lose all track of time, but I am no where near as ready as I like to be with presents, plans, and everything in between. Instead of wrapping presents I've been folding baby clothes (they're so tiny!) and thinking about everything that needs to happen before our new little one arrives in just a few short weeks. Sometimes I worry that I'm not as prepared this time around. Maybe that's normal for the second baby. Maybe what happens is, since you've done it once, you figure having a newborn around is kind of like riding a bike. It isn't, of course. Riding a bike is much easier. Lucky for me, I have the very best holiday appetizer on hand that can be made ahead and looks pretty and festive and like you spent hours working on it. Cranberry-Jalapeño Relish with Savory Cheesecake = your holiday appetizer secret weapon.

Cranberry-Jalapeno-Relish-Set-the-Table1.jpg
Cranberry-Jalapeno-Relish-Set-the-Table.jpg

A college friend of mine gave me the relish recipe. It took me a while to get around to making but after one bite I was kicking myself for not making it once a week starting the second she sent me the recipe. Ellie, you've made my holiday season easier and more flavorful. Thanks!

Cranberry-Jalapeno-Relish-with-Savory-Cheesecake-Set-the-Table.jpg

This relish could be used for any number of things but I love it over savory cheesecake. My savory cheesecake is simply cream cheese, greek yogurt, garlic salt and a couple of eggs. So simple you won't even know what to do with yourself. The relish and the cheesecake both last a couple of days in the fridge so they can be made ahead of time. To add a little extra color to the relish before serving, I like to add an additional sprinkle of cilantro. Other than that, the only prep you need to do before serving is to add a few crackers to the platter!

Cranberry-Relish-with-Savory-Cheesecake-Set-the-Table.jpg

What are your go-to survival tips for the holidays? Any food tips and tricks to keep us all sane? I'd love to hear anything and everything!

Cranberry-Jalapeño Relish with Savory Cheesecake

Recipe barely adapted from my friend Ellie.

Makes 8-10 servings

For the relish:

  • 1 c. dried cranberries
  • 1/4 cup fresh cranberries
  • 1/2 c. orange juice
  • 1/2 c diced red onion
  • 1/2 c. chopped fresh cilantro
  • 1 t. garlic, minced
  • 1 jalepeno, seeded and minced
  • 1/4 c. fresh lime juice
  • 1/2 t. salt

For the cheesecake:

  • 8 oz cream cheese, room temperature
  • 8 oz plain Greek yogurt
  • 1 teaspoon garlic salt
  • 2 eggs

Begin by combining the relish ingredients in a bowl. Toss together, cover with plastic wrap and refrigerate for at least 2 hours.

Meanwhile, make the cheesecake.

Preheat the oven to 325 degrees Fahrenheit.

Spray a 7 inch springform pan with cooking spray and wrap the bottom tightly with foil. Set the pan inside a 9x13 inch pan with 2 inch sides that has been filled with 1 inch of water.

Combine the cream cheese, yogurt, garlic salt and eggs in the bowl of a stand mixer. Mix on medium-high speed until smooth. Pour into the prepared springform pan and bake for 45 minutes until the center jiggles just slightly. Remove the cake from the water and set on a wire rack to cool for 1 hour. At this point, you can place it on a serving platter and chill for 2 hours and up to 2 days.

Top the chilled cheesecake with the relish and serve with a variety of crackers.

In Entertaining, Cocktails and Appetizers Tags cranberries, easy appetizer recipes, holiday appetizers, holiday planning, holiday recipe, make ahead appetizer
Comment
← NewerOlder →

Search Posts


Featured Posts

Summary Block
This is example content. Double-click here and select a page to feature its content. Learn more
Featured
Oct 30, 2025
Cursus Amet
Oct 30, 2025
Oct 30, 2025
Oct 23, 2025
Pellentesque Risus Ridiculus
Oct 23, 2025
Oct 23, 2025
Oct 16, 2025
Porta
Oct 16, 2025
Oct 16, 2025
Oct 9, 2025
Etiam Ultricies
Oct 9, 2025
Oct 9, 2025
Oct 2, 2025
Vulputate Commodo Ligula
Oct 2, 2025
Oct 2, 2025
Sep 25, 2025
Elit Condimentum
Sep 25, 2025
Sep 25, 2025
Sep 18, 2025
Aenean eu leo Quam
Sep 18, 2025
Sep 18, 2025
Sep 11, 2025
Cursus Amet
Sep 11, 2025
Sep 11, 2025
Sep 4, 2025
Pellentesque Risus Ridiculus
Sep 4, 2025
Sep 4, 2025
Aug 28, 2025
Porta
Aug 28, 2025
Aug 28, 2025

Powered by Squarespace