Quantcast
  • Contact
  • Portfolio
  • Subscribe
  • Recipes
Menu

Set the Table Photography

photography
  • Contact
  • Portfolio
  • Subscribe
  • Recipes
×
Yaki Onigiri | Set the Table

Yaki Onigiri | Japanese Grilled Rice Balls

Rachael White January 21, 2020

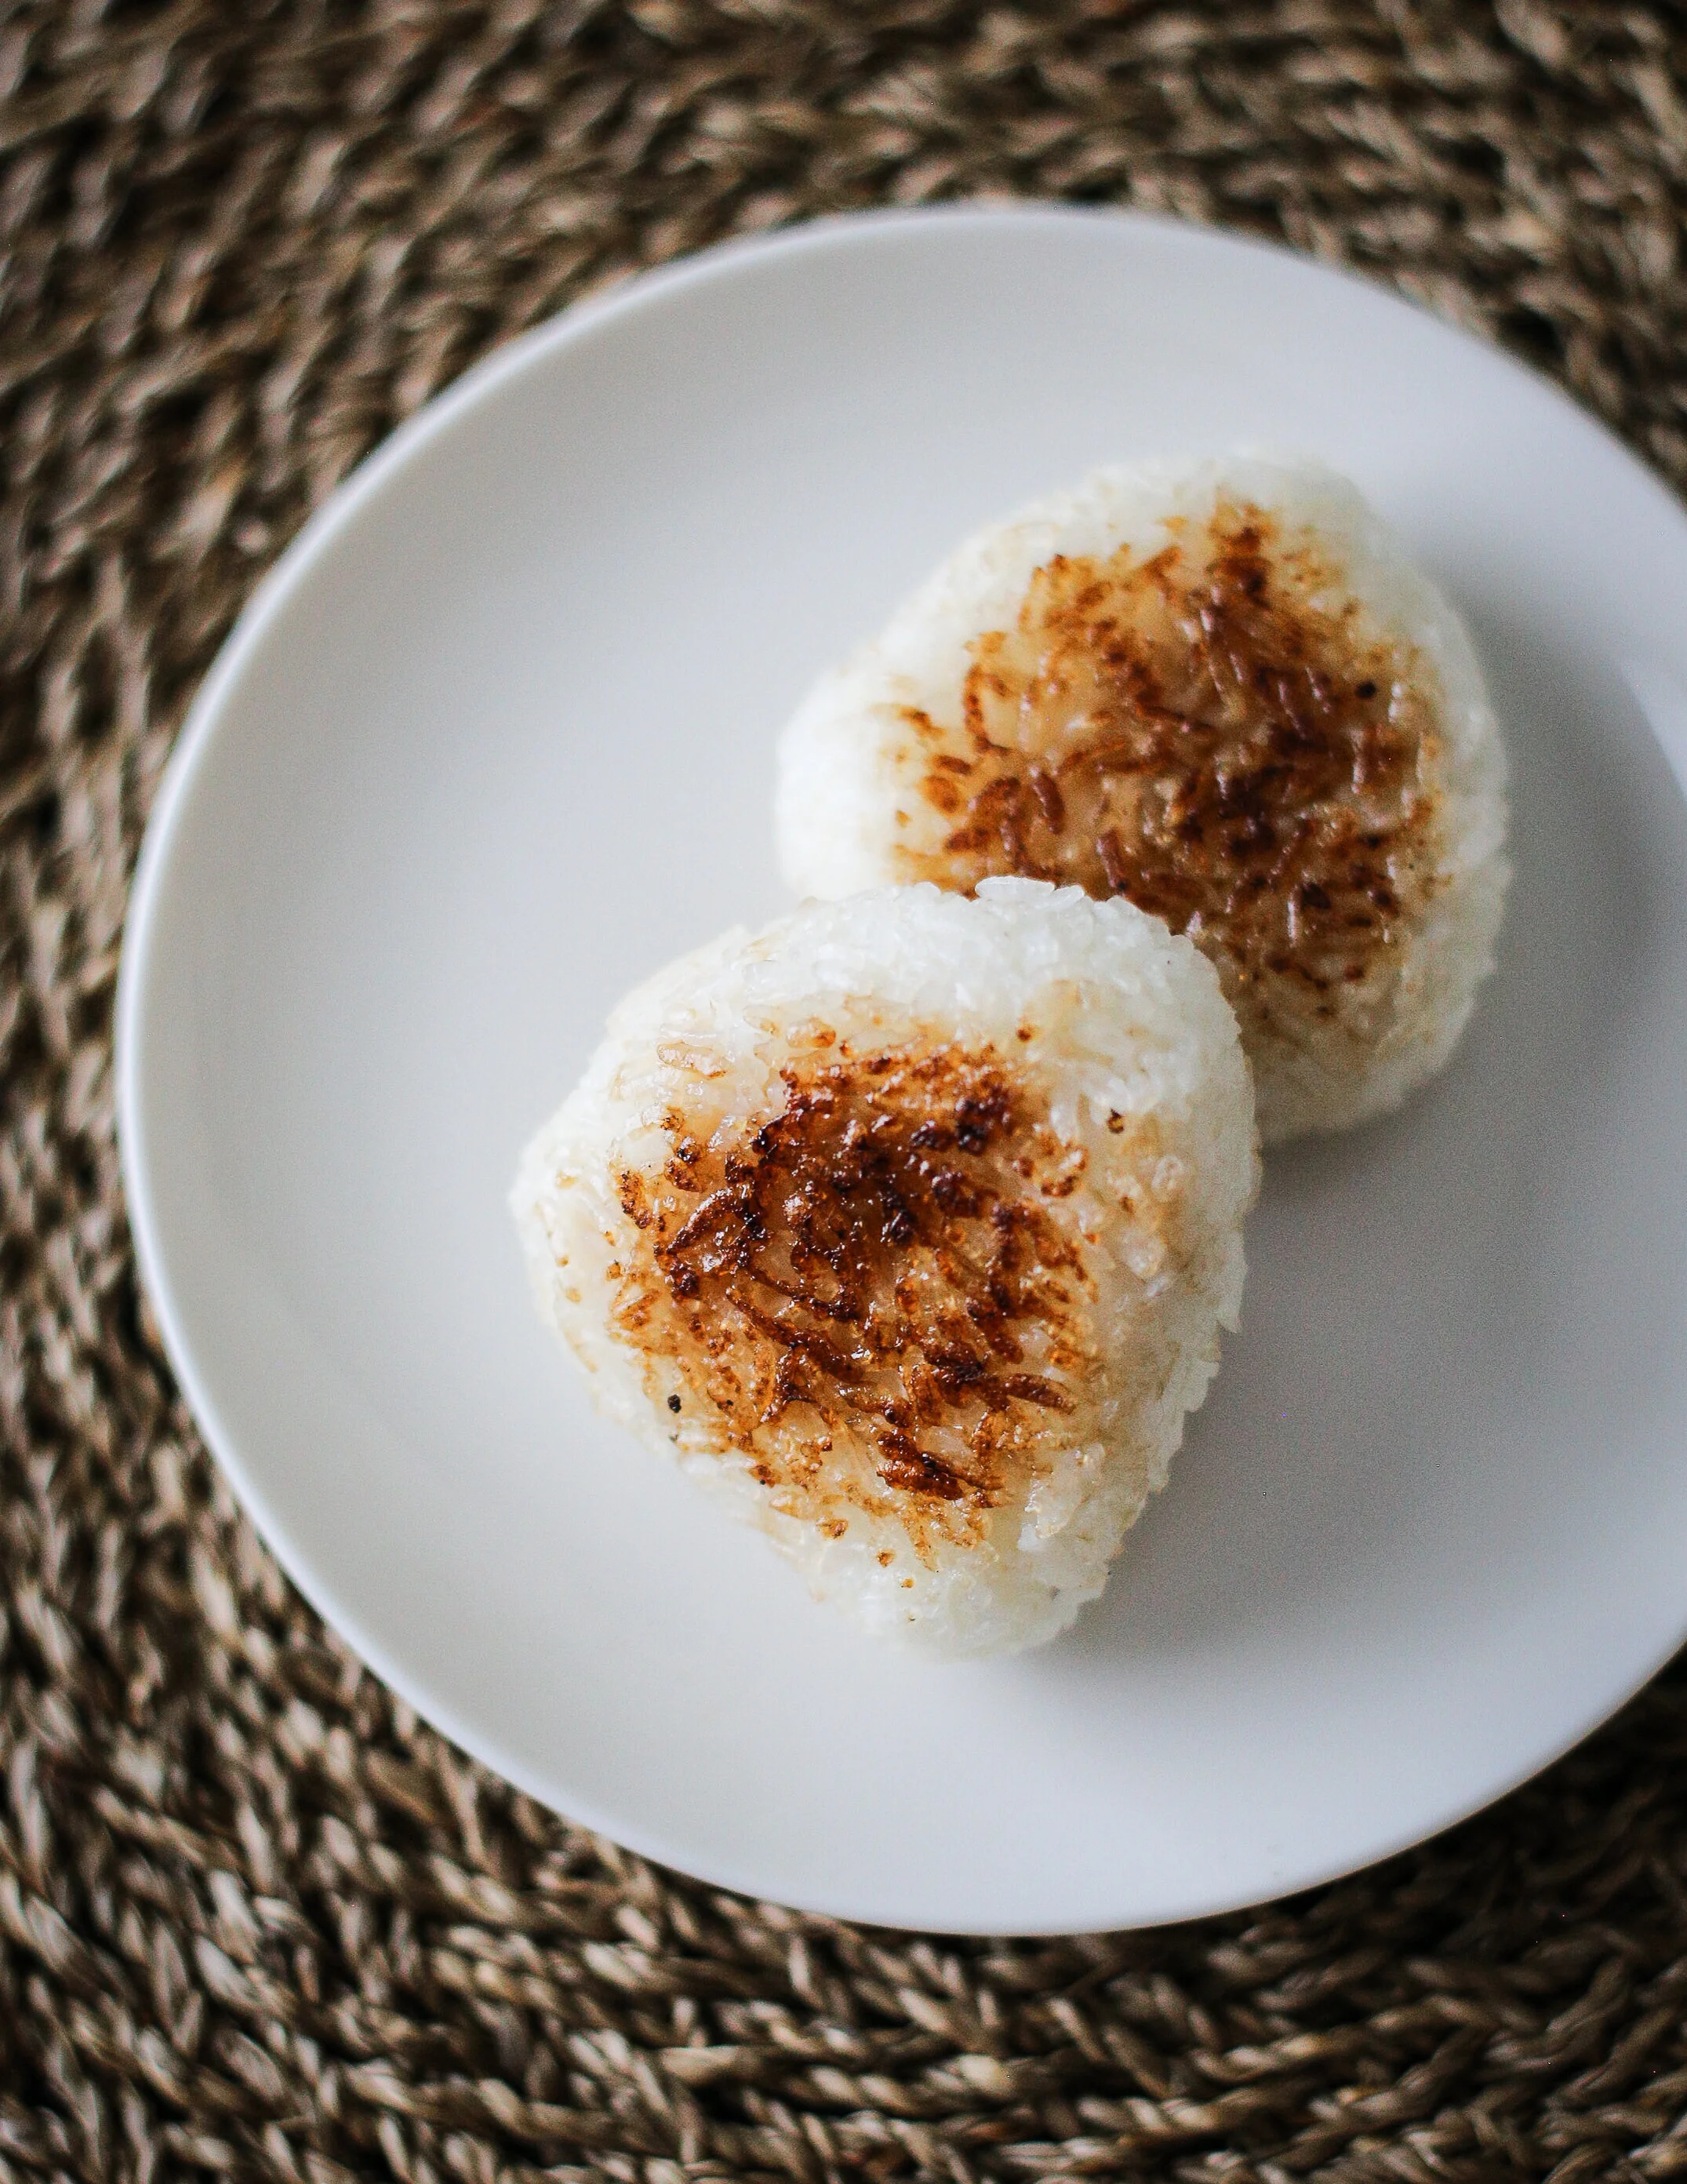
When we lived in Japan, I grew obsessively fond of yaki onigiri. Essentially, it is steamed rice that has been shaped into a ball (really more of a triangle), then brushed with a soy sauce and dashi mixture before being grilled over low heat. The low, slow grilling forms a deliciously crispy, salty outer crust and a soft, warm inside. Yaki Onigiri is comforting and appealing to kids (hello perfect after school snack) and adults (hello perfect happy hour snack) and is not difficult to make at home.

Yaki Onigiri | Set the Table

My first experience with yaki onigiri was at an Izakaya (a Japanese pub) with friends. It was love at first bite. I washed it down with an umeshu soda (plum wine + club soda) and have basically been in love with that combo ever since.

After my oldest was born, I found myself at home alone with him a lot in our Tokyo apartment. Eating was difficult because I just couldn’t figure out how to find the energy to cook after the sleepless nights and constant nursing. Yaki onigiri was a saving grace because I could guy it in the freezer section at our local supermarket! It was absolutely amazing to be able to take one of those little snacks and put them in the microwave to get me through the afternoon.

Yaki Onigiri | Set the Table

Given my history and love affair with yaki onigiri, I was thrilled to find a recipe in Ivan Orkin’s new cookbook, The Gaijin Cookbook. I’m pleased to say that his method worked perfectly and if you don’t see me for a few days it may or may not be because I’m busy making and eating yaki onigiri.

Also worth noting: Trader Joe’s now carried furikake! It isn’t quite as flavorful as what I typically buy or make, but it is lovely mixed with some Kewpi Mayo to be used as a dip!

If you’re looking for a new cookbook to stir things up a bit, I would highly recommend The Gaijin Cookbook.  I'm excited to cook my way through its pages, remembering and awakening that chapter of my life and sharing it with friends and family.

In Japanese Food, Vegetarian, Kid Friendly Tags Japanese food, Japanese recipe
Comment
CEF06026-3019-4443-8F3E-B06596BFE79F.JPG

Air Fryer "Roasted" Broccoli

Rachael White August 9, 2019

We have been in a serious eating funk around here. The kids have been all hot dogs, frozen pizzas, burgers, pasta…and it is fine because sometimes there are seasons like that. But it is time to break the cycle because I cannot deal! Enter: the air fryer! Yep. I caved. Did I need another kitchen appliance taking up space? Probably not. But this one seemed more and more practical after everything I’ve heard from others who have taken the plunge.

I ended up buying the Ninja Air Fryer simply because if was the right price and had good reviews. I’ve also heard great things about the Phillips Air Fryer but it is quite pricey.

Things I’m looking forward to making with my air fryer:

  • sweet potato fries

  • sweet potato chips

  • plantain chips

  • chicken nuggets

  • fish sticks

  • egg rolls

Those all seem like pretty obvious things to toss into the air fryer. What would you add to the list?

To get started, I went with something simple that I know my family will benefit from ASAP. Both of my kids like roasted broccoli, so it seemed like a no brainer to try making it in this fancy new appliance of mine. I used way less oil and it took me less time than it would in the oven. Hellooooo convenience! Plus, it is perfect for warmer days when you don’t want to heat up your house with a hot oven.

Stay tuned for more recipes like this one because I’m sure I’ll have more to share!

Air Fryer “Roasted” Broccoli

  • 3 cups broccoli florets

  • 2 tablespoons olive oil

  • salt

  • black pepper

  1. Preheat air fryer to 390 degrees Fahrenheit.

  2. Toss broccoli florets with 2 tablespoons olive oil and season with salt and pepper.

  3. Add to the air fryer basket in two batches, cooking each batch for 8 minutes. As they cook, take the basket out every 2-3 minutes, shake the broccoli around, and check for doneness.

  4. Serve and enjoy!


In Kid Friendly, Whole 30, Vegetarian, Gluten Free Tags air fryer recipes, air fryer, roasted broccoli recipe, vegetarian, gluten free, kid friendly recipes
Comment
Blueberry Almond Butter Smoothie | Set the Table #smoothierecipe #blueberry #smoothie #kidfriendlyrecipes #kidsmoothie #noaddedsugar

Blueberry Almond Butter Smoothie

Rachael White February 27, 2019

An antioxidant rich smoothie that is perfect for busy school mornings! Perfect for adults and kiddos, no added sugar, and a great way to start the day.

Read More
In Breakfast & Brunch, Go Sugar Free, Kid Friendly Tags smoothie recipe, healthy snacks, easy breakfast
Comment
Instant Pot Southwest Stuffed Peppers | Set the Table #instantpot #recipe #weeknightmeal #easydinnerrecipe #glutenfree #pressurecookerrecipes #dinnerinspiration #stuffedpeppers

Instant Pot Southwest Stuffed Peppers

Rachael White February 18, 2019

I think I’ve settled into a bit of a routine around grocery shopping. For someone who prefers to wander through the grocery store looking for food that looks freshest and sparks inspiration, this has been a long road. Before we had kids, our food budget was more fluid and our shopping list (if you can even call it that) was always flexible. Now, with 7 and 4 year olds running the roost, I have to be more intentional. So, we’ve been using the same list of ingredients in different ways. The kids both love bell peppers, 3 out of 4 of us eat ground beef, and we all love tacos. So consider these Southwest Stuffed Peppers a creative alternative for taco night!

Instant Pot Stuffed Peppers | Set the Table #instantpot #recipes #stuffedpeppers #easyweeknightrecipes
Instant Pot Southwest Stuffed Peppers | Set the Table #instantpot #recipe #easyweeknightrecipes #stuffedpeppers

It isn’t always easy to make food everyone will eat, but here, I have been able to take recipe like this one and use the same components to piece together something our pickiest eater won’t scoff at. Does he always eat what I give him? Um, no. But at least he gets a selection of healthy foods to choose from.

Other perks of this recipe:

  • gluten free

  • Whole 30 (as long as you leave out the cheese and have a compliant salsa/seasoning blend)

  • made in under 30 minutes

  • minimal dirty dishes

I mean, this is basically my dream weeknight meal. And if you’re looking for the best, meltiest cheese, you know I’m going to tell you that Tillamook is the best choice.

Instant Pot Southwest Stuffed Peppers | Set the Table #instantpot #recipe #dinnertonight #stuffedpeppers #instantpotstuffedpeppers

Instant Pot Southwest Stuffed Peppers

Makes 4 servings plus leftovers

  • 4 medium/large bell peppers

  • 1 lb lean ground beef

  • 1/2 cup salsa + 2 tablespoons

  • 2 teaspoons Penzy’s Southwest Seasoning or other salted seasoning you like

  • 1 egg, beaten

  • 1/2 cup frozen corn

  • 2 teaspoons cornstarch or arrowroot starch

  • 4 slices sharp cheddar cheese

  1. Cut the tops off your peppers and clean out the insides. I like to use my hands to pull out the membrane and seeds. Set the tops aside (I cut them so I have some raw pepper on hand for the kiddos throughout the week).

  2. In a medium bowl, combine the beef, 1/4 cup of the salsa, Southwest seasoning, egg, and cornstarch. Use your hands to combine.

  3. Fill each pepper with 1/4 of the beef mixture. Add 1/2 cup water to the Instant Pot and set the rack inside. Set the peppers in the instant pot, on the rack, top spoon the remaining salsa evenly over the top of each pepper, and seal the lid. Press the Manual button and set the time for 20 minutes.

  4. When finished cooking, do a quick release by using a towel or oven mit to rotate the knob to release. Top the peppers with the cheese, cover for 5 minutes, and serve!

In Kid Friendly, Lunch & Dinner, Instant Pot, Gluten Free, No Added Sugar, Whole 30 Tags instant pot, whole 30, easy dinner recipes, gluten free
Comment
Ginger Lemon Kombucha Smoothie | Set the Table #guthealth #followyourgut #healthadepartner #smoothie #recipe #probioticsmoothie

Ginger Lemon Kombucha Smoothie

Rachael White January 26, 2019

This post has been kindly sponsored by Health-Ade Kombucha. As with all sponsored content on Set the Table, this is a product I already use and love!

I’m not so good with allowing quiet into my life. For some reason, I’m always looking for something to look at, listen to, or do with my hands. It’s no wonder that it has gotten more difficult for me to sit down and write something that matters. I can’t tell you how many times I sit down at my laptop and alternate between typing and deleting the most mundane sentences. It’s simply because my brain cannot process thoughts of substance clearly when I have too much stimulation. There was a time in my life when I could do this, but that time has passed and it is dying a slow, painful death. My brain just cannot handle multiple tasks at one time unless it is parenting-related. And, let’s be honest, even that is a little dicey. 

I’m sure some of this is due to smart phone usage and the immediacy of information. And some of it is likely due to age. And anxiety. And a smattering of other things I cannot yet identify. I’m working on it. Slowly but surely, I’m working on taking things on one at a time rather than all at once. Funny thing: getting sick reminds me of this practice almost every time. 

Ginger Lemon Kombucha Smoothie | Set the Table #guthealth #followyourgut #healthadepartner #smoothie #recipe #probioticsmoothie

Recently, like many families I’ve talked to, we have dealt with the dreaded Stomach Bug. It hit me quickly and first, then took down the rest of us in 2 day increments. For me, the recovery from an illness like this means taking it super slow. Reintroducing foods one at a time, listening to my body extra carefully, and thinking carefully about what I put on my plate. If only I could learn to take such care in other areas of my life. 

Ginger Lemon Kombucha Smoothie | Set the Table #guthealth #followyourgut #healthadepartner #smoothie #recipe #probioticsmoothie

After our recent bout of the Stomach Bug, I made it a point to get more probiotics into my system. I take LoveBug probiotics, so that was a given. I also am a pretty big fan-girl when it comes to Health-Ade Kombucha, so their Ginger-Lemon flavor was on repeat for days. Of course, at some point, for my sanity, I needed to mix it up. Enter: this tasty smoothie! It’s creamy and flavorful without being too overwhelming on a sensitive digestive tract. #sorrynotsorry for being honest here. Just keeping it real! 

Ginger Lemon Kombucha Smoothie

makes 2 small smoothies or 1 large

*A coupe notes: for some, the acidity of pineapple may not sound great until a few days after being sick. If that’s the case, I’d recommend swapping milder mango or leaving out any fruit except for the frozen banana. Ice is always another great option to add in! You know your body better than anyone, so listen to it and don’t push it!

  • 1/2 cup frozen pineapple

  • 1 frozen banana (not required to be frozen but I like the texture better if it is)

  • 1 1/2 cups Health-AdeGinger-Lemon Kombucha

  1. Combine all ingredients in a blender. Blend until smooth and enjoy!


In Get Healthy!, Gluten Free, Kid Friendly, Products I Love, Breakfast & Brunch Tags smoothie recipe, kombucha
Comment
Spiced Brownie Cut Outs | Set the Table #snack #kidfriendly #recipe #afterschoolsnack #protiensnacks #kodiakcakes #sponsored

Spiced Brownie Cut Outs

Rachael White December 5, 2018

I remember coming home from school and being ready for a snack. Not just any snack, but something simple and comforting that made me happy to be safe and cozy in our house. I don’t know what I usually had for snacks, but I remember that feeling so clearly. These days, it has been chilly and a little windy on the walk home from school. When the 7 year old gets home at the end of the day, usually without his coat because he says he’s “FINE, MOM”, his cheeks are rosy red and ice cold. It makes me want to wrap him up in a big blanket and hold him tight.

Spiced Brownie Cut Outs | Set the Table #kidfriendly #snacks #recipe #sponsored

Since that is usually not on his list of things to do when he gets home, I like to have a special snack ready for him from time to time instead. These 100% whole grain brownies from Kodiak Cakes are absolutely perfect right now. They have a healthy amount of protien, come together in a flash, and when poured into a half baking sheet they make the perfect canvas for ninja and dinosaur cutouts.

To make these a little extra special, I like to add about a teaspoon of ground cinnamon. There’s something about cinnamon and chocolate together that makes life a little extra cozy, don’t you think?

And don’t worry. The almost-4-year-old approves as well…

Spiced Brownie Cut Outs | Set the Table #kidfriendly #snack #brownies #recipe #sponsored #kodiakcakes

We use Kodiak Cakes regularly for breakfast and lunch. My boys need protein in their diets to function (so do I!) so these are perfect for busy mornings! Plus, anytime there are leftovers, I can toss them in the kids’ lunchboxes as peanut butter sandwiches or just plain. No matter what, they disappear every time! Since my children are both very picky eaters, it thrills me to no end that they will devour everything Kodiak Cakes makes!

*a note about sponsored posts: This post is sponsored by Kodiak Cakes. I ALWAYS post about products and brands that I know and love and think you will love too! Kodiak Cakes is no exception!

spiced brownie cut outs

makes 8-10 brownie cut outs, plus scraps*

  • 1 box Kodiak Cakes brownie mix

  • 2 eggs

  • 1/2 cup unsalted butter, melted & cooled

  • 2 tablespoons vegetable or coconut oil

  • 2 tablespoons water

  • 1 teaspoon ground cinnamon

  • powdered sugar

  1. Preheat the oven to 350 degrees Fahrenheit. Combine everything but the powdered sugar in a mixing bowl. Mix by hand until fully combined.

  2. Pour the batter into a parchment lined quarter sheet pan and spread in an even layer using an offset spatula. Bake for 15-17 minutes or until the brownies are just browning around the edges.

  3. Remove the pan from the oven and cool completely.

  4. Use your favorite cookie cutters to cut out shapes while the brownies are still in the pan (trust me on this one- you’ll save yourself a headache by not flipping them out of the pan unnecessarily). Place the cut outs on a cooling rack set over another baking sheet.

  5. When all your shapes are cut out, use a sieve to sprinkle the powdered sugar over the top. Enjoy!

*This recipe results in a lot of scraps, so here are some suggestions for what to do with them: store in an airtight container and eat them all yourself. Use them as a small treat in your kids’ lunches. Make a tasty nut butter dip using 1/3 cup creamy peanut or almond butter, 1/2 cup plain yogurt, and a bit of maple syrup. Dip the scraps in the mixture for a tasty, family-friendly snack!

In Dessert, Kid Friendly Tags easy dessert recipe, holiday cookie recipe, healthy snacks, kid friendly recipes
Comment
← NewerOlder →

Search Posts


Featured Posts

Summary Block
This is example content. Double-click here and select a page to feature its content. Learn more
Featured
Aug 1, 2025
Cursus Amet
Aug 1, 2025
Aug 1, 2025
Jul 25, 2025
Pellentesque Risus Ridiculus
Jul 25, 2025
Jul 25, 2025
Jul 18, 2025
Porta
Jul 18, 2025
Jul 18, 2025
Jul 11, 2025
Etiam Ultricies
Jul 11, 2025
Jul 11, 2025
Jul 4, 2025
Vulputate Commodo Ligula
Jul 4, 2025
Jul 4, 2025
Jun 27, 2025
Elit Condimentum
Jun 27, 2025
Jun 27, 2025
Jun 20, 2025
Aenean eu leo Quam
Jun 20, 2025
Jun 20, 2025
Jun 13, 2025
Cursus Amet
Jun 13, 2025
Jun 13, 2025
Jun 6, 2025
Pellentesque Risus Ridiculus
Jun 6, 2025
Jun 6, 2025
May 30, 2025
Porta
May 30, 2025
May 30, 2025

Powered by Squarespace