Quantcast
  • Contact
  • Portfolio
  • Subscribe
  • Recipes
Menu

Set the Table Photography

photography
  • Contact
  • Portfolio
  • Subscribe
  • Recipes
×
Rebecca's Gazpacho
Rebecca's Gazpacho

Rebecca's Gazpacho Recipe

Rachael White June 26, 2013

My sister eats salsa straight from the jar. For dinner. It's impressive, really. She doesn't even need tortilla chips whereas I must have a salty, crunchy vehicle for most condiments. It's no surprise, given her love for salsa, that Rebecca has a fabulous gazpacho recipe under her belt. The first time I made gazpacho was using her recipe last summer. Before then, I had never really thought about this cold, vegetable packed soup. I had been missing out. Big time.

Vegetables for Gazpacho

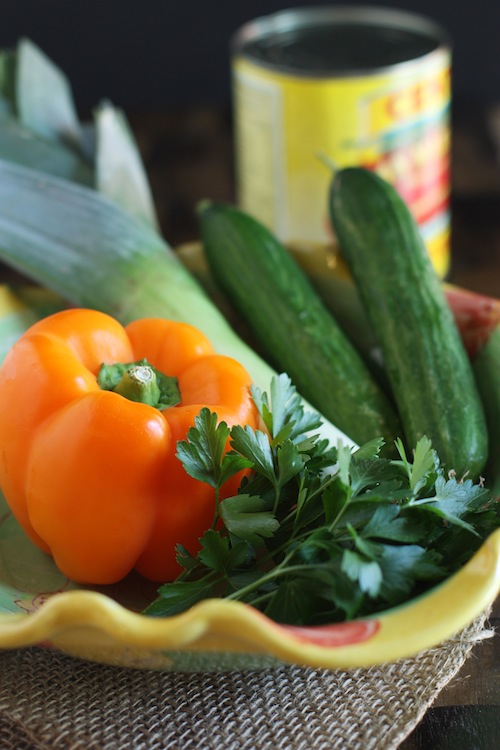
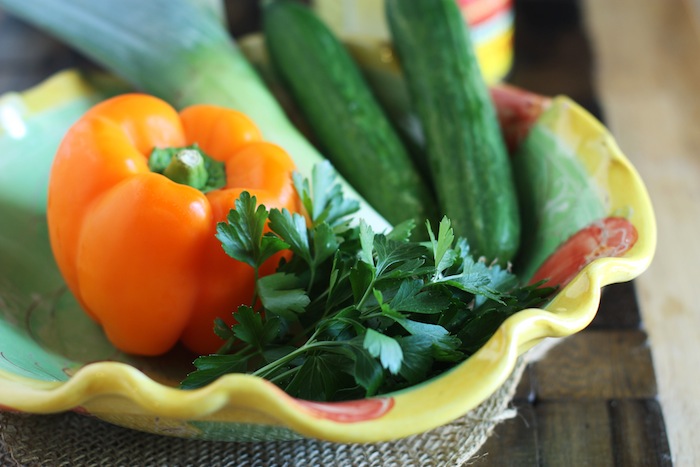
Gazpacho is perfect for people like me who go crazy at farmers markets and end up with more produce than time to eat it. Yes, gazpacho is the answer for people like me. It's versatile, requires zero heat from the oven or stove (a priceless advantage when temps are in the upper 90's) and it is insanely healthy. The vegetables in the photo above are what I used to make my most recent batch, which deviates a bit from Rebecca's usual recipe but only slightly: orange bell peppers, baby cucumbers, a leek, and a can of San Marzano tomatoes because that's what we had on hand.

Gazpacho for Summer
Gazpacho for Summer

This is a great recipe to have on hand for CSA folks too and is the perfect way to utilize the delicious, fresh tomatoes mid to late summer. I often hear from people wondering what to do with the plethora of vegetables they receive every week and this is a refreshing solution. Using Rebecca's recipe as a guide, I like to make variations based on what I have in my refrigerator. Even though I used canned tomatoes this time around, it is best with fresh.

Veggies for Gazpacho

As if you needed another reason to try making gazpacho, keep in mind that it gets better as it sits. If you make it on Monday and have it for lunch throughout the week, it will just get better with each passing day. Did I mention that it takes less than 20 minutes to make? True story.

Rebecca’s Gazpacho


My variation of Rebecca's recipe used a 24 oz. can of San Marzano tomatoes in place of the 3 large tomatoes and the tomato juice, orange bell peppers rather than red, and a leek in place of the onion. I also omitted the tomato juice and used the juice from the can of tomatoes. If you use canned tomatoes, you may still want to add a bit of tomato juice to thin out the gazpacho.

Ingredients

  • 3 large tomatoes
  • 2 cucumbers
  • 1 onion
  • 2 red bell peppers (orange work well too)
  • ¼ cup parsley, curly or flat leaf
  • 5 Cups Low-Sodium Tomato Juice
  • 1/3 cup vinegar
  • Sriracha, to taste
  • Salt + Pepper, to taste

Instructions

  1. Roughly chop all of the vegetables.
  2. Place them in the food processor and pulse a few times but don't completely purée yet.
  3. Add the tomato juice, vinegar, Sriracha, salt and pepper and purée until smooth.
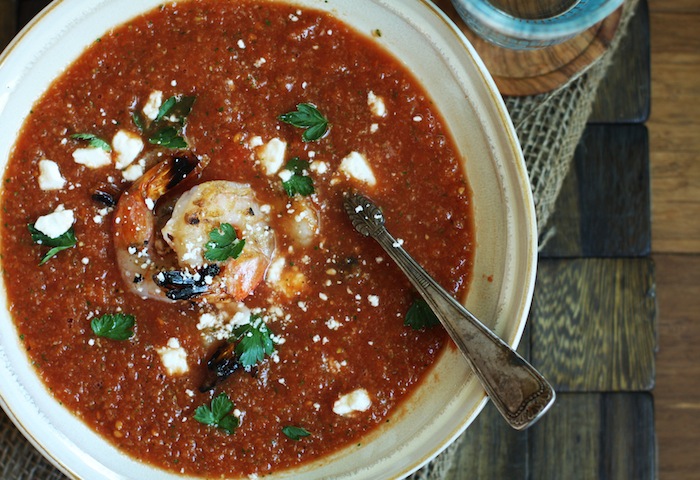
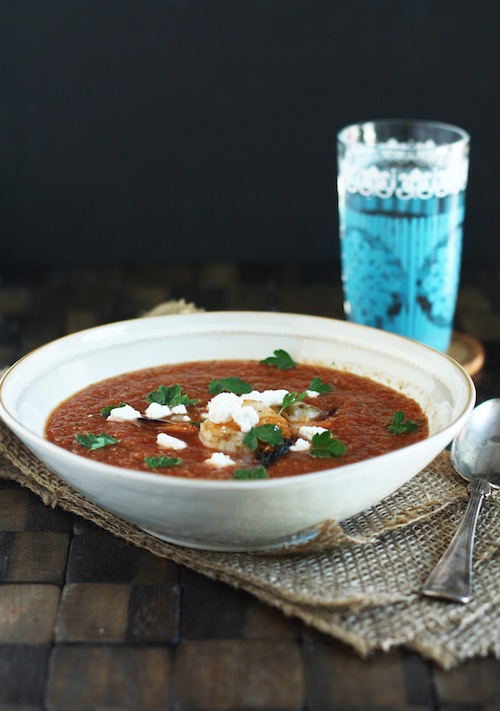
  4. Serve cold topped with feta cheese, grilled shrimp, croutons, or nothing at all.
In Lunch & Dinner, Vegetarian Tags gazpacho recipe, how to use up vegetables, summer soup recipe, vegetables, vegetarian
1 Comment
Melon & Prosciutto Flatbread

Melon + Prosciutto Flatbread with Arugula + Goat Cheese

Rachael White June 19, 2013

Riley has started this funny habit of running around the dining room table over and over again. He doesn't make any noises like you might expect a toddler to do while going in circles. Instead, there is only the sound of his little feet hitting the wood floor with a soft, muted sound that I hope never escapes my memory when he is six feet tall and no longer my little baby. I fear that day will come much faster than I'm prepared for, so I'm trying to soak up every goofy, sweet little moment I get with him.

Flatbread dough
Flatbread dough

Here's the thing: watching Riley run around in circles is adorable. Watching me run around in circles is not. When we have little gatherings at our house, I sometimes feel like all I'm doing is running around like crazy trying to make sure food is ready, drinks are poured, etc. In order to minimize the craziness, I've been trying to find things that I can serve to guests that aren't terribly time consuming but is still beautiful and full of flavor. This flatbread with prosciutto, melon, arugula and goat cheese is one examle of how something simple and classic can be stunning and party-worthy.

Melon, Prosciutto, Arugula

The classic combination of melon and prosciutto is perfect for this time of year. It is light, sweet and salty, with a beautiful, summery appearance that dresses up any party spread. Transferring these flavors to flatbread, which is perfect for eating with cocktails, becomes even better with some peppery arugula and tangy goat cheese.

Full disclosure: I usually use store-bought pizza dough rather than making my own. A lot of grocery stores are selling pizza dough that is ready to pop in the oven with whatever toppings you like. They taste great and save quite a bit of time and stress, especially if you are entertaining. If you are extra ambitious, go ahead and make your own pizza dough. I'm always up for going 100% homemade. Well, almost always.

Healthy dose of olive oil

The dough is drizzled with a healthy amount of olive oil and sprinkled with sea salt. When it comes out of the oven, it has a light golden color with the perfect chewy-crunchy texture. Then, the melon, prosciutto, arugula and goat cheese are arranged on top with a little bit of freshly ground black pepper and one last light drizzle of olive oil to add a nice sheen.

Melon and Prosciutto Flatbread

And that's that! You're all set to serve this up to your guests with a lovely glass of prosecco. No need to run around in circles.

Melon + Prosciutto Flatbread with Arugula + Goat Cheese


  • Pizza dough, store bought or homemade
  • 2-3 tablespoons good olive oil
  • sea salt or course salt
  • Cornmeal for dusting
  • 1 cup fresh cantaloupe, peeled, sliced and cut into 1 inch pieces
  • 1/2 cup loosely packed arugula leaves
  • 4 oz goat cheese
  • Freshly ground black pepper
  1. Preheat the oven to 425 degrees.
  2. On a lightly floured work surface, roll or pat the dough out to fit a medium/large rimmed baking sheet. Sprinkle the baking sheet with a thin, even layer of cornmeal to keep the crust crispy and to keep it from sticking. Transfer the dough to your baking sheet and poke some holes in the dough with a fork to keep it from bubbling up too much during baking.
  3. Drizzle with the olive oil, sprinkle with a little salt, and bake for 10-12 minutes or until the crust is golden brown. Remove from the oven and let cool for a couple minutes.
  4. Arrange the melon, arugula, prosciutto and goat cheese on top of the crust. Sprinkle with freshly ground black pepper and drizzle with a little olive oil. Cut and serve.
In Breakfast & Brunch, Lunch & Dinner, Vegetarian, Cocktails and Appetizers
4 Comments

Homemade Furikake

Rachael White June 17, 2013

I’m a condiment person. Dips, salsas, sauces...you name it, I probably love it. When I was a kid, it was not difficult to find me at parties because I was most likely lurking near the chips and dip. OK, let’s be honest...that’s usually where you’ll find me as a grown-up, too. Chips and fries are just vehicles for salsa and ketchup, right?

When we lived in Japan, I got hooked on furikake, a combination of sesame seeds, nori, and other seasonings that is sprinkled on rice and other foods for added flavor. For the first 3 years of life in Tokyo, I used furikake liberally. Then, I got pregnant with Riley and like many first-time mothers I obsessively read every ingredient label on everything I put into my body. When I saw MSG as one of the main ingredients in furikake, it immediately exited my list of pregnancy-friendly foods.

Recipe for Homemade Furikake

This was difficult. Mostly because I was craving Japanese sticky rice like no one’s business and all I wanted to do was put some salty, crunchy, umami-flavored furikake on top. The thought of making my own crossed my mind, but I was pretty busy growing a human being and didn’t have the energy to think about making something that I was sure would be equally as difficult. I had visions in my mind of drying salmon skin in the oven and other “complicated” steps that must go into making such a flavorful mixture. Turns out, furikake is not at all difficult to make.

Homemade Furikake
Homemade Furikake

Here’s the basic recipe that I’ve found to work quite well (no MSG included). If you’re not a fan of fish flakes, you can omit them, although I highly recommend you at least try it with the flakes before tossing them out the window. They add such a lovely, smokey note that can only be found in these immensely flavorful flakes can lend. Once you have the basic recipe down, experiment with other flavor combinations. I’m working on a wasabi version right now, but you can do almost anything from classic sesame to matcha (think of a dish with a flavor profile like toasted rice in matcha broth) to a simple sesame salt, or gomashio.

Homemade Furikake Recipe

I love using furikake on popcorn, hard boiled eggs, in salads, and of course sprinkled over steaming hot rice. You could even keep a little ziploc bag of the stuff in your office drawer to spice up some noodles or other bland workday lunch that needs a pick-me-up.

No MSG. No hard work. Big rewards. Can’t get much better than that, can it?

Homemade Furikake

Ingredients

  • 1/3 cup nori sheets, broken up into small pieces
  • 1/2 cup white or black sesame seeds
  • 1 cup loosely packed bonito flakes (fish flakes), broken up into small pieces
  • 1 tablespoon soy sauce
  • 1 teaspoon mirin
  • 2 or 3 drops toasted sesame oil

Instructions

  1. Preheat the oven to 275 degrees F.
  2. In a small bowl, combine the sesame seeds and bonito flakes.
  3. Add the soy sauce and mirin and stir to evenly coat the sesame seed mixture. Add the nori and stir to combine.
  4. Spread the mixture in and even layer on a baking sheet lined with parchment paper.
  5. Bake for 15-18 minutes or until the mixture is dry and slightly toasted. Keep an eye on it while it cooks to make sure it doesn’t burn.
  6. Let the furikake cool for about 2 hours before transferring to an air-tight container.
  7. Store at room temperature for up to 2-3 weeks. (If it lasts that long.)


In Lunch & Dinner, Vegetarian, Cocktails and Appetizers
17 Comments
Poached Egg & Salad
Poached Egg & Salad

Poached Egg + Spinach Salad

Rachael White June 10, 2013

The topic of careers doesn’t come up often here on the blog. It didn’t come up often on Tokyo Terrace either. I didn’t omit this information on purpose, it just didn’t seem to work it’s way into my thoughts as I wrote. Today, however, there is a direct connection: eggs.

Allow me to explain. In Japan, Brad and I were teachers at an international school. I was a substitute for the first two years while I worked on getting my Masters in Elementary Education. Then, for the last two years, Brad and I both taught 2nd grade. Last spring, Brad was offered the opportunity to found a new school here in Denver and we packed up our belongings and left our Tokyo home to begin a new adventure.

Bowl of Eggs
Bowl of Eggs

It has been a crazy year with lots of changes and adjustments. Not only are we living in a new country, but I am staying at home full time while Brad works to create a school from the ground up. I am so proud of Brad for all the work he’s done to make sure his students have a great school to attend. He already cares so much about each one of them.

Brad does home visits with each and every student that will be attending his school in the coming year. The other day, during one of these visits, he received a dozen fresh eggs. Literally, they were the freshest eggs can be. They were gathered from a family’s chicken coop, placed in an egg carton, and sent home with Brad. We enjoyed them every day until they were all gone. I posted a photo of the eggs on facebook, twitter and instagram asking what we should do with them and the consensus seemed to be mostly to use them straight up poached or fried. So we did.

Fresh Eggs
Fresh Eggs

These photos are of my lunch the day after we got the eggs. A simple spinach salad with cherry tomatoes, balsamic vinaigrette, and a perfectly poached egg. The yolks were so rich and deep yellow, which is sometimes hard to find in store-bought eggs. I told Brad that having these eggs made me want to have chickens. He didn’t agree. Maybe someday...

Poached Egg & Spinach Salad

The wonderful part about the simple gift this family gave was this: in a year that has posed many challenges and changes, this simple gesture brightened our day. It’s hard not to be in a good mood when something this simple and lovely is shared.

So, we are in the midst of our new adventure: figuring out how to be parents, starting a new career, and learning how to live in a new place. If simple pleasures like these eggs continue to pop up, we’ll do just fine.

Egg Shell
Egg Shell

Poached Egg with Spinach Salad

Makes 1 salad

1 egg

handful of baby spinach

5 or 6 cherry tomatoes, halved

balsamic vinegar & olive oil

course salt & black pepper

Begin by poaching your egg. Bring a medium pot of water to a gentle simmer. Add 2 tablespoons of vinegar (this helps the white remain intact). Use a spatula or wooden spoon to swirl the water, creating a funnel in the center. Drop your egg into the center of the funnel, turn off the heat, cover and let sit for 6 or 7 minutes until the egg white is firm and the yolk is still soft. You can check the egg by taking it out of the water with a slotted spoon and pressing on the yolk gently. If it seems very, very soft, you may want to poach it for 30 seconds to 1 minute.

In a salad bowl, add the spinach and tomatoes. Drizzle with balsamic and olive oil and sprinkle with salt and pepper. Add the egg and serve.

In Lunch & Dinner
5 Comments
Jacqueline's Pasta Bake

Guest Recipe: Jacqueline's Pasta Bake

Rachael White June 4, 2013

Eating healthy food can be more challenging than we are willing to admit. At least it is for me. I try so hard to feed myself and my family nutritious meals on a consistent basis, but some days are so overwhelming and busy that I can’t seem to get it together. On those days, we end up eating pizza. Or Chinese take-out. Doing this occasionally isn’t horrible, but it’s nice to have a recipe in your arsenal that is healthy, fast, and easily adaptable based on what you have in your pantry and refrigerator.

How To Use Up Your Greens

My friend Jacqueline, who I met at Luther College during our freshman year together, has made it her job (literally) to help others be healthy in a realistic and effective way. She is the creator and leader of theGo Sugar Free online course where she helps her students find what “sugar free” means for them. On her website, she has this to say about going sugar free:

“Going sugar free looks slightly different for every individual. In this course, you decide what sugar free looks like for you with the help of a comprehensive, interactive form I developed exclusively for Go Sugar Free. I guide you through the decision-making process and then hold you accountable in the way you like to be held accountable.”

Of course, as with any life change, consistency is important. One of the things I am always so impressed with is how much Jacqueline truly cares about helping people. She saw big changes in her own life after going sugar free and wants to help others improve their lives in a similar way.

Pasta Bake
Pasta Bake

This recipe is a perfect example of how healthy eating doesn’t have to be flavorless or boring or complicated. Jacqueline’s Pasta Bake is perfect for using up veggies (specifically greens) that are on their way out in your fridge. I used baby spinach, kale and fennel fronds in mine and it was wonderful. Plus, there is no need to boil water for the pasta, which makes this a one pot meal. The pasta cooks in the sauce as it bakes in the oven, which I love on those nights when I can barely find the motivation to cook, let alone do a ton of dishes. This recipe is a wonderful example of how Jacqueline is able to make healthy eating possible and enjoyable for just about anyone.

Here is a little note from Jacqueline about this recipe and Go Sugar Free:

I teach a course about sugar. The best part about it is seeing people win big over health problems and unwanted habits that previously ruined their happiness. Life's just too short to not feel good...and to set the table every once in a while for a meal that reminds you of your mom's casseroles. Here's a recipe that'll do both. -Jacqueline

If you would like to learn more about Jacqueline's Go Sugar Free online course, click here and consider registering for the summer session.

main-headshot
main-headshot

About Jacqueline Jacqueline Smith, MPH is a University of Michigan School of Public Health trained health educator and motivational interviewer…and she’s a former sugar addict. She trained herself off of sugar with lasting results and will show you how to do it too. You can read more about her professional backgroundhere.

Jacqueline’s Pasta Bake

  • 1 12 oz. box of Jovial's Whole Grain Einkorn or Brown Rice Pasta*
  • 1 25 oz. jar of vodka cream sauce
  • 1⁄2 cup filtered water
  • 2 large handfuls of organic greens
  • 1-2 teaspoons freshly crushed or chopped garlic
  • 1⁄4 cup chopped red onion
  • 2 teaspoons cold-pressed, unfiltered, extra virgin olive oil
  • Italian seasoning to taste
  • 1-2 large handfuls fresh basil

When you find yourself with an abundance of greens that need to be used up because they're wilting fast, bake them into this warm, nutritious, Midwestern-feel-good pasta dish. Rest assured (for the greens-averse in your home), you'll barely taste the greens because they wilt down and the other flavors shine through. I've used dinosaur kale, spinach, collards, radish greens, and beet greens with success. This meal will make your home smell like an Italian restaurant, and its warmth and density will leave you full and satisfied.

Note: my husband and I demolish this meal in one sitting between the two of us. Double the recipe if you're feeding four or more.

Here we go:

Heat your oven to 375°F.

Empty your package of dry pasta into a deep oven-safe dish.

Pour a bottle of pasta sauce on top of it. Any pasta sauce will do, but vodka cream is especially conducive.

Fill the sauce jar with about 1⁄2 cup of filtered water, shake, and pour over the pasta.

Chop the garlic and onion. Let the garlic stand in open air for 5 minutes for maximum allicin production. Then add both onion and garlic over the pasta sauce.

Sprinkle Italian seasoning over the entire dish. Add extra oregano for even more of a health kick.

Stir well ensuring that all of the pasta is in contact with the sauce/water mixture.

Bake for 10 minutes at 375°F.

Meanwhile, finely chop your washed greens in a food processor (or with a knife).

Now add the greens to the pasta dish. Stir everything really well so that all of the ingredients are evenly distributed. Cook for another 10-15 minutes or until the pasta is al dente. (Adding the greens later in the cooking process helps preserve their vitamins and minerals.)

Meanwhile, chiffonade your fresh basil.

When the pasta is al dente, take it out of the oven. Stir in the fresh basil, drizzle with your best finishing olive oil, and serve.

Enjoy every healthy, warm bite.

Notes: * From Jacqueline: Any 100% whole grain pasta will work, but after experimenting with several reasonably-priced brands, Jovial won over our household for its texture, taste, and price. All of their cuts are delicious and make for fun experimenting. I do not have any affiliation with Jovial. I'm just a fan.

*From Rachael: I found the stirring the pasta halfway through the second round of cooking helped the pasta on the top cook more evenly.

Full Disclosure: This post contains affiliate links. All opinions are my own.

In Lunch & Dinner, Vegetarian
3 Comments
kale-pineapple-smoothie.jpg
kale & pineapple smoothie

Riley's Kale Pineapple Smoothie

Rachael White May 29, 2013

I'm really excited about this Kale Pineapple Smoothie but before I get into that, I need a mommy moment.

I’m not really sure how this happened, but Riley is a year and a half old. He has gone from being a tiny baby who couldn’t do much of anything without help from me to being a toddling, independent little boy. He runs in the backyard, climbs on the sofa, and loves buses. He loves buses the way I love him: unconditionally.

625503_732304559223_564544827_n

One of our favorite activities right now is going to the mall on rainy days. They have a great play area where Riley can run around with other kids and get completely worn out.  I love watching him run up to other tiny humans, bursting with things to say. Granted, nothing he says makes sense to any of the adults, but he and whatever toddler he’s chosen to communicate with use their secret language to chit chat. It’s hilariously wonderful.

Enjoy a Green Smoothie

After he is sufficiently worn out, Riley and I go to a little restaurant right next to the play area where he downs an entire kale and pineapple smoothie and picks at pieces of pesto turkey from my sandwich. The first time he finished one of these vitamin packed smoothies I was totally shocked. Shocked and elated because of all the good things he was voluntarily putting into his little growing body.

Riley and his smoothie...

So, after a few tries I finally created a recipe we can make at home. Now that the weather is nicer, we can spend time outside or at the park and this smoothie is the perfect thing to take along with us. It is also a great way to supplement on those days when all Riley will eat is a combination of Cheerios and chicken nuggets.

It's hard to remember, but moms and dads need to eat healthy foods too. I sometimes fall into lulls where I am so focused on taking care of Riley that I forget to take care of myself. Fortunately, I love this smoothie just as much as Riley does. It feels wonderful putting so many healthy things into such a delicious treat that Riley can see me enjoying as well. Smoothies = me trying to set a better example.

Thanks to my darling boy for being so many shades of wonderful over the past year and a half. Cheers to you, sweet boy!

Riley's Kale-Pineapple Smoothie

Makes 2  smoothie

2 packed cups chopped kale leaves 1 cup fresh or frozen pineapple 1 banana 1/2 cup fresh or frozen mango (you can also use peaches) 1/2 cup pineapple juice 1 cup unsweetened almond milk

Combine the ingredients in a blender and blend until smooth.

In Breakfast & Brunch, Lunch & Dinner, Vegetarian Tags almond milk, green smoothie, kale, kale smoothie recipe, pineapple
18 Comments
← NewerOlder →

Search Posts


Featured Posts

Summary Block
This is example content. Double-click here and select a page to feature its content. Learn more
Featured
Jan 29, 2026
Cursus Amet
Jan 29, 2026
Jan 29, 2026
Jan 22, 2026
Pellentesque Risus Ridiculus
Jan 22, 2026
Jan 22, 2026
Jan 15, 2026
Porta
Jan 15, 2026
Jan 15, 2026
Jan 8, 2026
Etiam Ultricies
Jan 8, 2026
Jan 8, 2026
Jan 1, 2026
Vulputate Commodo Ligula
Jan 1, 2026
Jan 1, 2026
Dec 25, 2025
Elit Condimentum
Dec 25, 2025
Dec 25, 2025
Dec 18, 2025
Aenean eu leo Quam
Dec 18, 2025
Dec 18, 2025
Dec 11, 2025
Cursus Amet
Dec 11, 2025
Dec 11, 2025
Dec 4, 2025
Pellentesque Risus Ridiculus
Dec 4, 2025
Dec 4, 2025
Nov 27, 2025
Porta
Nov 27, 2025
Nov 27, 2025

Powered by Squarespace