
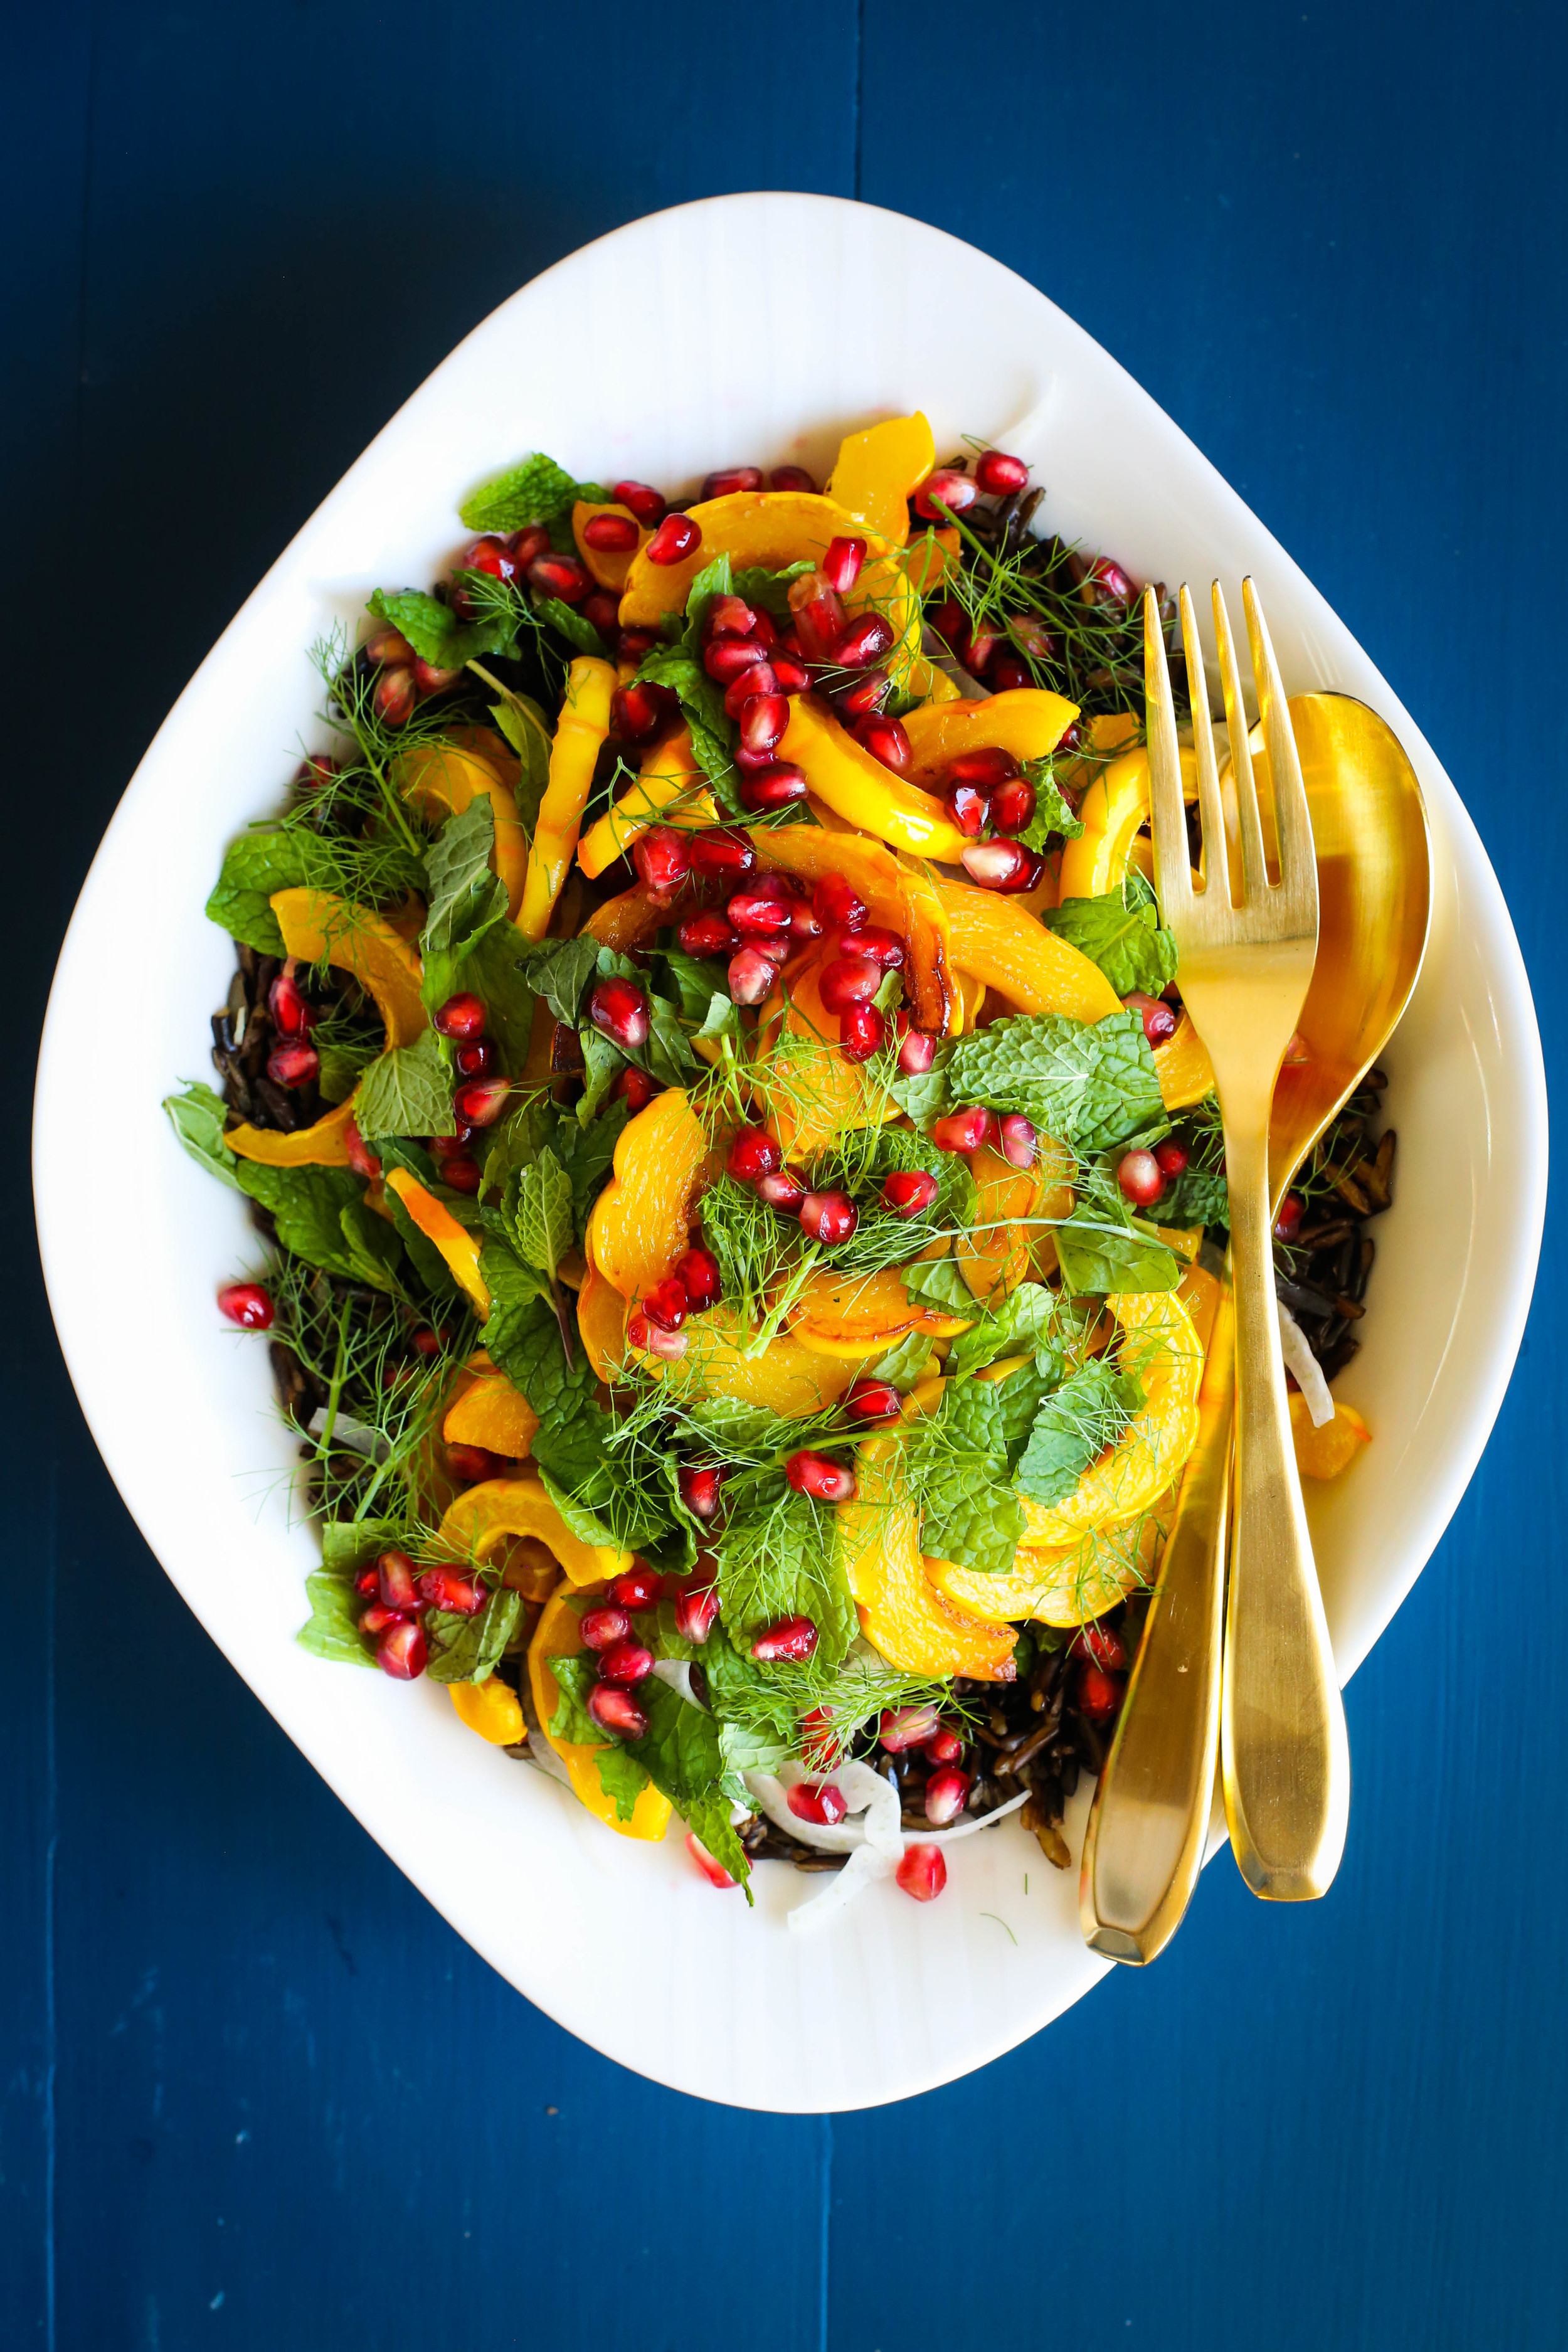
A colorful, vibrant salad is a welcome addition to any holiday spread. This roasted squash and wild rice salad will become a crowd favorite and will add gorgeous color to your table!
Read More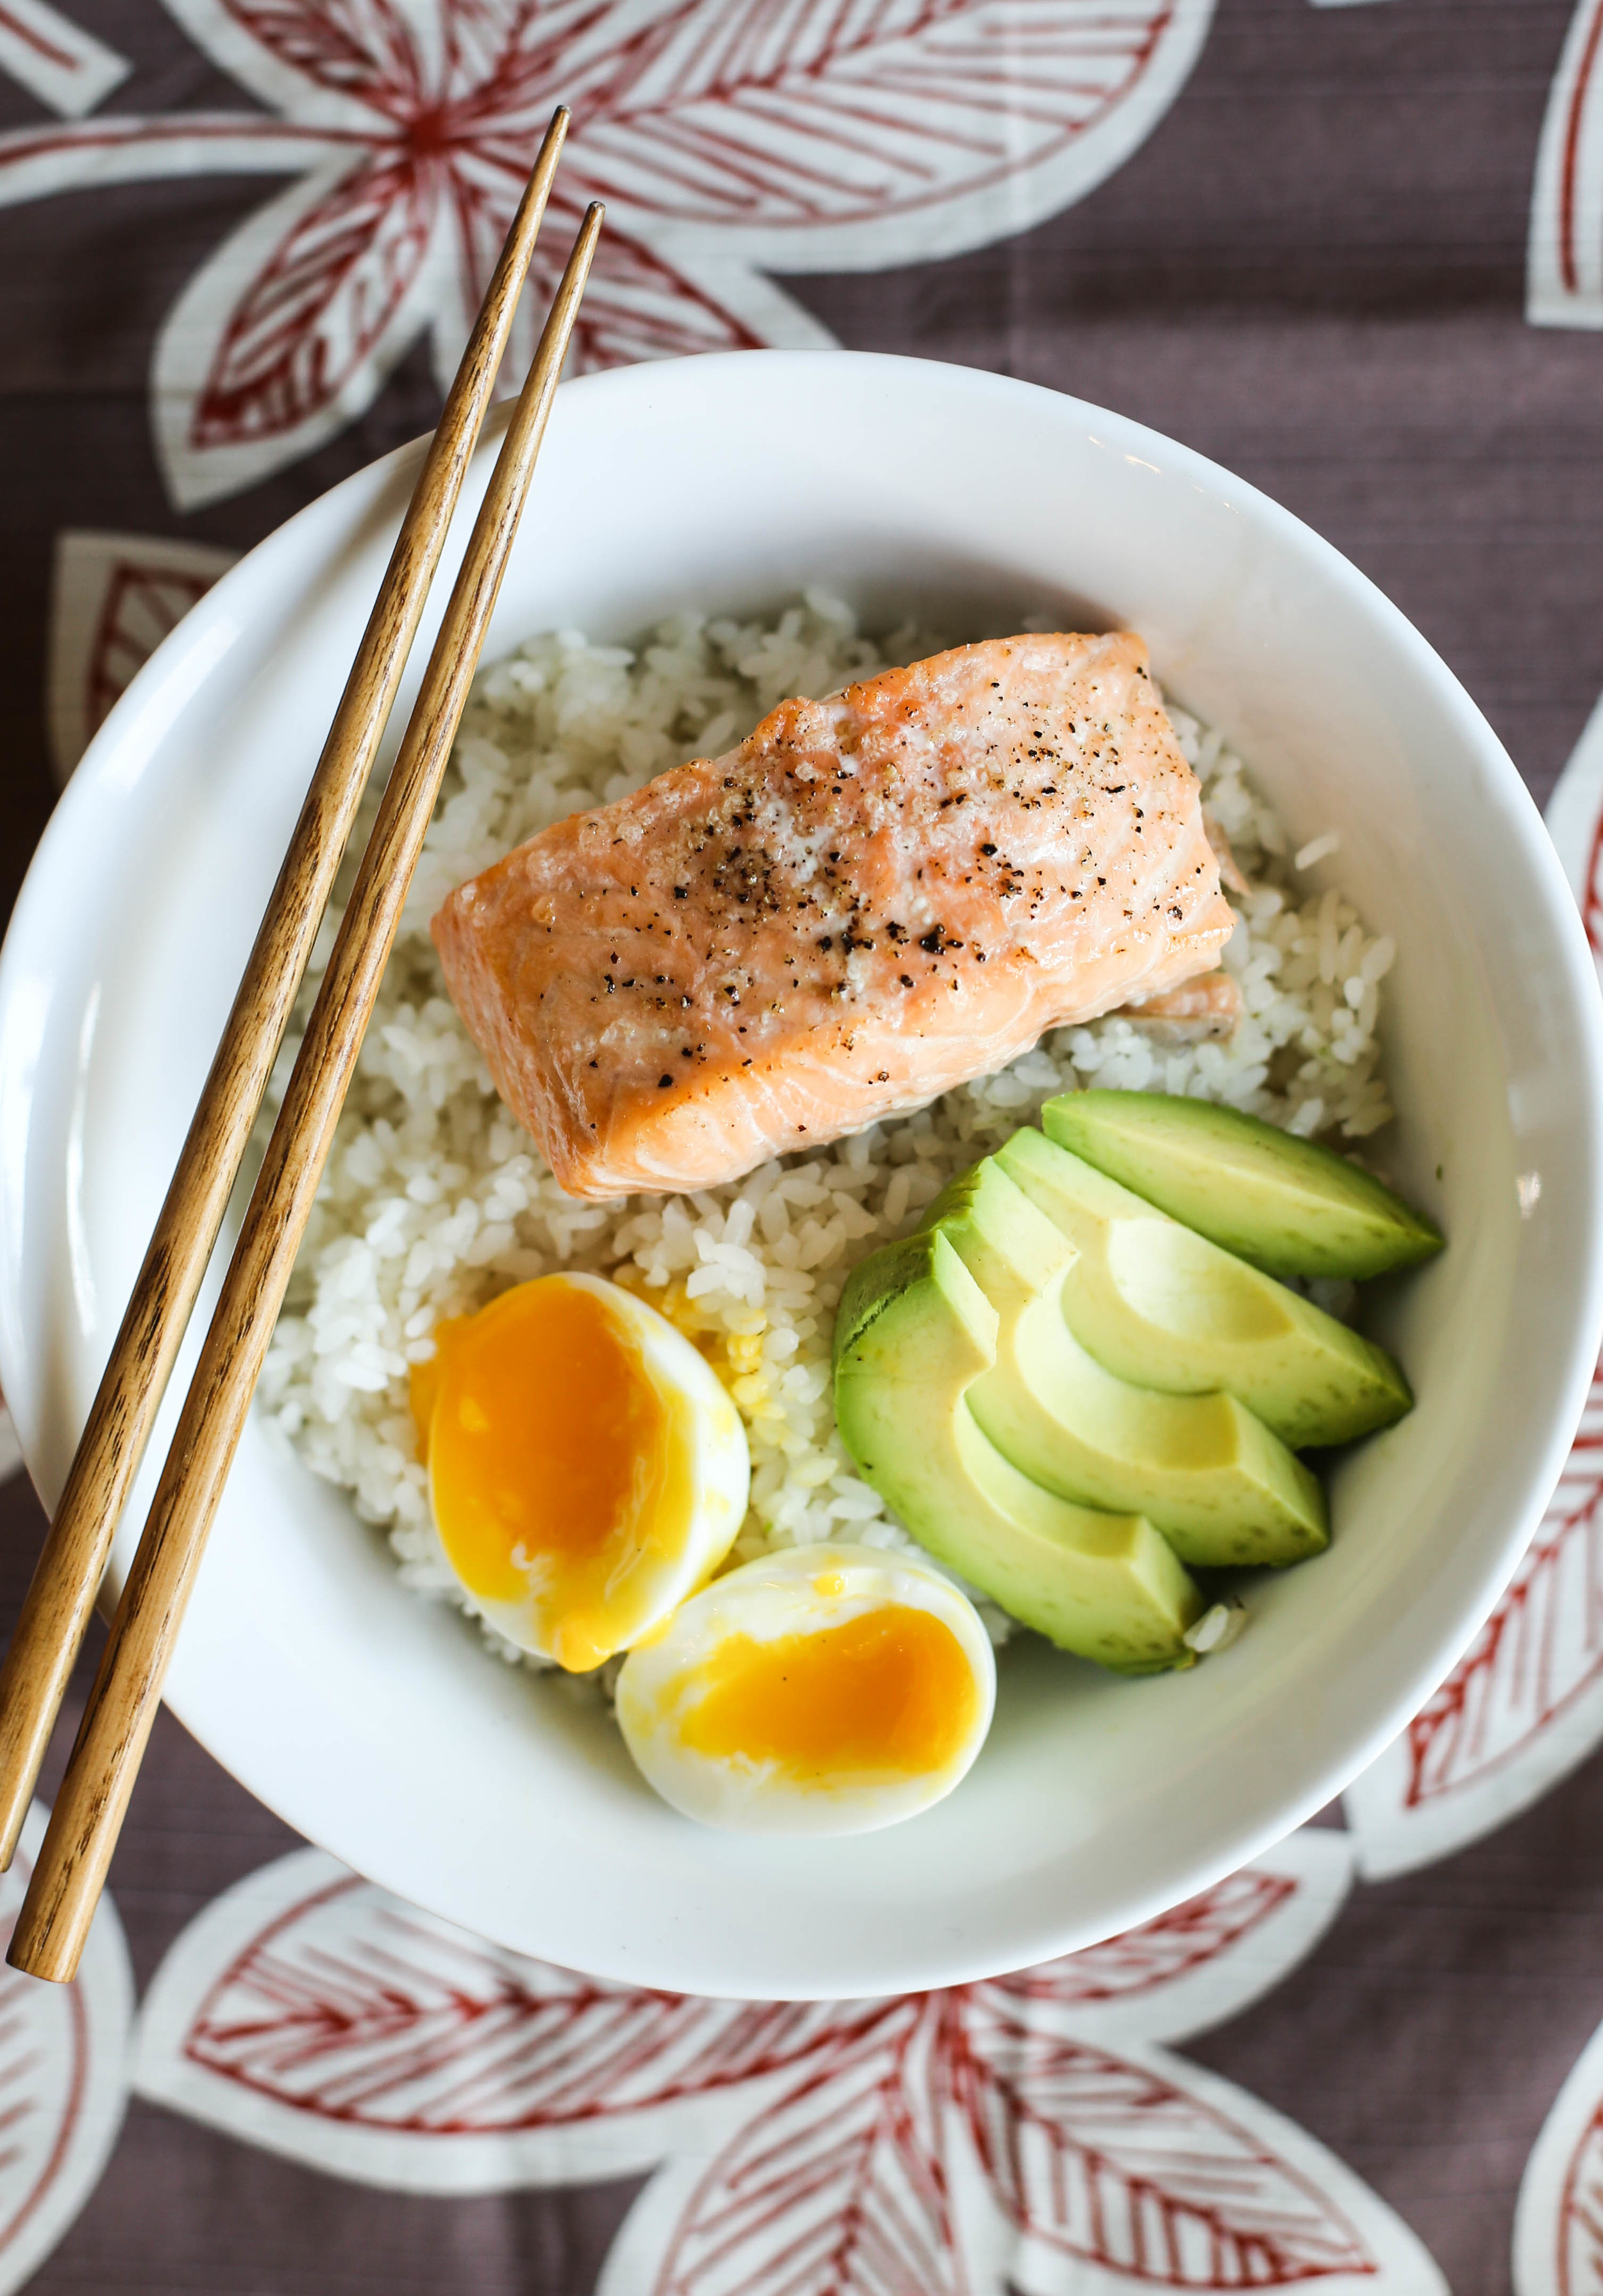
15 Minute Salmon & Avocado Rice Bowls | VIDEO
The easiest dinner recipe on the planet: 15 minute salmon avocado rice bowls! Kid friendly, adult friendly, and ridiculously simple and comforting.
Read More
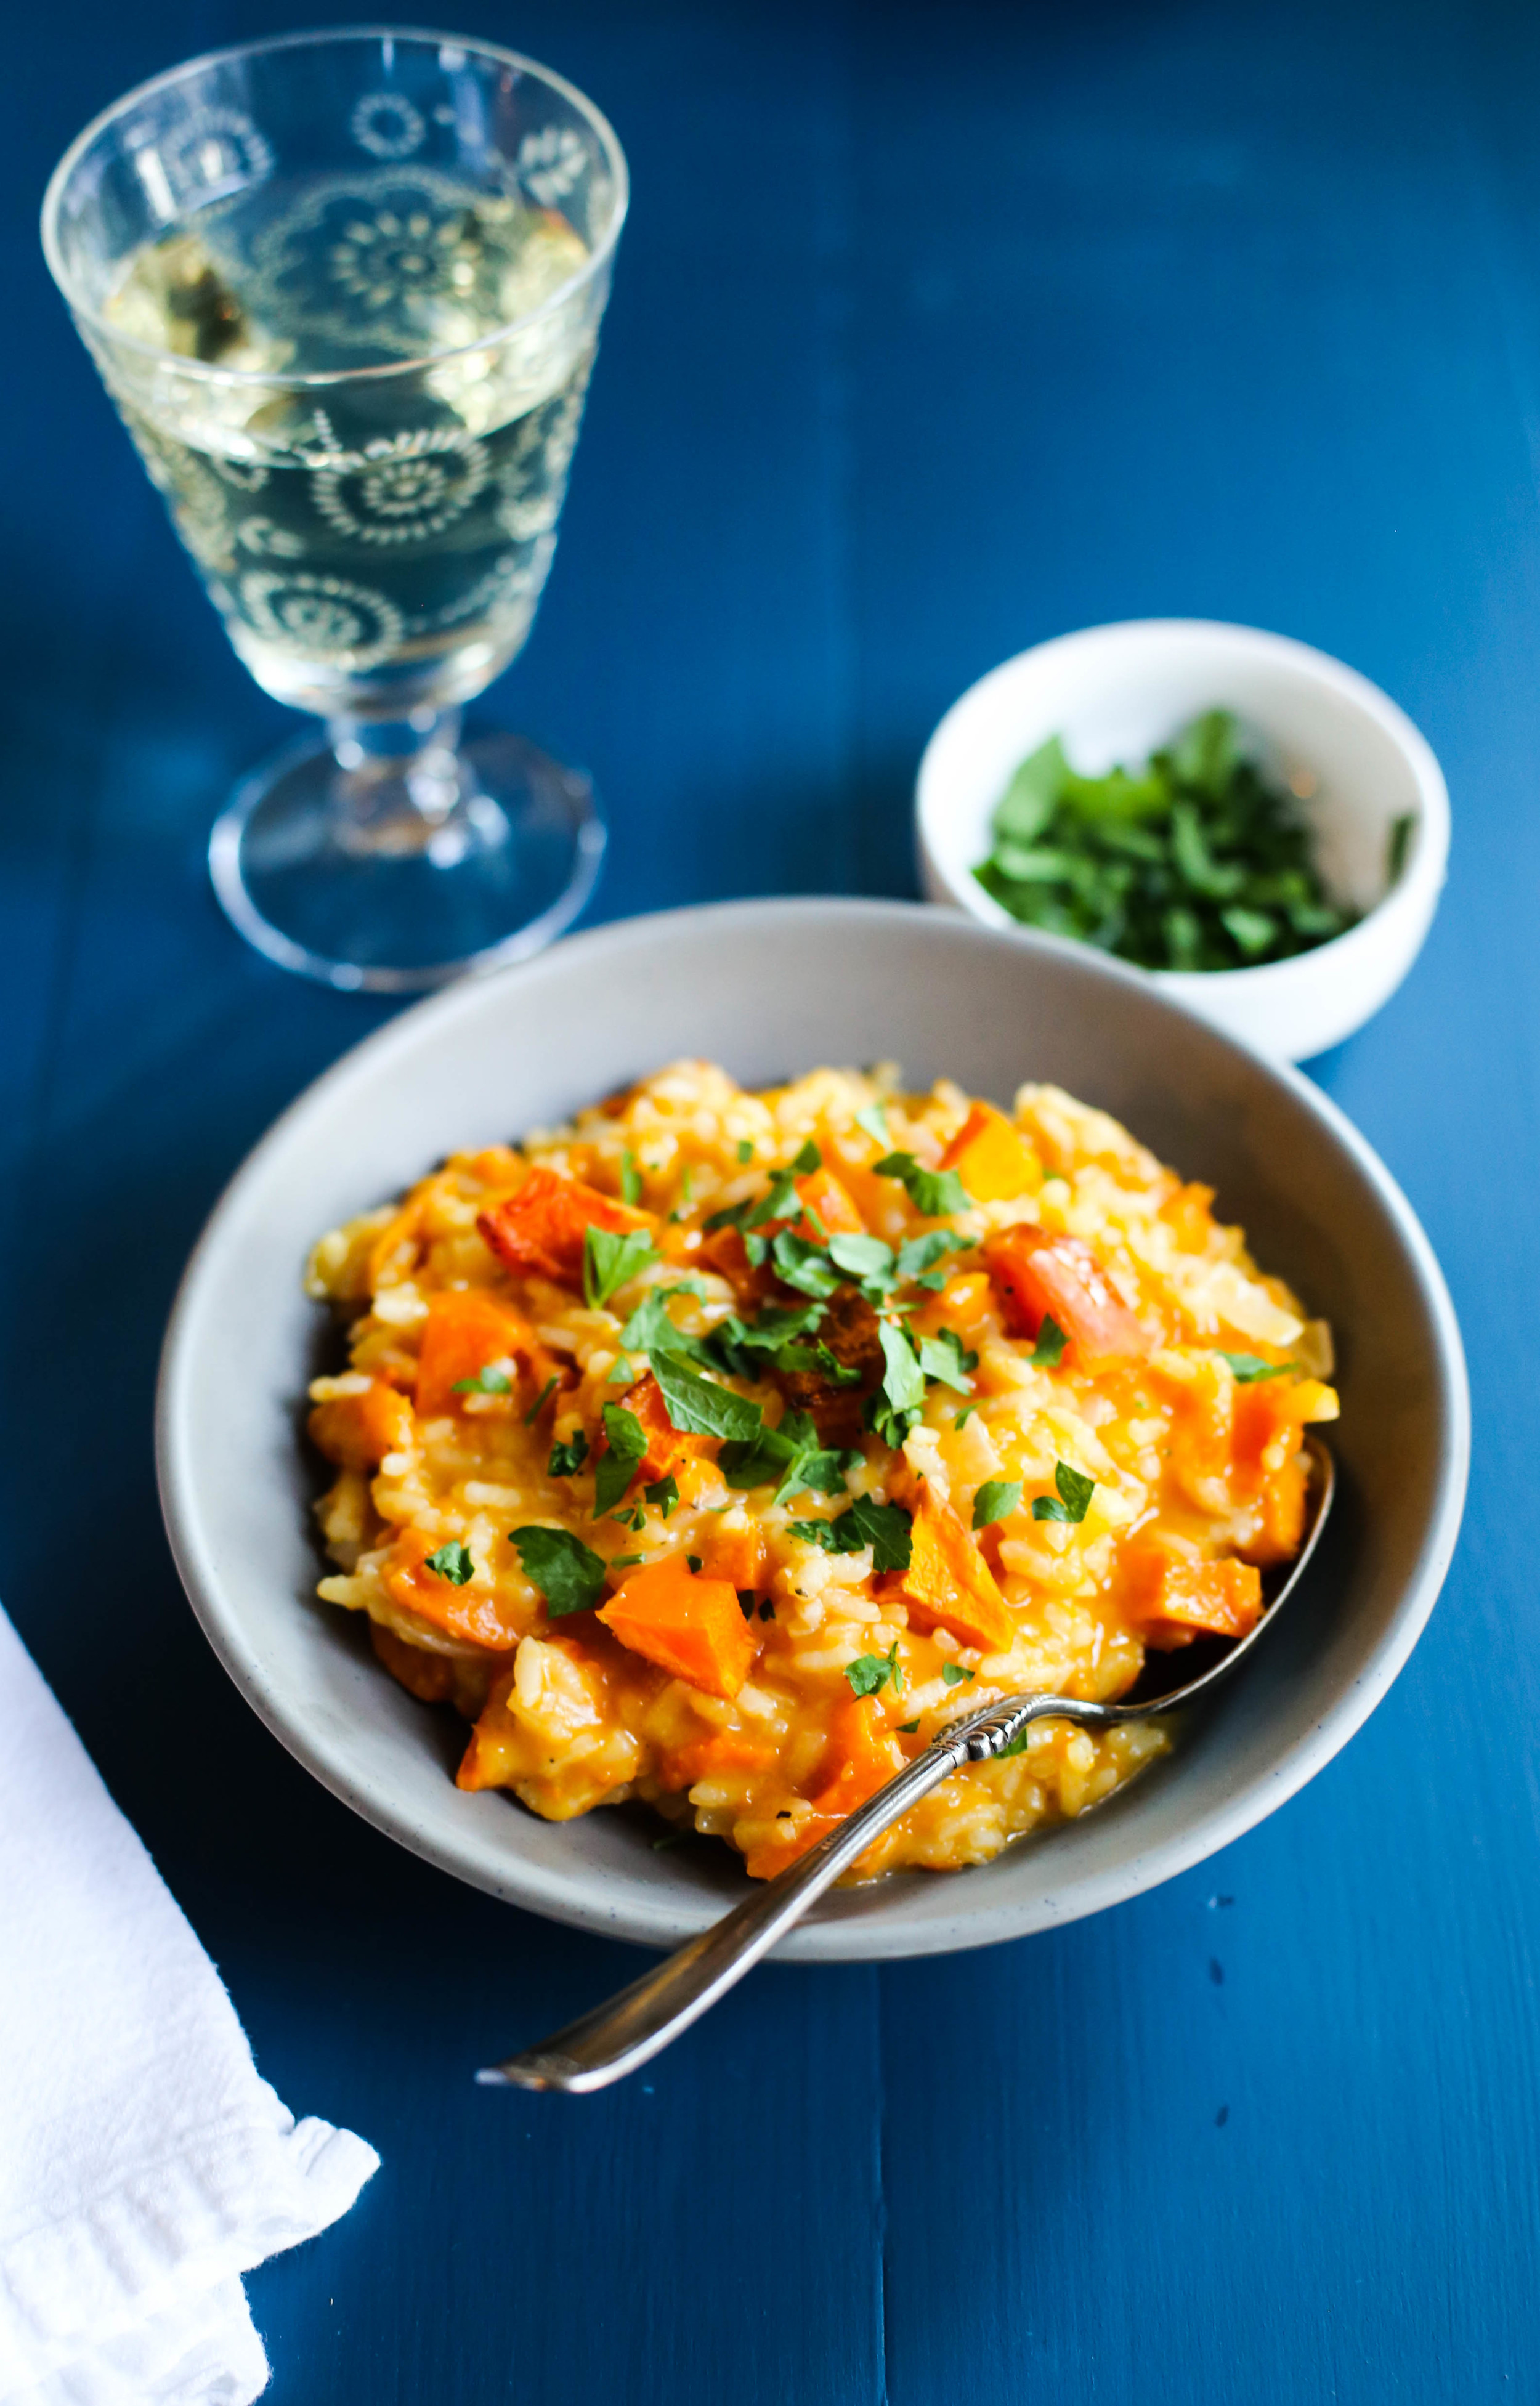
Roasted Butternut Squash Risotto
When we lived in Japan, Brad and I used to go grocery shopping nearly every day. We had a refrigerator the size of those tiny dorm room fridges so we couldn't fit too much in there. It didn't take long for us to realized that we needed to get used to walking to and from the grocery store on a daily basis. I really enjoyed having the freedom to decide what we would eat based solely on what I saw in the grocery store that afternoon. It forced me to think on my feet and helped me learn about new ingredients and cooking techniques. Plus, I was able to focus on seasonal produce and catch-of-the-day seafood. This time of year, hot pots would be nearly in season and kabocha squash and sweet potatoes were everywhere. Perhaps my favorite thing about our little Japanese market were the kitschy, artificial fall leaves on plastic branches that decorated the aisles.

It took me a while to realize that we couldn't operate on the same grocery shopping schedule here in the United States. With 2 kids and a husband who works long hours, I find that meal planning for the whole week and making just one shopping trip works best for us. However, we often end up with odds and ends in the cabinets and produce drawers: the last of a box of dry pasta, half an onion, a carton of chicken stock, and other bits and bobs sit around getting ignored. So, this week I challenged myself to cook our nightly dinners using only what we had in the pantry, freezer, and fridge that needed to be used up. This beautiful, vibrant risotto is one of my favorite ways to get creative with basic ingredients and helps use items that might otherwise end up in the trash.


This risotto is creamy, full of comforting flavors, and perfect for a simple weeknight dinner. We topped our risotto with poached eggs and a couple drops of white truffle oil but that is totally optional. This bowl of goodness can stand on its own two feet without any fancy flourishes. And the leftovers? Yeah. Almost better than the original. I like risotto that has been reheated in a hot skillet until crispy in places and topped with a fried egg and a drizzle of hot sauce. Rice and eggs...I might have a little bit of an addiction.
Roasted Butternut Squash Risotto
Makes 6-8 Servings
- 1 small butternut squash, peeled, seeded and cubed
- 1 tablespoon + 1 teaspoon olive oil
- course salt
- 1 teaspoon unsalted butter
- 1 large garlic clove, minced
- 1/2 a medium yellow onion, chopped
- 1/2 cup white wine
- 1 cup arborio rice
- 4 cups chicken stock, warmed
- 1/3 cup grated pecorino romano cheese
- 1/4 cup flat leaf parsley leaves, roughly chopped
- salt and pepper to taste
- Preheat the oven to 425 degrees Fahrenheit. Arrange the butternut squash cubes in a single layer on a parchment lined, rimmed baking sheet. Toss with 1 tablespoon olive oil and sprinkle with salt. Bake for 25-30 minutes or until golden and tender.
- While the squash roasts, heat the remaining 1 teaspoon olive oil and the butter in a large skillet over medium-high heat. Add the chopped onion and the garlic and stir, cooking until softened, about 3-4 minutes.
- Stir the rice into the onion mixture and cook, stirring often until the rice begins to take on a slight golden color.
- Increase the heat slightly and stir in the white wine, scraping the bottom of the skillet. Bring the wine to a steady simmer.
- When the rice has absorbed the liquid, begin adding the stock 1/2 cup at a time, stirring the liquid into the rice until almost completely absorbed before adding the next 1/2 cup. Continue until the rice is tender but not mushy.
- When the squash is done, mash it roughly with a potato masher or a large fork. Stir the squash into the skillet with the risotto and stir until combined. Add the pecorino, season with salt and pepper, and sprinkle with the fresh parsley. Serve immediately.

Pueblo Chile Grilled Cheese with Strawberry Jam
I'm slowly but surely recovering from sending my oldest baby to preschool last week (cue the tears...again). Each day brings new challenges and rewards, but we are making it through and figuring how routines that work for us. I have often heard parents talk about how their children seem to move at a glacial pace when they need to be somewhere on time. That has been a difficult thing for me and my rocky relationship with early morning wake-up calls. Still, we have made it on time every morning and that, as many people will tell you, is a big win for me. I could go on and on about how wonderful and difficult this transition has been, but I'll save that for my Mommy Stuff page. The last thing I'll say is this: on the first day of school, I came home, put the baby down for a nap, and made myself this delicious grilled cheese sandwich piled with Pueblo chiles from Colorado, my mom's homemade strawberry jam, and not TWO delicious slices Tillamook cheddar cheese. Comfort food central.


Something about melty cheese, my very favorite jam in the entire universe, and locally roasted, gently spicy Pueblo chiles sandwiched between buttery bread helped make everything slow down for a few brief moments. Grilled cheese sandwiches have magical healing power. Of this, I am certain. I am also certain that this feeling that time is moving too quickly will always be there, lurking in the shadows and making me feel like I'm in a car that's moving too fast and the breaks are broken. Realizing this fact may help me to hold on to the small moments and simple pleasures a little tighter. Or at least that's what I'm going to tell myself.
While I figure all of that out, I believe another one of these sandwiches is necessary.

Pueblo Chile Grilled Cheese with Strawberry Jam
Serves 1
Ingredients
- 2 slices white or wheat bread
- 2 slices sharp cheddar cheese
- 2 teaspoons strawberry jam
- 1-2 small/medium sized roasted green chiles
- 3 tablespoons unsalted butter, room temperature
Instructions
- Begin by heating a cast iron or another heavy pan over medium low heat. I like cast iron because of the even heat and the picture perfect crust that forms on the outside of the bread.
- While the pan is heating, peel and seed your chiles and cut off the stems.
- Spread 2 tablespoons of the butter on one side of each slice of bread making sure the butter reaches all the way to the very edge.
- Melt the remaining butter in the heated pan and, once it has melted, place one slice of bread, buttered side down, in the pan and place one slice of cheese on the bread.
- Place the chiles on top of the cheese, then place the second slice of cheese on top of the chiles.
- Spread the jam on the remaining slice of bread (on the side without butter) and place on top of the sandwich. Press down on slightly.
- Allow the sandwich to cook for about 5 minutes per side, watching the heat carefully and adjusting as necessary.
- Once the cheese is nicely melted and the bread is a deep golden color, transfer it to a cutting board and let it sit for 2-3 minutes before cutting in half.
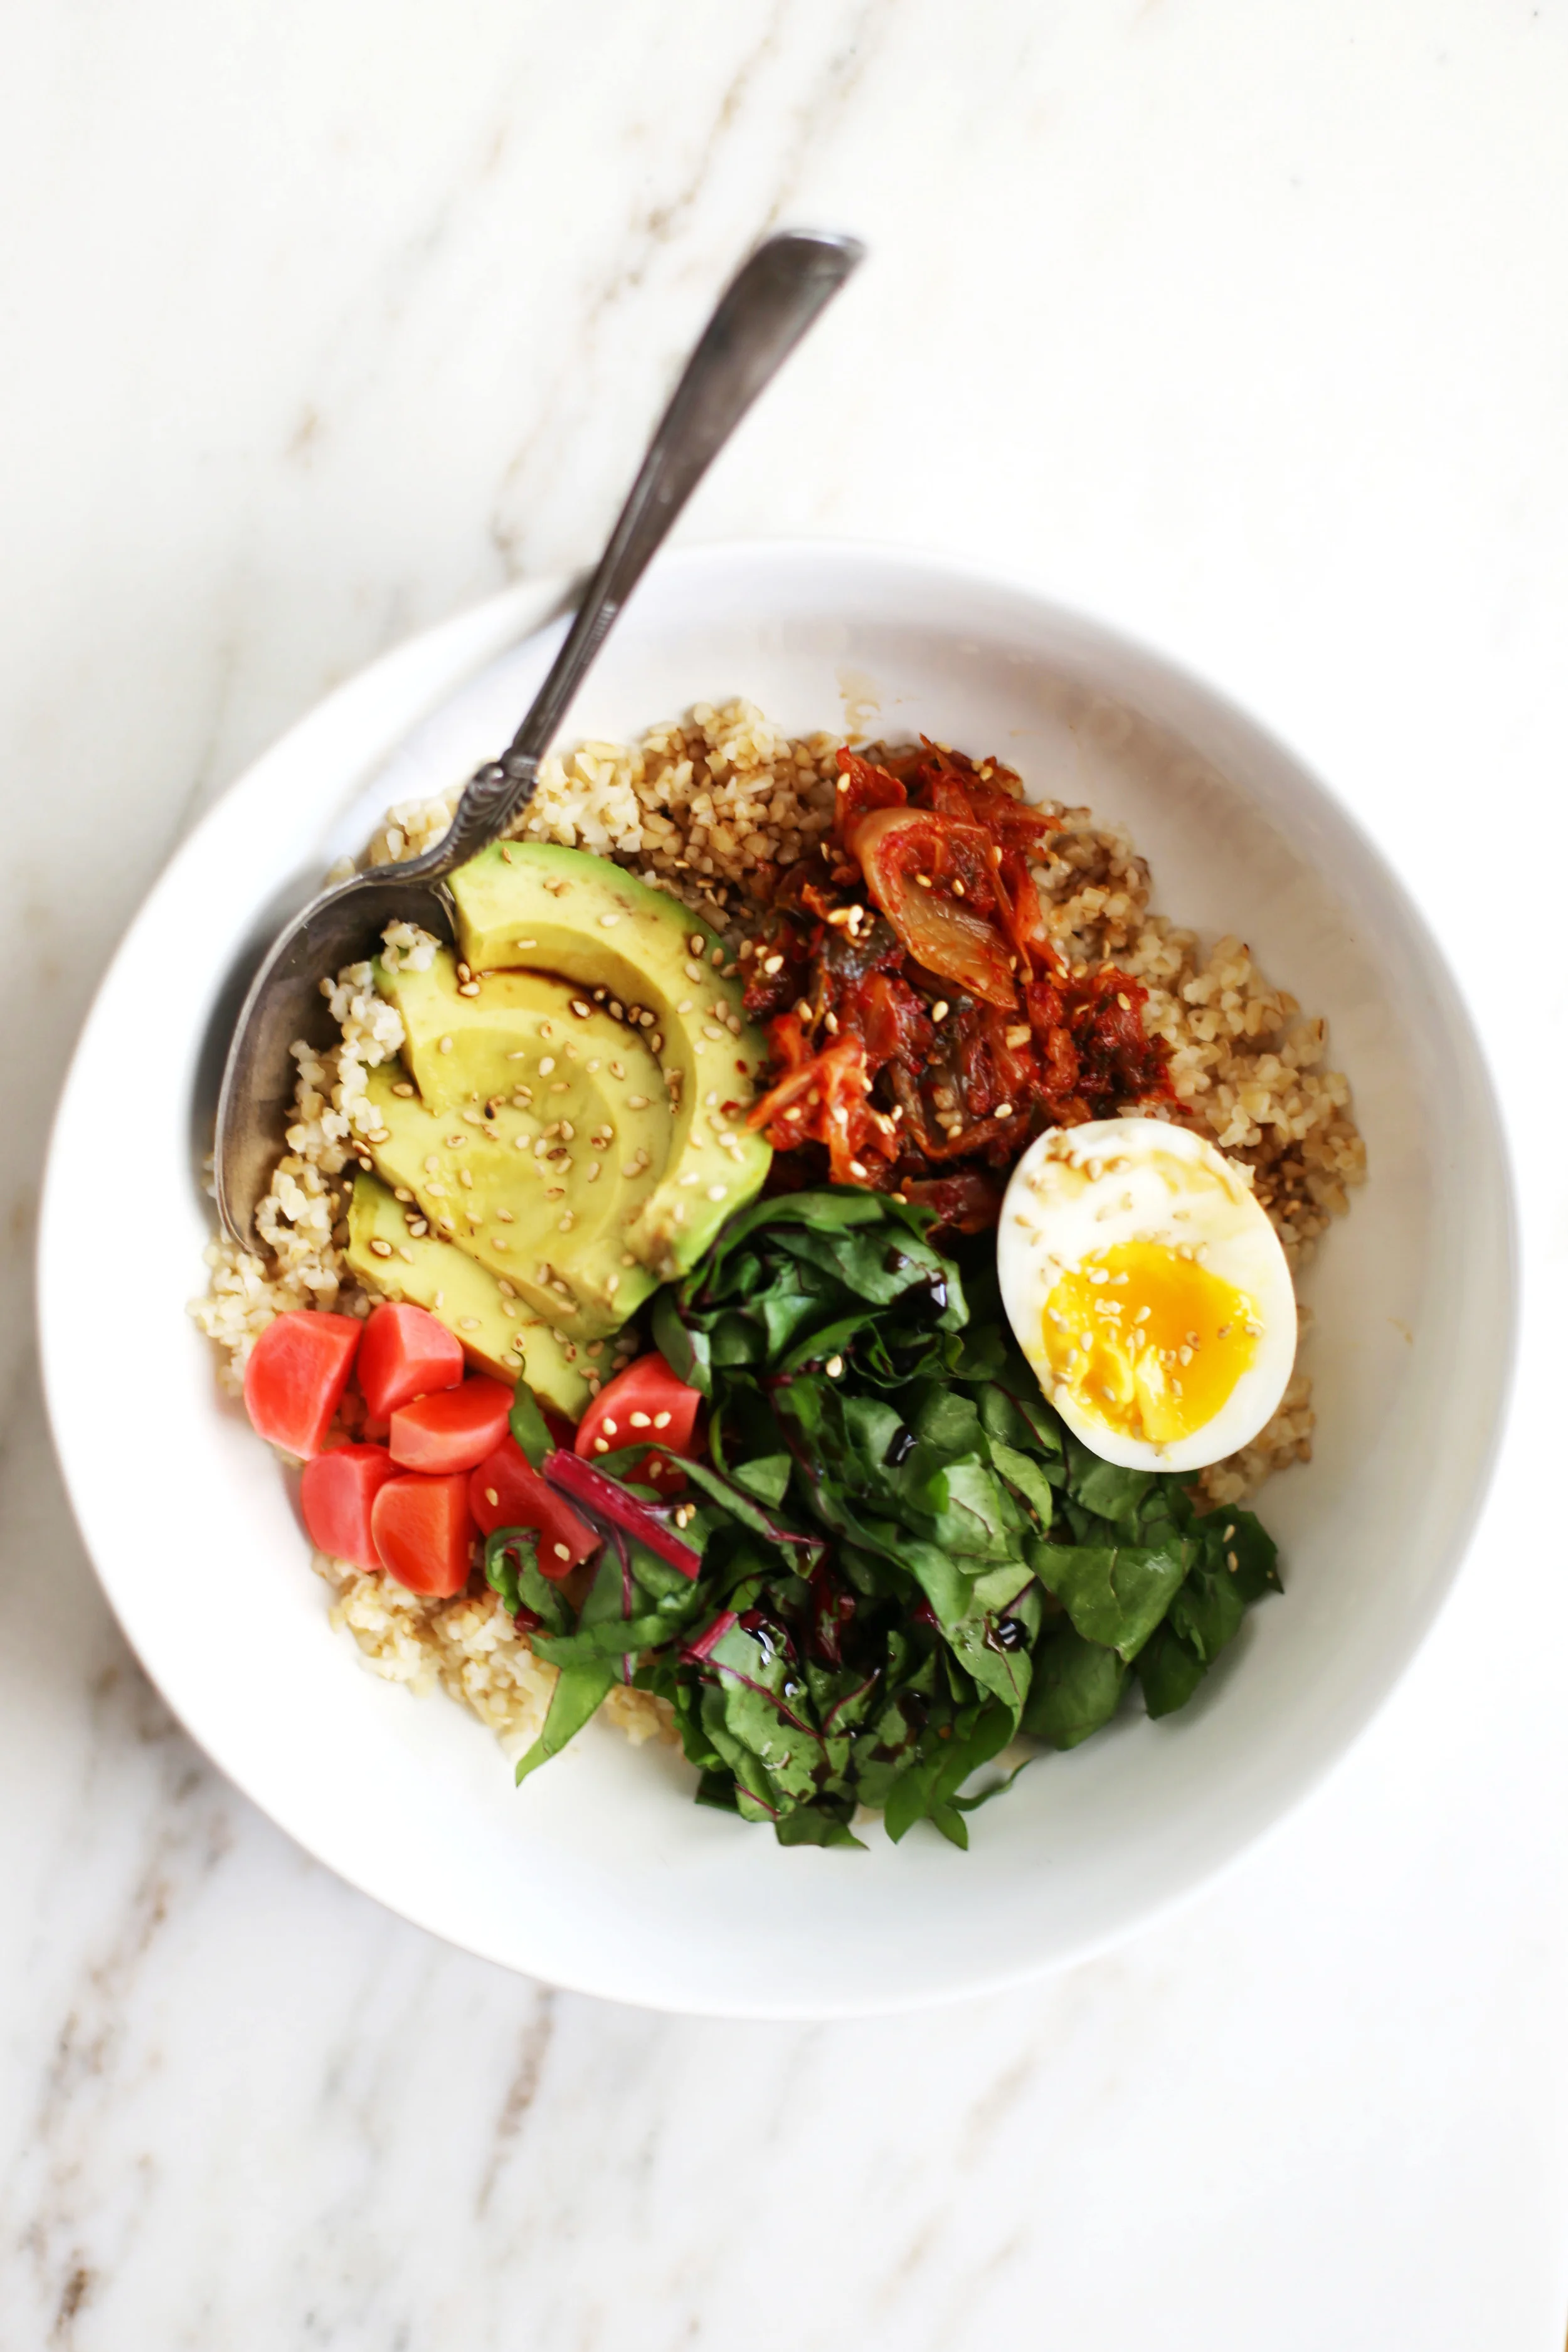
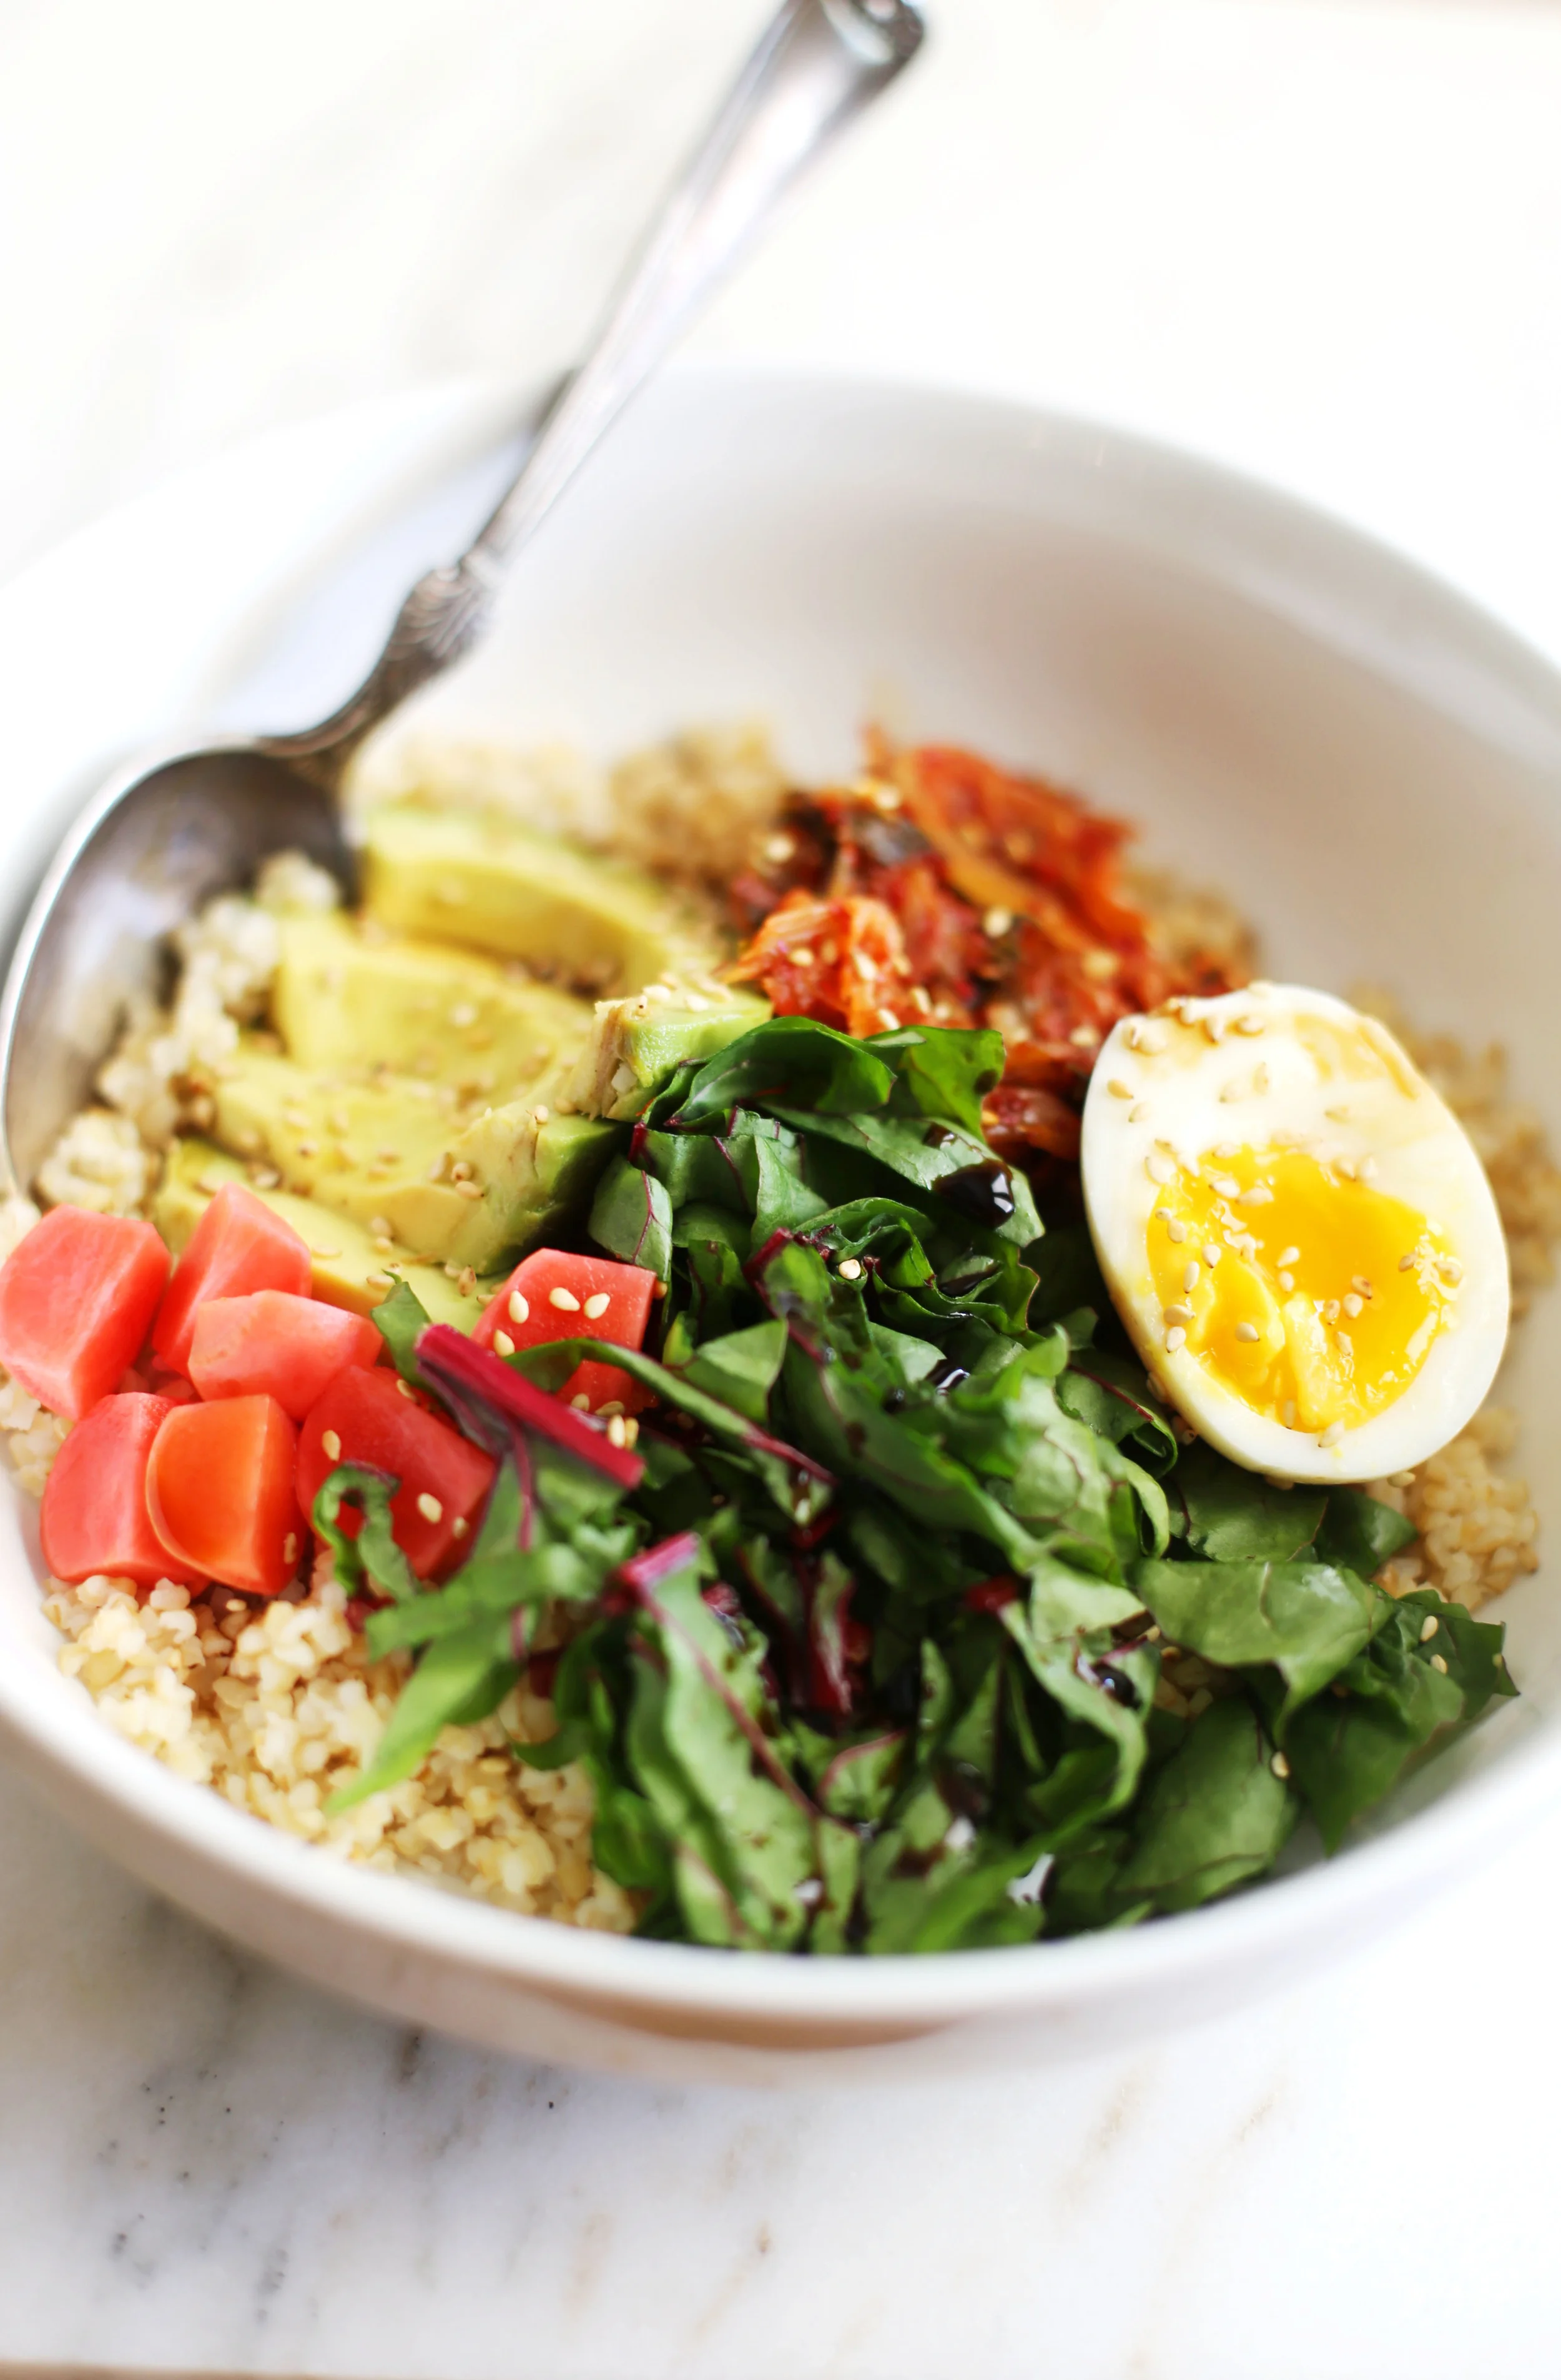
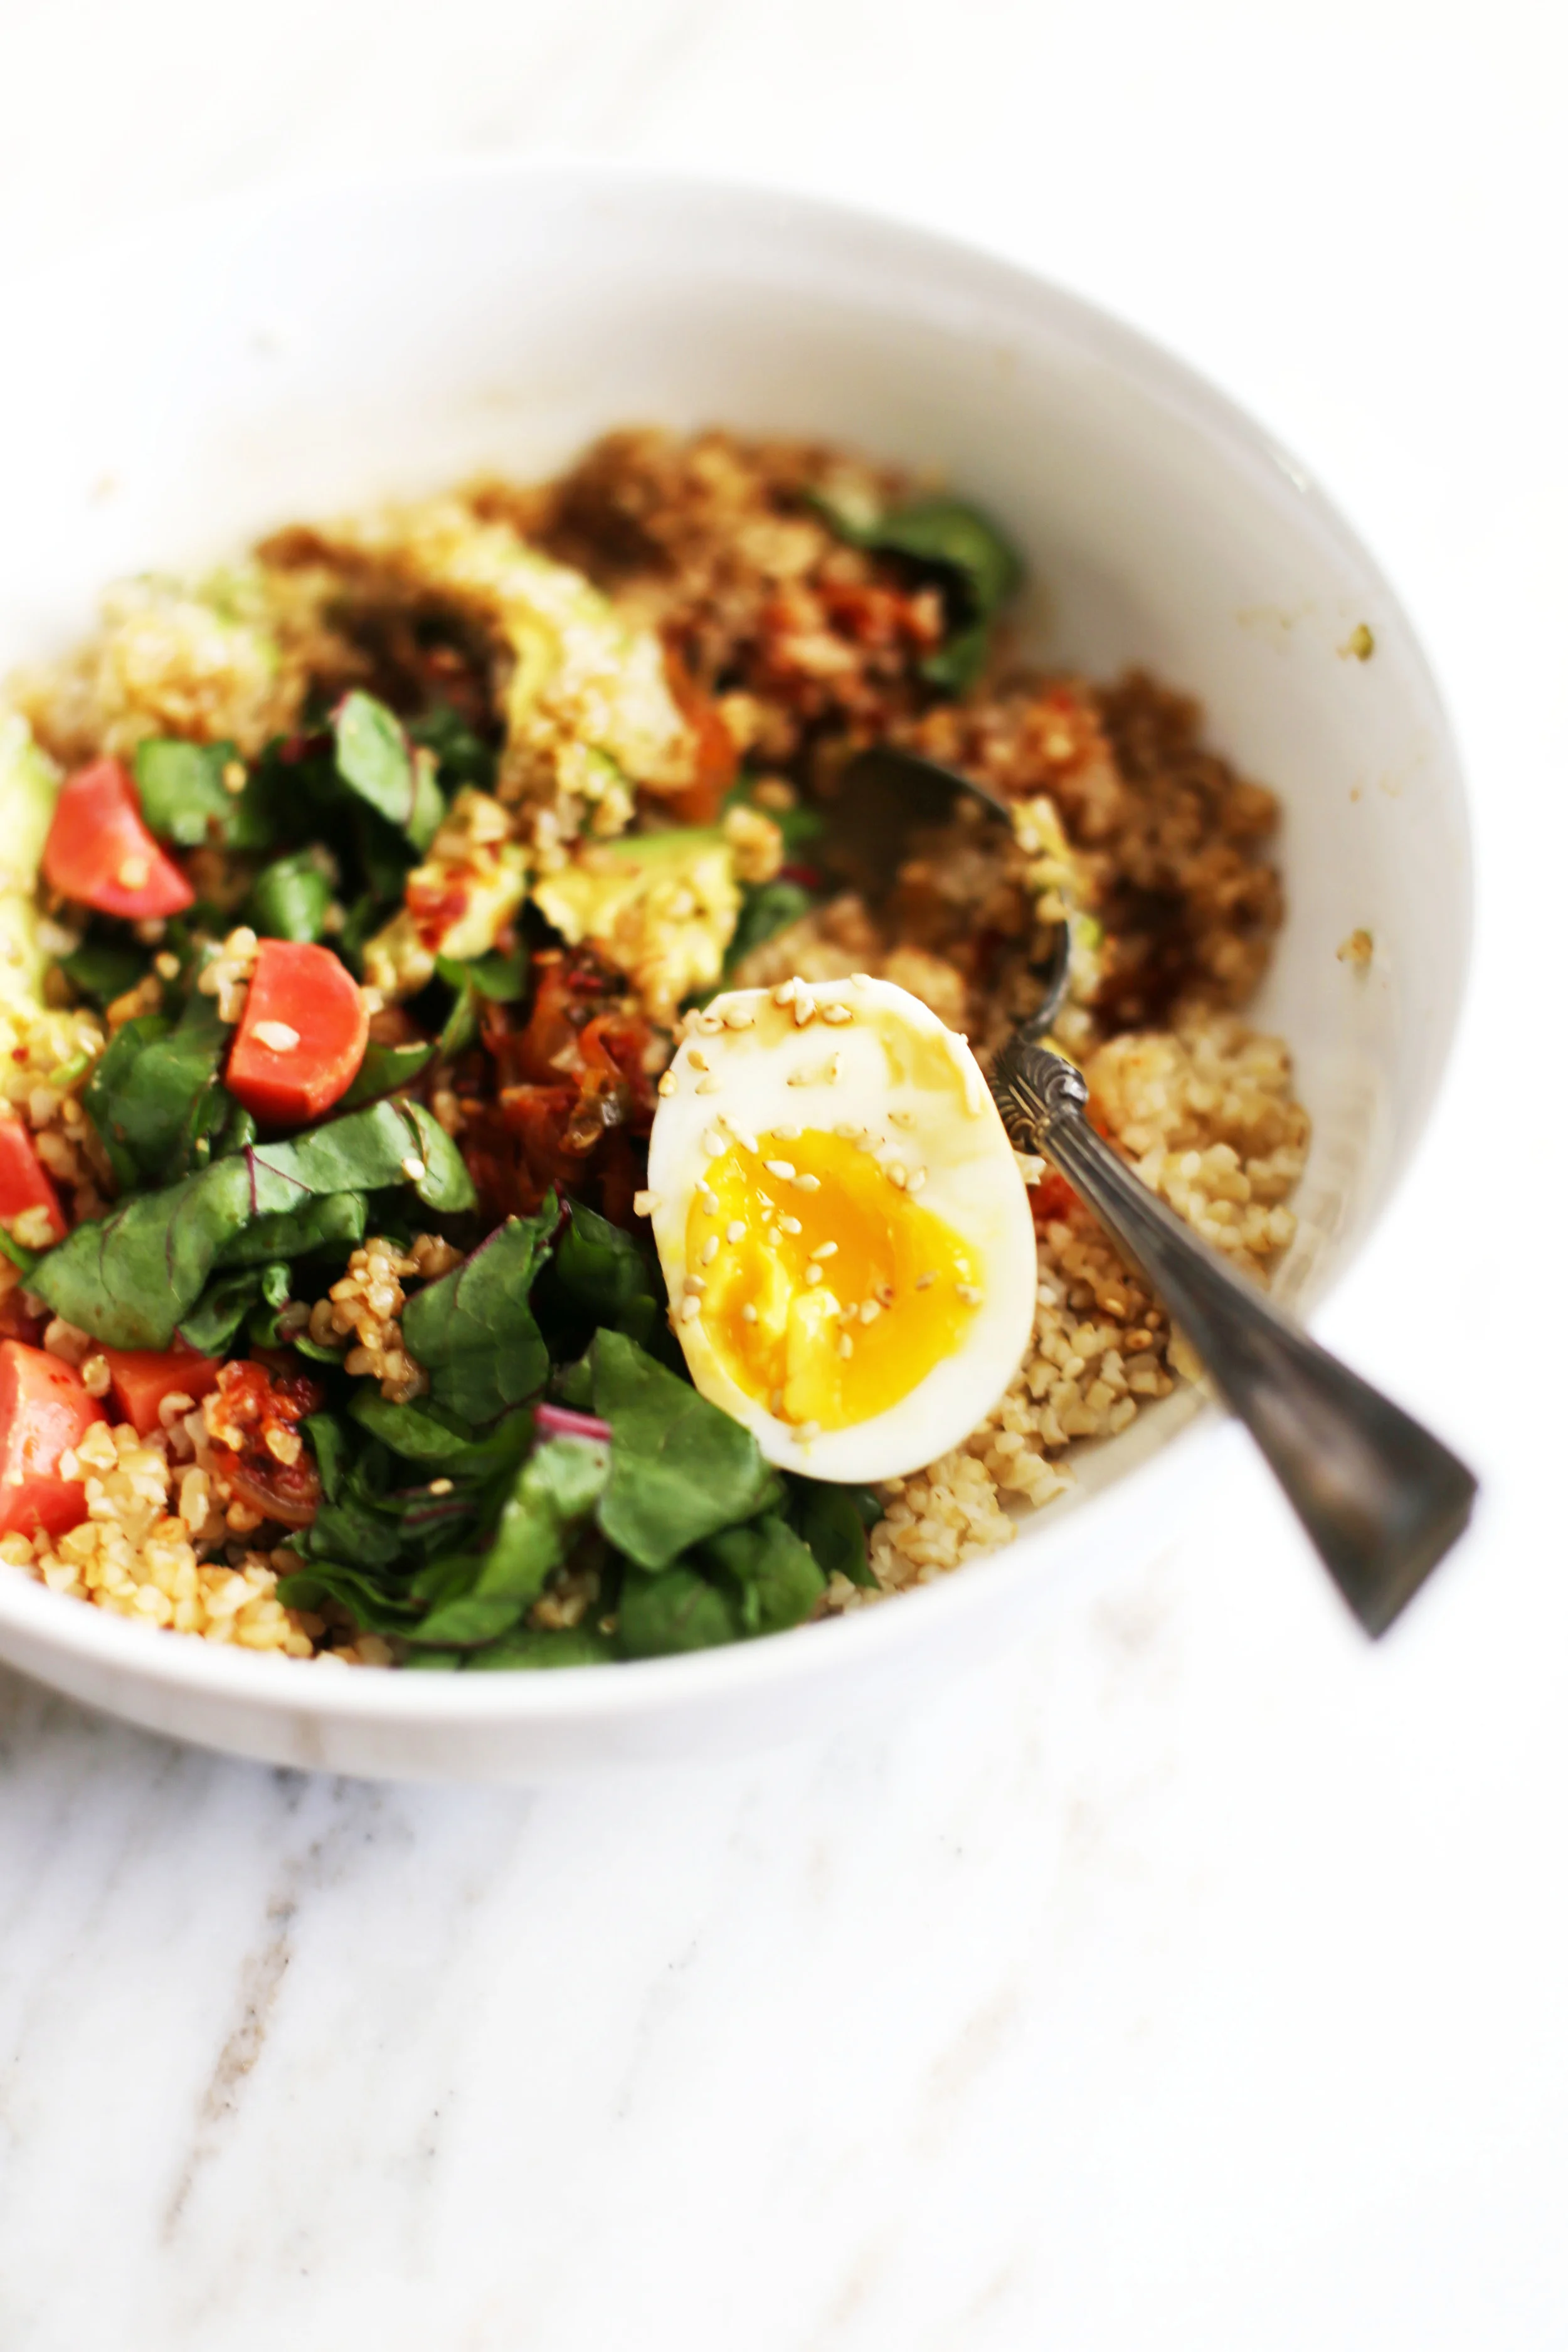
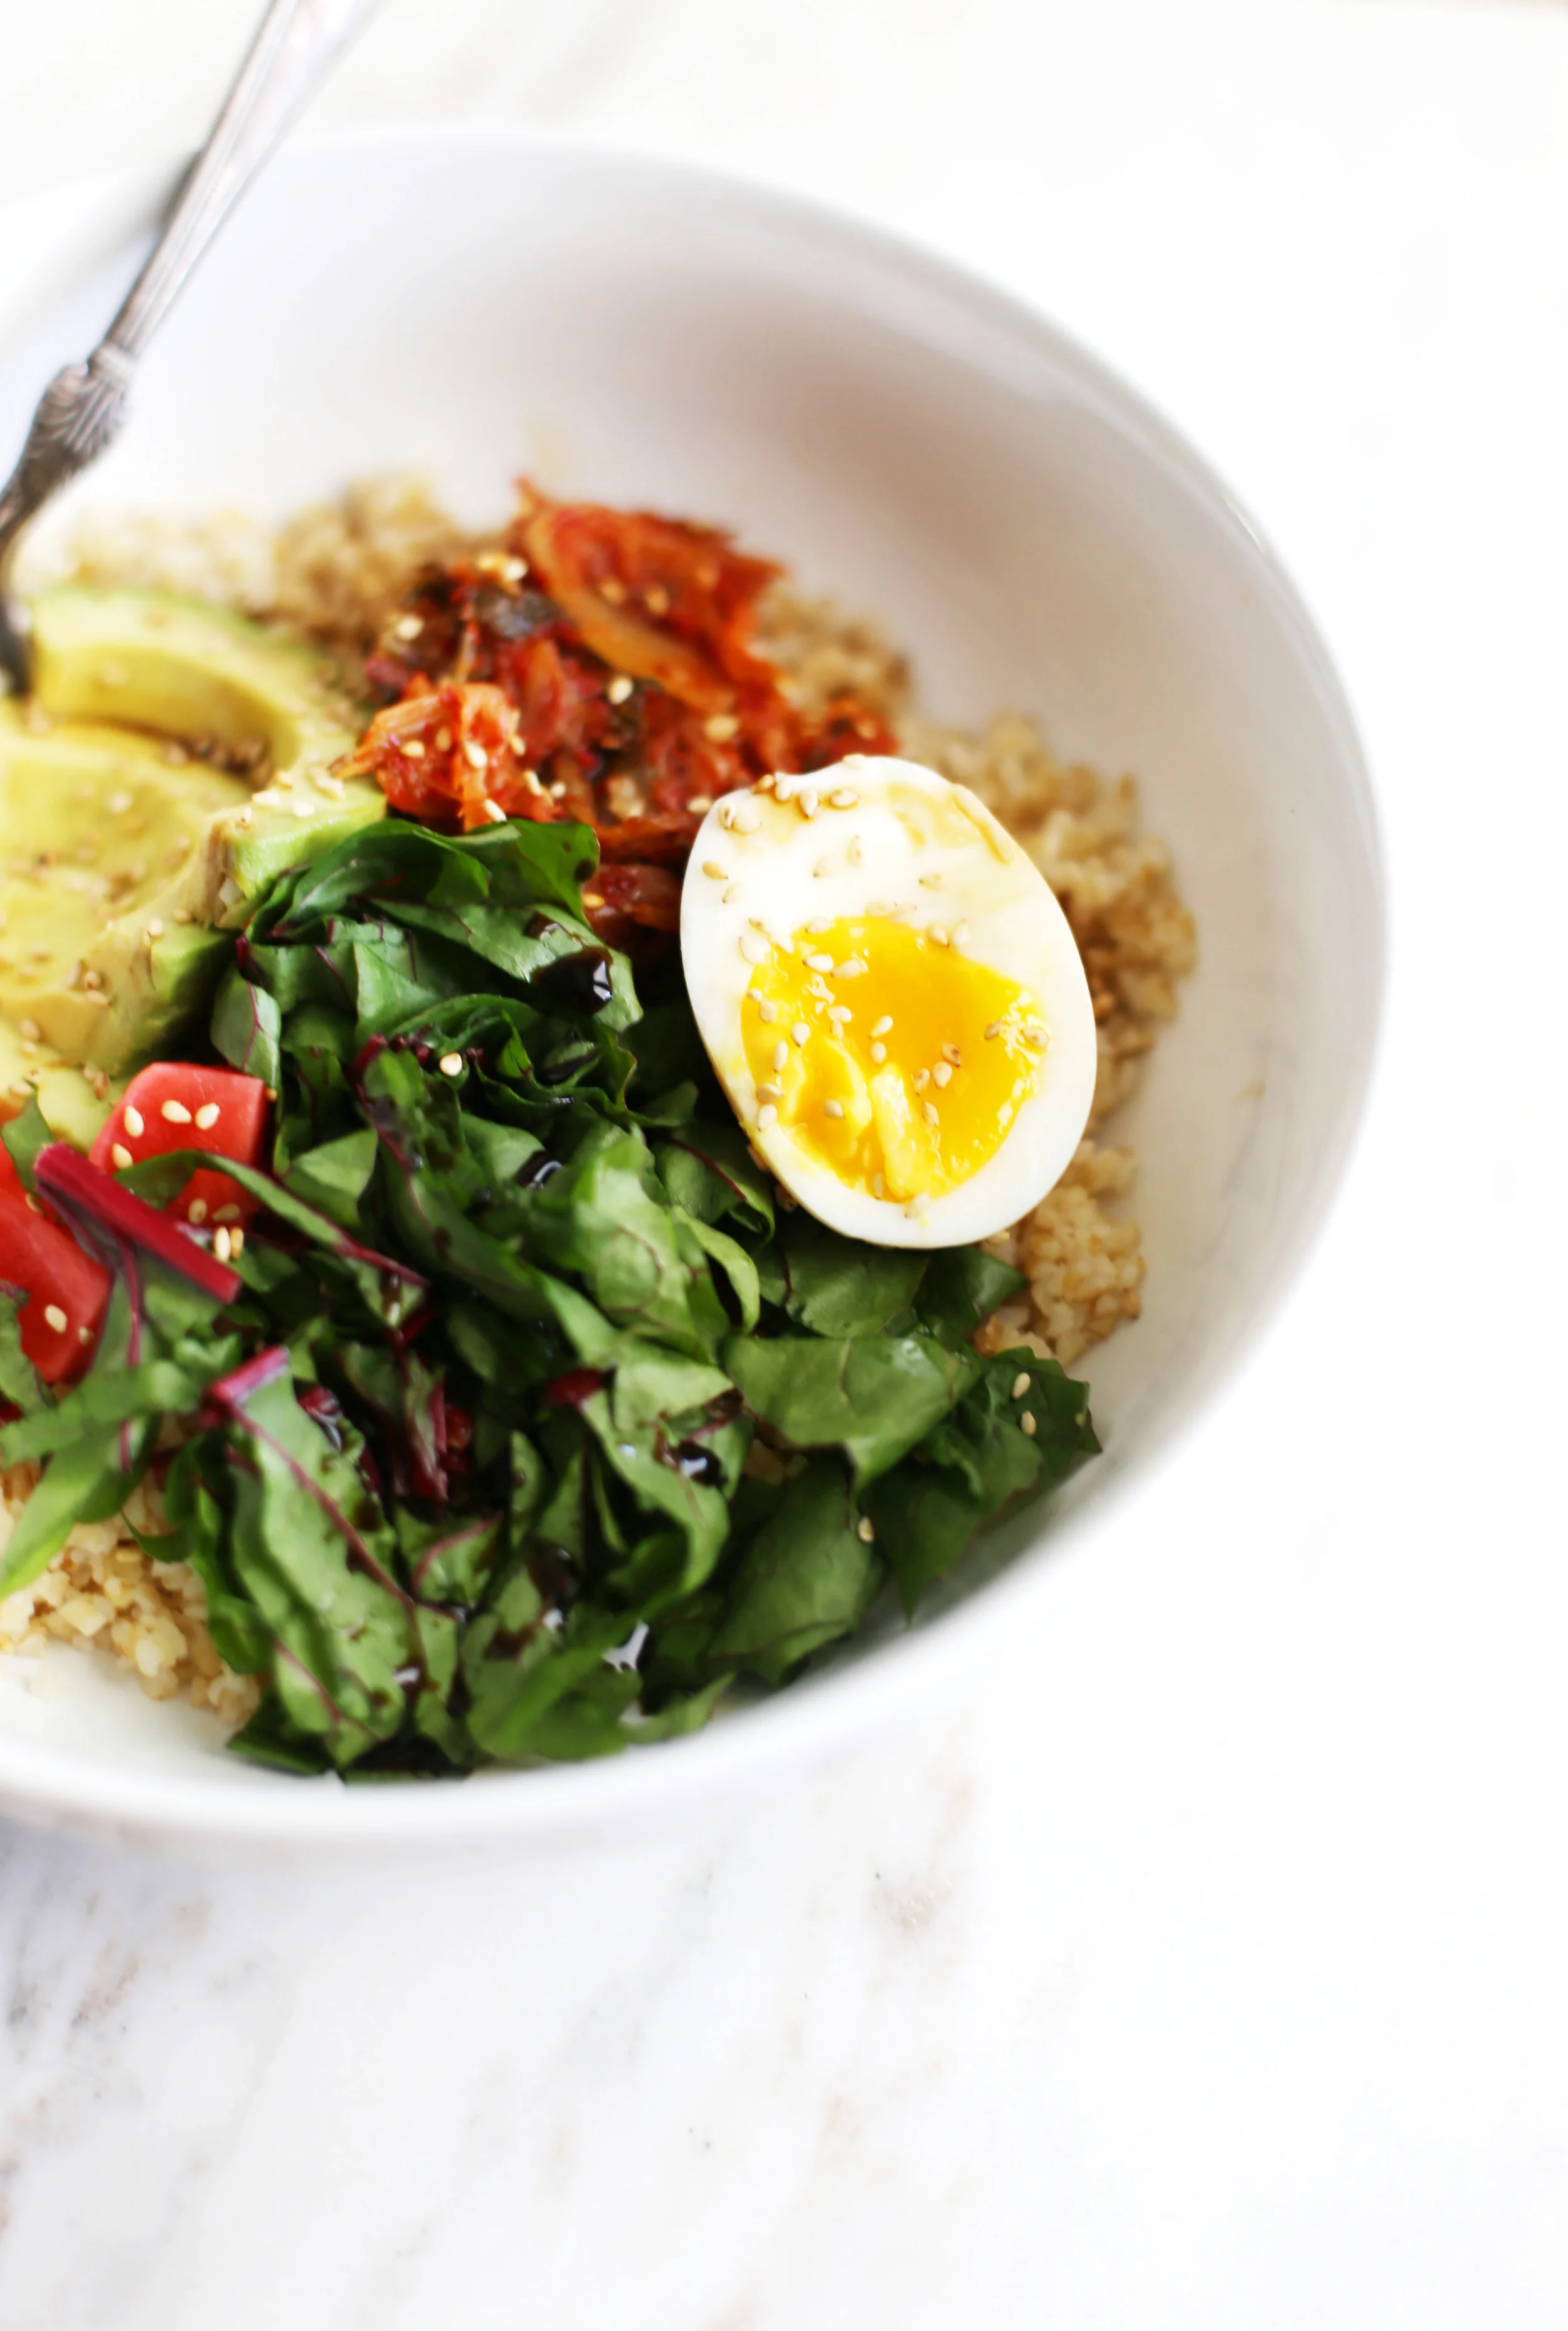
Kimchi, Grains + Greens Bowl
Getting healthy, delicious food in my body has been challenging since welcoming baby Braden into the world. Breakfast is ALWAYS coffee and sometimes a bowl of Cheerios or, on really good days, a fried egg on top of avocado toast. After a small snack mid-morning, making lunch for a picky 3-year-old, and managing double nap times, I find a few moments to sit down and realize that I haven't eaten lunch yet. Then the scrounging begins. And that typically means a downward spiral into finding anything that will give me a quick boost of energy.
I have my good days, but not enough of them.
I'm currently vacationing in Minnesota/spending tons of time with family/catching up with friends/introducing Braden to real food/having uninterrupted conversations with my husband/FINALLY get into a post-baby exercise routine/giving the blog some love/taking care of my body while my parents take care of me. All of these things have been good for my soul. It feels like I'm giving myself permission to take care of me. My hope is that by the time I return home, I will be able to develop better habits that will make me work smarter in all areas of my life.

Since food plays such a major role in how I feel, I'm trying to incorporate more simple, whole foods into my diet and removing lots of sugar. I've done this eating-less-sugar-thing before and been extremely happy with the results, both physically and emotionally. After 60 days, I felt amazing and made better choices all around for myself and my family. I'm definitely feeling like I need some help getting back on track, so I'm taking Jacqueline Smith's upcoming Go Sugar Free course for a second time.
One of the many things I LOVE about Jacqueline's course is that I have lifetime access to all of her resources. She shares information that she has selected thoughtfully and purposefully to help educate and empower her students. There are so many reasons why she is a woman I greatly admire. Her dedication and genuine passion for helping others Go Sugar Free is something I am in awe of on a daily basis.
Since becoming involved in GSF, I've become even more committed to providing recipes on Set the Table that are beautiful, delicious and healthy. Lucky for me, that means more creations like this Kimchi, Grains & Greens Bowl I'm sharing today! Whole grain bowls are so easy to throw together and I can always find new combinations that I love (and old standbys that are easy to whip up). This one is made with bulgur, a fast-cooking whole grain, is topped with locally made kale kimchi, homemade pickled radishes, a perfectly soft-boiled egg, and shredded chard from the garden.
Helloooooooo, lunch perfection!
Since this meal doesn't really require a "recipe", I'm providing a formula so you can come up with your own tasty creations based on what you have in your fridge. I promise you can't go wrong if you follow this guide and the countless combinations help keep things interesting.
Here are the main components that will help you build the perfect whole grain bowl:

Your grains could be bulgur, brown rice, quinoa, or farro. Your egg could be fried, poached or soft-boiled. You pickles could be cucumbers, radishes, or onions. Your fermented veggies could be sauerkraut or kimchi. There are so many delicious options, which is why this formula is so wonderful!
These bowls are always so gorgeous and taste as wonderful as they look, which makes it a million times easier to stick with a healthy menu on a daily basis. Some of the most beautiful recipes I've made, including this one, have been the result of all I've learned as a Go Sugar Free student and graduate. As with many things, learning never really stops with letting go of sugar, but that's part of what makes the process so meaningful, rewarding and worthwhile. I think this meal will be joining the list of new favorites that are sure to come out of this next course!
If you don't feel ready to make the commitment yet, feel free to follow me here for delicious recipes that will help you see how delicious going sugar free can be. In the meantime, get your hands on some kimchi and get this bowl of goodness in your belly ASAP!
*This post contains affiliate links.

Miso-Honey Glazed Chicken Wings
As my belly gets bigger, I am able to spend less time on my feet in the kitchen. Between my waddling from one counter to another and the belly bumping into things, I think it's safer for everyone if I just get out of the way. Still, I try to get in he kitchen here and there to make simple things like smoothies or oatmeal for breakfast. I have also been able to muster the strength to make these miso-honey glazed chicken wings a couple of times, much to my husband's delight. They are sticky, sweet, salty and oh-so-easy. And did I mention they are baked? Well, they are. And that makes them even better and healthier and more appealing.
Here's what happens: the wings get brown and crispy skin thanks to a 475 degree oven before being brushed with a flavor explosion of miso, honey and a touch of rice vinegar. They are baked for a few more minutes to make the glaze extra sticky before one last coating is brushed on before serving. Done and done.

I've mentioned in previous posts that I'm not much of a football fan unless there is delicious food involved. These wings are helpful for getting anyone and everyone through a game. They are also delicious as an appetizer while playing a fierce game of Chutes & Ladders with a 3 year old.

Now, if I could devise a plan to eat this entire plate of wings and suffer no pregnancy-heartburn-side-dish-of-tums, I'd really be winning at life.
NOTES:
As you can see, I did not break these wings down. You don’t have to! If you do want to, the recipe still works as written, so you do you! If you do break them down, save the wing tips in a freezer bag to use in homemade stock if you feel so inclined.
You can totally grill these. Just grill instead of putting them in the oven!
If you are struggling to get your miso paste to whisk into the honey and rice vinegar smoothly, pop the miso and the honey in the microwave for 10-15 seconds to soften it all up a bit. DO NOT add water- the glaze won’t be as sticky!
Miso-Honey Glazed Chicken Wings
Makes 6-8 servings
3 pounds chicken wings
2 teaspoons kosher salt
2 tablespoons miso paste (anything you have is fine- I used shiro)
3 tablespoons honey
1 1/2 teaspoons rice vinegar
Preheat the oven to 475˚F. Pat the chicken wings dry with paper towels and arrange them on two large, parchment-lined baking sheets. Brush them with some canola or avocado oil and season with salt.
Bake for 15 minutes or until the skin is golden brown and crisp. Meanwhile, whisk the miso paste, honey and rice vinegar together in a bowl.
Remove the wings from the oven, toss them in a large bowl with the glaze. Turn on the broiler so it can heat while you place the wings back on the baking sheets. This time, broil them for 3-5 minutes, turning occasionally. It is ok if the skin gets dark brown in places- that’s where you’ll get the most flavor.
Serve as is immediately, or sprinkle with some mint leaves or sesame seeds to a little color and texture.