Quantcast
  • Contact
  • Portfolio
  • Subscribe
  • Recipes
Menu

Set the Table Photography

photography
  • Contact
  • Portfolio
  • Subscribe
  • Recipes
×

Kale + Parsley Pesto

Rachael White March 31, 2014
20140331-113648.jpg

Creating a successful road trip with a toddler is a little bit like recipe testing. You have to find the right combination of ingredients, then test each amount. Eventually, you realize that you only need a pinch of this, a handful of that, and to mix it all roughly with your hands. Rather than an exact recipe, it's similar to making dough. You have to know it and understand it by touch, feel, and sometimes sound. The first day of our road trip last summer, if it were to be compared to dough, didn't rise. Instead, we began the day with our dog bolting out the door of our mini van (I still can't believe we drive one of those- apparently she wanted nothing to do with it), and getting just barely hit by a car. Yep. A car actually hit her. Fortunately, it was early enough in the morning that there was little traffic and the cars that were on the road had plenty of time to slow down so she didn't get hurt. I'm just gonna throw this out there: worst start to a road trip ever.

20140331-113709.jpg

The rest of the day was filled with lots of crying from our then 1 1/2 year old in the back seat. He didn't sleep one wink from 6am until 9pm. It was a long day and we were all pretty ragged by the end of it. Problem #1: we wanted to be the parents who didn't resort to TV shows to survive a road trip. I never had that growing up, why should Riley? But then I realized most of my road-tripping happened when I was old enough to entertain myself, chose to sleep in the car, and read books. This time, we allowed a little TV near the end of the day- Sesame Street, Land Before Time and Daniel Tiger - in the hopes that it would keep us all a bit more sane. That, combined with introducing new toys every couple of hours and pulling off of the interstate to get out and stretch our legs for a few minutes, gave us a 1,000% improved day of driving.

Ya gotta do what ya gotta do. Right?

When it comes right down to it, anything that gets us from Colorado to Iowa en route to Minnesota for moments like this is completely worth it...

20140331-113623.jpg

So, can we move on to this Kale & Parsley Pesto? OK. Let's do it.

I've been making kale pesto for a while now. I love it and so does the rest of my family, which makes me so happy. (Just one more way to make grilled cheese sandwiches and pasta a bit healthier- yes!) I've been testing recipes for kale pesto and this is my absolute favorite. I like to use pistachios, a healthy amount of lemon juice, and of course garlic, olive oil, salt and pepper. I don't add parmesan cheese, as many traditional pesto recipes do, but you certainly could if you wanted to.


The vibrant green color (that withstands time and heat without turning brown) and bright flavor are enough to keep you coming back for more. Every little bite helps when you're trying to work more greens into your diet and this pesto makes it infinitely easier to do just that.

Kale & Parsley Pesto

Ingredients

  • 4 cups chopped kale leaves, washed & ribs removed
  • 1 cup flat leaf parsley (a few tender stems are ok to include but remove any larger, tougher stems)
  • 1/2 cup shelled, unsalted pistachios
  • 3 cloves garlic
  • 1/4 cup lemon juice (from about 1 lemon)
  • 1 teaspoon course salt
  • 1/2 cup olive oil
  • 1/4 cup water
  • salt & black pepper to taste

Instructions

  1. Combine the pistachios, garlic, lemon juice, and 1 teaspoon salt in a food processor. Pulse until the mixture is well mixed and looks a little like wet sand.
  2. Add the kale and parsley to the processor bowl and pulse until just finely chopped, about ten 1 second pulses.
  3. With the processor running, slowly stream the olive oil into the processor, followed by the water.
  4. Taste the pesto and season with salt and pepper, pulsing a couple of times to combine.
  5. Store in an airtight container for 1-2 weeks.

Notes

If you want a thinner/thicker pesto, add a little more water (not too much...just a tablespoon at a time but no more than 2 or 3 total) and/or extra olive oil.

In No Added Sugar, Sides + Condiments, Vegetarian
2 Comments
Blueberry-Thyme-Fizz-Set-the-Table.jpg

Cocktail Friday: Blueberry Thyme Gin Fizz

Rachael White March 27, 2014

We had a truly wonderful spring day on Wednesday. The sun was full of enough warmth to take away the need for a sweater or jacket. The moment I felt the heat hit my skin I felt instantly rejuvenated. Riley and I went to the park where he discovered the joy of watching bugs crawl on the sidewalk. As I watched him discover new things that only come with the changing seasons I realized how much he has grown. Last year at this time I was watching him clumsily walk around as he discovered that moving one step in front of the other brought him from here to there and back again. Those sweet baby legs are now little boy legs. He has grown faster than I'm willing to acknowledge most of the time.

Luckily, each new stage brings even more sweetness than my heart can hold (even in the midst of the toddler mood swings that come with being 2 years old).

Blueberry-Thyme-Fizz-Set-the-Table1.jpg

So, I'm saying goodbye to one season and hello to a new one by celebrating the things that I love most. Today, it's all about fresh thyme and bright blueberries. Muddled together they create the perfect beginning to a spring cocktail. Gin, vermouth and bitters are given a little life with a splash of club soda. Sweetness comes from my date simple syrup (which makes this a no-sugar-added cocktail).

And just like that it's time to say cheers to the weekend. And spring. And change.

Life become more beautiful with change, don't you think?

Blueberry Thyme Gin Fizz

Ingredients

  • 15 fresh or frozen blueberries
  • 3 large thyme sprigs
  • 1 oz gin
  • 1 oz vermouth
  • 2 dashes Angostura bitters
  • 1/2 oz date simple syrup
  • club soda

Instructions

  1. Combine the blueberries, thyme sprigs, gin, bitters and simple syrup in the bottom of a cocktail shaker. Fill the shaker with ice and shake vigorously until thoroughly chilled.
  2. Strain into a cocktail glass filled with ice.
  3. Top with club soda and garnish with a thyme spring and a couple blueberries.
In No Added Sugar, Cocktails and Appetizers Tags blueberries, cocktail, gin, no sugar added, spring cocktail, sugar free, Vermouth
4 Comments
Lemony-Quinoa-Salad-Set-the-Table.jpg

Quinoa Salad with Peas, Bacon & Golden Raisins

Rachael White March 26, 2014

Today I found some green, pointy hyacinth leaves coming up out of the soil in our backyard. They were in a place I had forgotten about completely. I carefully cleared away some of the debris that was covering the tender new leaves so I could more clearly see them, imagining what they would look like in each stage of growth, all the while relishing the feeling of dirt under my finger nails. Spring is such a lovely time of year, even when it takes its sweet time getting here.

Quinoa-Salad-with-Lemon-Herbs-Bacon-Set-the-Table.jpg

The weather may not be all that spring-like just yet, aside form a day or two here and there, but I'm starting to incorporate more seasonally appropriate food into our rotation. This quinoa salad, studded with bright green sweet peas, salty bacon, and sweet golden raisins is perfection. It was kind of an everything-but-the-kitchen-sink kind of concoction, but it turned out so well. I made a flavorful and bright dressing with lemon zest, lemon juice, olive oil, and lots of fresh herbs to bring even more freshness. It's been a delicious lunch this week and I know I'll be making various versions of it in the future.

Spring-Quinoa-Salad-Set-the-Table.jpg

I've been trying to incorporate more grains into my diet that aren't in the form of macaroni and cheese (the little man's favorite) or rice bowls (a family favorite). This is a step in the right direction, yes?

Another plus is that this is added sugar free! Perfect for anyone who has gone through (or plans to sign up for) this Go Sugar Free Course.

Just a reminder- you have 5 more days to register as an Early Bird for GSF. Click here if you're interested!

Spring-Quinoa-with-Bacon-Peas-Golden-Raisins-Set-the-Table.jpg

So, I'm going to continue watching my hyacinth (and tulips) grow and eventually bloom as a reminder that all good things come to those who wait. Spring included.

Want something you don't have to wait for? This recipe.

Quinoa Salad with Peas, Bacon & Golden Raisins

Ingredients

  • 1 cup quinoa
  • 1 cup fresh or frozen green peas
  • 2 lemons, zest and juice reserved
  • 1/4 cup olive oil
  • 2 tablespoons fresh flat leaf parsley, chopped
  • 2 tablespoons fresh basil, chopped
  • 1 tablespoon fresh dill, chopped
  • 1 tablespoon fresh chives, chopped
  • 4 slices thick cut bacon, cooked and crumbled
  • 1/3 cup golden raisins
  • 1/3 cup chopped pecans

Instructions

  1. Put 2 cups of water in a saucepan and bring to a boil.
  2. Add the quinoa and stir.
  3. Cover the pan, reduce heat so the water is just simmering, and cook until the quinoa is tender, about 15 minutes.
  4. Add the peas to the pan and stir with the quinoa. Cover and cook another 5 minutes.
  5. Transfer the quinoa to a large bowl.
  6. In a small bowl, combine the lemon zest, lemon juice, olive oil, parsley, basil, dill, and chives. Season with salt and pepper. Stir to combine.
  7. Pour the dressing over the quinoa. Add the bacon, raisins and chopped pecans and toss to coat.
  8. Serve warm, at room temp, or cold from the fridge.
In Lunch & Dinner, No Added Sugar Tags added sugar free, Bacon, healthy lunch recipe, no added sugar, Quinoa
Comment
Date-Simple-Syrup-Set-the-Table.jpg

Date Simple Syrup + Go Sugar Free Update

Rachael White March 25, 2014

Before I get into a summary of my experience going sugar free, let's chat about this date simple syrup.

Going sugar free is tricky when you blog about cocktails each and every week. Simple syrup, one of the staple ingredients when it comes to cocktails, is difficult to avoid entirely. Fortunately, I found a way to add sweetness without even the smallest pinch of refined sugar. This simple syrup is simply (no pun intended) dates that have been simmered in water until it has been infused with sweetness. The consistency is not as thick as a traditional simple syrup, but the sweetness is there. And that's the most important part, right? It does have a slightly nutty flavor, similar to that of brown sugar, but it is subtle enough that it can be used in most cocktail recipes.

Dates have been one of the most versatile and delicious additions to my list of staple ingredients to have in the kitchen. They make a perfect, sweet snack paired with a little bit of blue cheese and act as a healthy sweetener for anything from this syrup to this peanut butter bulgur wheat (pictured below).

Peanut-Butter-and-Date-Bulgur-Wheat-copy-Set-the-Table.jpeg
Date-Syrup-for-Cocktails-Set-the-Table.jpg

OK, now that we have a naturally sweet, no sugar added simple syrup, let's talk about where I got the inspiration to  create a recipe like this...

As a food blogger, I like to feel like I have control over everything I put in my body, but the reality is that sometimes...I don't. A lot of my time outside of food blogging and recipe development is spent focusing on feeding my 2 year old something that involves more than crackers, popcorn, toast and milk. That takes a surprising amount of energy now that he's learned to reject anything he doesn't recognize.  When all is said and done, I don't always have much motivation to focus on what gets put on my own plate.

When I started the Go Sugar Free course I was scared. It was scary because I didn't want to give anything up. Well, I did want to but the thought of it really seriously scared me. What would happen if I went to a birthday party and had to say no to the chocolate cake with rich butter cream frosting? What would I do without my sweet cocktails and occasional bite of ice cream? I was happy to learn that, even though my sugar habit was not extreme, I was able to go without it and still survive.

Sometimes I have assignments to develop recipes. Developing recipes requires tasting. Sometimes that meant eating sugar even during the course, which is not a typical situation for most students. I think it is a testament to Jacqueline and her course that I was able to get through those moments without completely falling off the wagon.

If you are reading this and thinking to yourself, "I don't eat that much sugar." Here's the thing...sugar is not the only thing you learn about through Go Sugar Free. Jacqueline has done all of the grunt work to collect information about the best grains and how they can impact reliance on sugar. There are other foods with connections to sugar that I never considered before GSF. And most importantly, I began to realize how important routines are when it comes to health. Waking up in the morning and knowing what I need to do to start my day out the right way has been the most significant and liberating change I've taken with me since completing GSF.

To explain what I mean, here is an example of my morning routine:

  • 7:00am wake up
  • 7:05am put coffee on
  • 7:05am do yoga stretches while coffee brews
  • 7:20am drink an 8 oz. glass of Kefir
  • 7:25am drink coffee & read
  • 7:30-7:45am toddler wakes up and the day barrels on

Having those morning routines helps me find my center and prepare my mind for making healthy choices all day long. That, along with losing 2 inches from my waist, made the GSF course more than worth it.

The most common question I get from the people I talk to about this course is if they have to give up sugar permanently forever and ever. My answer, for myself, is no. I feel that I have control over how much sugar is in my diet and I can, thanks to Jacqueline's course, recognize the signs (complexion, exhaustion, etc) my body is using to tell me I need to tone it down. But each person is different. You make decisions that work best for you and Jacqueline gives 100% of her support no matter what.

If you're curious or have questions about the course, head over to the FAQ's on Jacqueline's website by clicking here.

I am blessed to call Jacqueline a friend and I know how much she puts into this course and that her past experiences and struggles make her an expert in every sense of the word. In addition to being an expert, her passion to help individuals understand the impact sugar has on our overall health and well-being is incredible.

If you feel like this is the right time for you to get control of your diet, feel more energized, and make healthier choices, you can register for GSF as an early bird which includes:

  • A copy of Jacqueline's ebook 5 Easy Ways to Look Radiant Tomorrow Morning.
  • The 10 full-length free online workouts Jacqueline uses to keep in shape when she doesn’t have time to leave the house to exercise.

Click here to register for the next course, which runs May 7-July 12, 2014.

*This post contains affiliate links. The opinions stated are 100% my own.

Date Simple Syrup

Ingredients

  • 5 oz pitted Medjool dates, halved
  • 1 1/2 cups water

Instructions

  1. Combine the dates and water in a saucepan over medium heat.
  2. Bring to a simmer and cook for 10 minutes or until the liquid has reduced by about 1/3.
  3. Pour through a fine mesh strainer and into a heatproof jar.
  4. Cool completely and store in the refrigerator for up to 2 weeks.


In No Added Sugar, Cocktails and Appetizers Tags cocktails, dates, no sugar added, no sugar added cocktails, simple syrup, sugar free
7 Comments
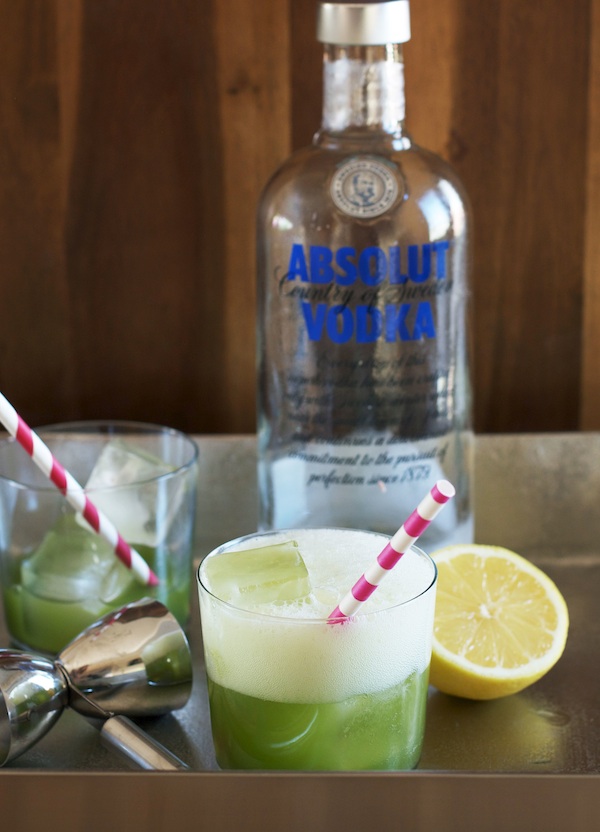
Zucchini-Sea-Salt-Vodka-Soda-Set-the-Table1.jpg

Cocktail Friday: Zucchini + Sea Salt Vodka Soda

Rachael White March 21, 2014

I am ready for Spring now. It was warm and sunny yesterday and I thought I was going to burst with happiness despite my lack of sleep thanks to a late night ER trip with our little guy who has croup. (All is well now - just waiting it out at this point.) Don't get me wrong. I still love winter and won't complain when we get our inch of slushy stuff tomorrow, but there comes a time in the year when I, along with everyone else, am ready for things to grow and be green. Or as green as things can be here in Colorado.

Zucchini-Juice-Vodka-Soda-Set-the-Table.jpg

So, although St. Patrick's Day has come and gone, I have another green cocktail to share with you in honor of Spring. Admittedly, this is not a convenient cocktail to just whip up. I made some zucchini-farro cakes the other night and the recipe required me to shred 2 1/2 pounds of zucchini, sprinkle with salt, then squeeze out the extra juice. I saved the juice because it was so vibrant and beautiful it just broke my heart a little to think of discarding it without a second thought.

I'm so happy I saved it because this is a great trick that will come in very handy this summer. Added to a vodka soda with some lemon juice and a sprinkle of flaky sea salt, this juice makes a lovely, fresh twist on a sometimes boring cocktail. My sister would be offended that I called a vodka soda boring. It's her favorite. I just think everything needs a little sprucing up sometimes.

So, if you find yourself with some leftover zucchini juice (said no one ever), go ahead and give this fun drink a try! You could do something similar with carrot juice, cucumber juice, or even tomato water. What a great way to incorporate veggies into cocktails, right?

Zucchini-Sea-Salt-Vodka-Soda-Set-the-Table.jpg

OK- that's my contribution to the list of unrealistic-but-super-awesome-cocktails. But seriously, once zucchini season kicks it into high gear I bet you'll find yourself with some leftover juice at least once or twice!

Zucchini + Sea Salt Vodka Soda

Ingredients

  • 2 oz zucchini juice (recipe follows)
  • 1 1/2 oz vodka
  • 3/4 oz lemon juice
  • flaky sea salt
  • club soda
  • 2 lbs zucchini, shredded
  • 1 teaspoon salt

Instructions

  1. Combine the zucchini juice, vodka, and lemon juice in the bottom of a cocktail glass. Stir to combine.
  2. Fill the glass with ice and top with club soda.
  3. Sprinkle with a little sea salt and serve immediately.
  4. Place the shredded zucchini in a large bowl and sprinkle with the 1 teaspoon salt. Toss to combine.
  5. Let sit for 10 minutes.
  6. Collect the shredded zucchini in a large, clean dish towel. Squeeze the shredded zucchini over a small bowl until about 1/2-2/3 cup juice has been removed.
  7. Save the shredded zucchini for making zucchini bread, zucchini fritters, or to toss with stir-fries.
  8. Keep the juice in a jar in the refrigerator for up to 1 week.
In Cocktails and Appetizers Tags cocktails, juice, lemon, spring recipes, vodka, vodka soda recipe, zucchini
3 Comments
Silky-Spiced-Carrot-Soup-Set-the-Table.jpg

Roasted Carrot Soup with Tillamook Greek Yogurt

Rachael White March 18, 2014

I'm learning that this time of year is a little crazy here in Colorado. One day it is a bright, sunny 70 degrees and the next brings piles of wet, heavy snow. I kind of love it. I'm a winter girl who loves being cozy in the house with something delicious cooking on the stove or in the oven. But I also get to the point where vitamin D is a necessity. And it must be in the form of beautiful, hot rays of real live sunshine.

Creamy-Carrot-Soup-with-Tillamook-Farmstyle-Greek-Yogurt-Set-the-Table.jpg

Spring in Colorado also means that crazy hot weather is not far behind. Last year it was far too warm to use the oven in our house. (We have a tiny swamp cooler that barely keeps half of the house at a comfortable temperature.) So, I'm trying to get all the oven time that I can under my belt before it's too much to bear. This means baking buttermilk drop biscuits, Irish soda bread, and roasting lots of vegetables. This soup was the result of a big sheet pan of carrots, onions, and garlic that I drizzled with honey and roasted for about an hour. Everything was perfectly soft and golden brown with a honey glaze that gave a subtle sweetness to offset the rich roasted flavor.

I simply took the roasted vegetables and tossed them in a pot with some chicken stock (just like I do for my Butternut Squash & Coconut Soup). After it all simmers together for about 10 minutes, I take my immersion blender and transform it into a creamy, luxurious soup that is perfect with a dollop of creamy Greek yogurt and a few fresh thyme leaves. It's just so. darn. easy.

Silky-Carrot-Soup-with-Tillamook-Farmstyle-Greek-Yogurt-Set-the-Table.jpg

Can we talk about Greek yogurt for just a moment? I love it. I eat it pretty much every day. So when I got the chance to get a first taste of Tillamook's new Farmstyle Greek Yogurt I was thrilled. I used the 0% Farmstyle Greek for topping this soup and it is creamy and rich and has no hint of being fat free. Check out my Instagram feed for more photos of the flavors I'm trying. They've all been such a treat! My favorite so far is...wait for it...CINNAMON HAZELNUT. Perfect.

Tillamook is a well-known brand. I probably don't have to tell you how delicious their cheese is...right? You've had it, right? RIGHT? If you haven't you're going to need to fix that. STAT. Since they are new to the Greek yogurt scene, here are some delicious details...

About Tillamook Farmstyle Greek Yogurt

·         Tillamook Farmstyle Greek Yogurt is made with no artificial flavors, no artificial colors, no artificial sweeteners, no high fructose corn syrup and with the highest quality milk from cows not treated with artificial growth hormones.

·         Tillamook Farmstyle Greek is a thick, creamy and less tart yogurt made with buttermilk cultures, while providing 14g of protein per serving.

·         To make their better tasting Greek distinctively ‘Farmstyle’, Tillamook slow churns farm fresh milk with seven active yogurt and buttermilk cultures.

·         Tillamook Farmstyle Greek Yogurt is made with fruits and nuts locally sourced from the Pacific Northwest

·         To find out where to buy Tillamook Farmstyle Greek Yogurt readers can use the handy ‘Where to Buy’ tool - http://www.tillamook.com/where-to-buy.html?product=yogurt&variety=all&size=all&zip=

Roasted Carrot Soup with Tillamook Greek Yogurt

Serves 6-8

Ingredients

  • 2 lbs carrots, peeled and cut into 1/2 inch rounds
  • 1 large yellow onion, cut into wedges
  • 1 head of garlic, cut in half crosswise
  • 1 teaspoon ground cumin
  • 1 teaspoon ground cinnamon
  • 1/8 teaspoon ground nutmeg
  • 2 tablespoons honey
  • 2 tablespoons olive oil
  • salt and pepper to taste
  • 6 cups low sodium chicken stock
  • 1 tablespoon fresh lemon juice
  • 1/2 cup plain Greek yogurt
  • 1 tablespoon fresh thyme leaves

Instructions

  1. Preheat the oven to 375 degrees Farenheit.
  2. Line a large rimmed baking sheet with aluminum foil.
  3. In a large bowl, toss the vegetables with the spices, honey, olive oil and a bit of salt and black pepper.
  4. Spread the vegetables onto the baking sheet in a single layer. If you need to, use two baking sheets so the veggies aren't crowded.
  5. Roast the veggies for 45 minutes-1 hour or until nicely softened and golden brown. Stir every 20 minutes to ensure even cooking and to avoid burning the honey.
  6. Take the garlic and squeeze the cloves out into a soup pot. (To make sure the garlic skin doesn't make it into the pot, squeeze the cloves into a separate bowl first, then transfer to the pot.)
  7. Add the rest of the vegetables and the stock to the pot and place over medium heat. Bring to a simmer and cook for 10 minutes.
  8. Use an immersion blender and blend until the soup is nice a smooth. Alternately, you can work in batches, pureeing the soup in a blender. Be very careful as hot liquids may explode out the top of the blender.
  9. Add the lemon juice. Taste and adjust seasonings as needed.
  10. Ladle the soup into serving bowls and top with a dollop of Greek yogurt and some thyme leaves.


In Lunch & Dinner, No Added Sugar, Vegetarian Tags Carrots, healthy, Soup, Spring, yogurt
4 Comments
← NewerOlder →

Search Posts


Featured Posts

Summary Block
This is example content. Double-click here and select a page to feature its content. Learn more
Featured
Nov 10, 2025
Cursus Amet
Nov 10, 2025
Nov 10, 2025
Nov 3, 2025
Pellentesque Risus Ridiculus
Nov 3, 2025
Nov 3, 2025
Oct 27, 2025
Porta
Oct 27, 2025
Oct 27, 2025
Oct 20, 2025
Etiam Ultricies
Oct 20, 2025
Oct 20, 2025
Oct 13, 2025
Vulputate Commodo Ligula
Oct 13, 2025
Oct 13, 2025
Oct 6, 2025
Elit Condimentum
Oct 6, 2025
Oct 6, 2025
Sep 29, 2025
Aenean eu leo Quam
Sep 29, 2025
Sep 29, 2025
Sep 22, 2025
Cursus Amet
Sep 22, 2025
Sep 22, 2025
Sep 15, 2025
Pellentesque Risus Ridiculus
Sep 15, 2025
Sep 15, 2025
Sep 8, 2025
Porta
Sep 8, 2025
Sep 8, 2025

Powered by Squarespace