

Easy Instant Pot Baked Beans using dry beans for all your summer side dish needs!
Read More
Date Night Grilled Steak Salad
I’ve tried sitting down to write this post several times. Inevitably, life gets in the way. The 4 year old needs me to put on his shoes (something he’s done with zero help approximately 147 times) or the 7 year old has a story to tell me (I realize this may not be the case forever so I try to drop everything and listen when I can). Other times, I get a phone call or someone comes to the door or the dogs are getting antsy and need some attention. Finding the quiet space in my day that I need to focus on writing is difficult right now. Sure, I could just sit down and write something for the sake of getting words on a page, but that’s not what makes me feel good about posting here for you all. I want my words to be thoughtful and meaningful and honest. That is something that only comes with the proper conditions.


Right now, I’m sitting at my kitchen counter. It is dreary outside as we await a late spring snow storm, which is allowing the kids to sleep in a little longer than usual. I have my coffee. The dogs are snuggled up on their beds and all is quiet. So here I am. Soaking up one of the last mornings I’ll have like this in our home in Colorado. In just over 6 weeks, I’ll be doing this in my new kitchen in Minnesota. I’ve been quiet about this here because I hate saying goodbye. It feels like everything has to change and change makes my heart hurt. I’m so excited to be going back to my home state. I’ve been waiting for this for nearly a decade. But transitions are hard for me. Are they hard for you, too? How do you cope?

One of the ways I’ve been dealing with our impending move is by making time with my husband a top priority. Even more than usual. We’ve started going climbing together, and sometimes following that up with a happy hour date involving margaritas, chips and salsa. Other days, we stay home and cook together. Just a week or so ago, we made this delicious grilled steak salad. We went to the store together and picked out the ingredients that looked best. Then, we came home and brought it all together into something simple, beautiful, and full of flavor. Nothing complicated. But the perfect meal to eat on our back patio while playing a game of scrabble and drinking wine.
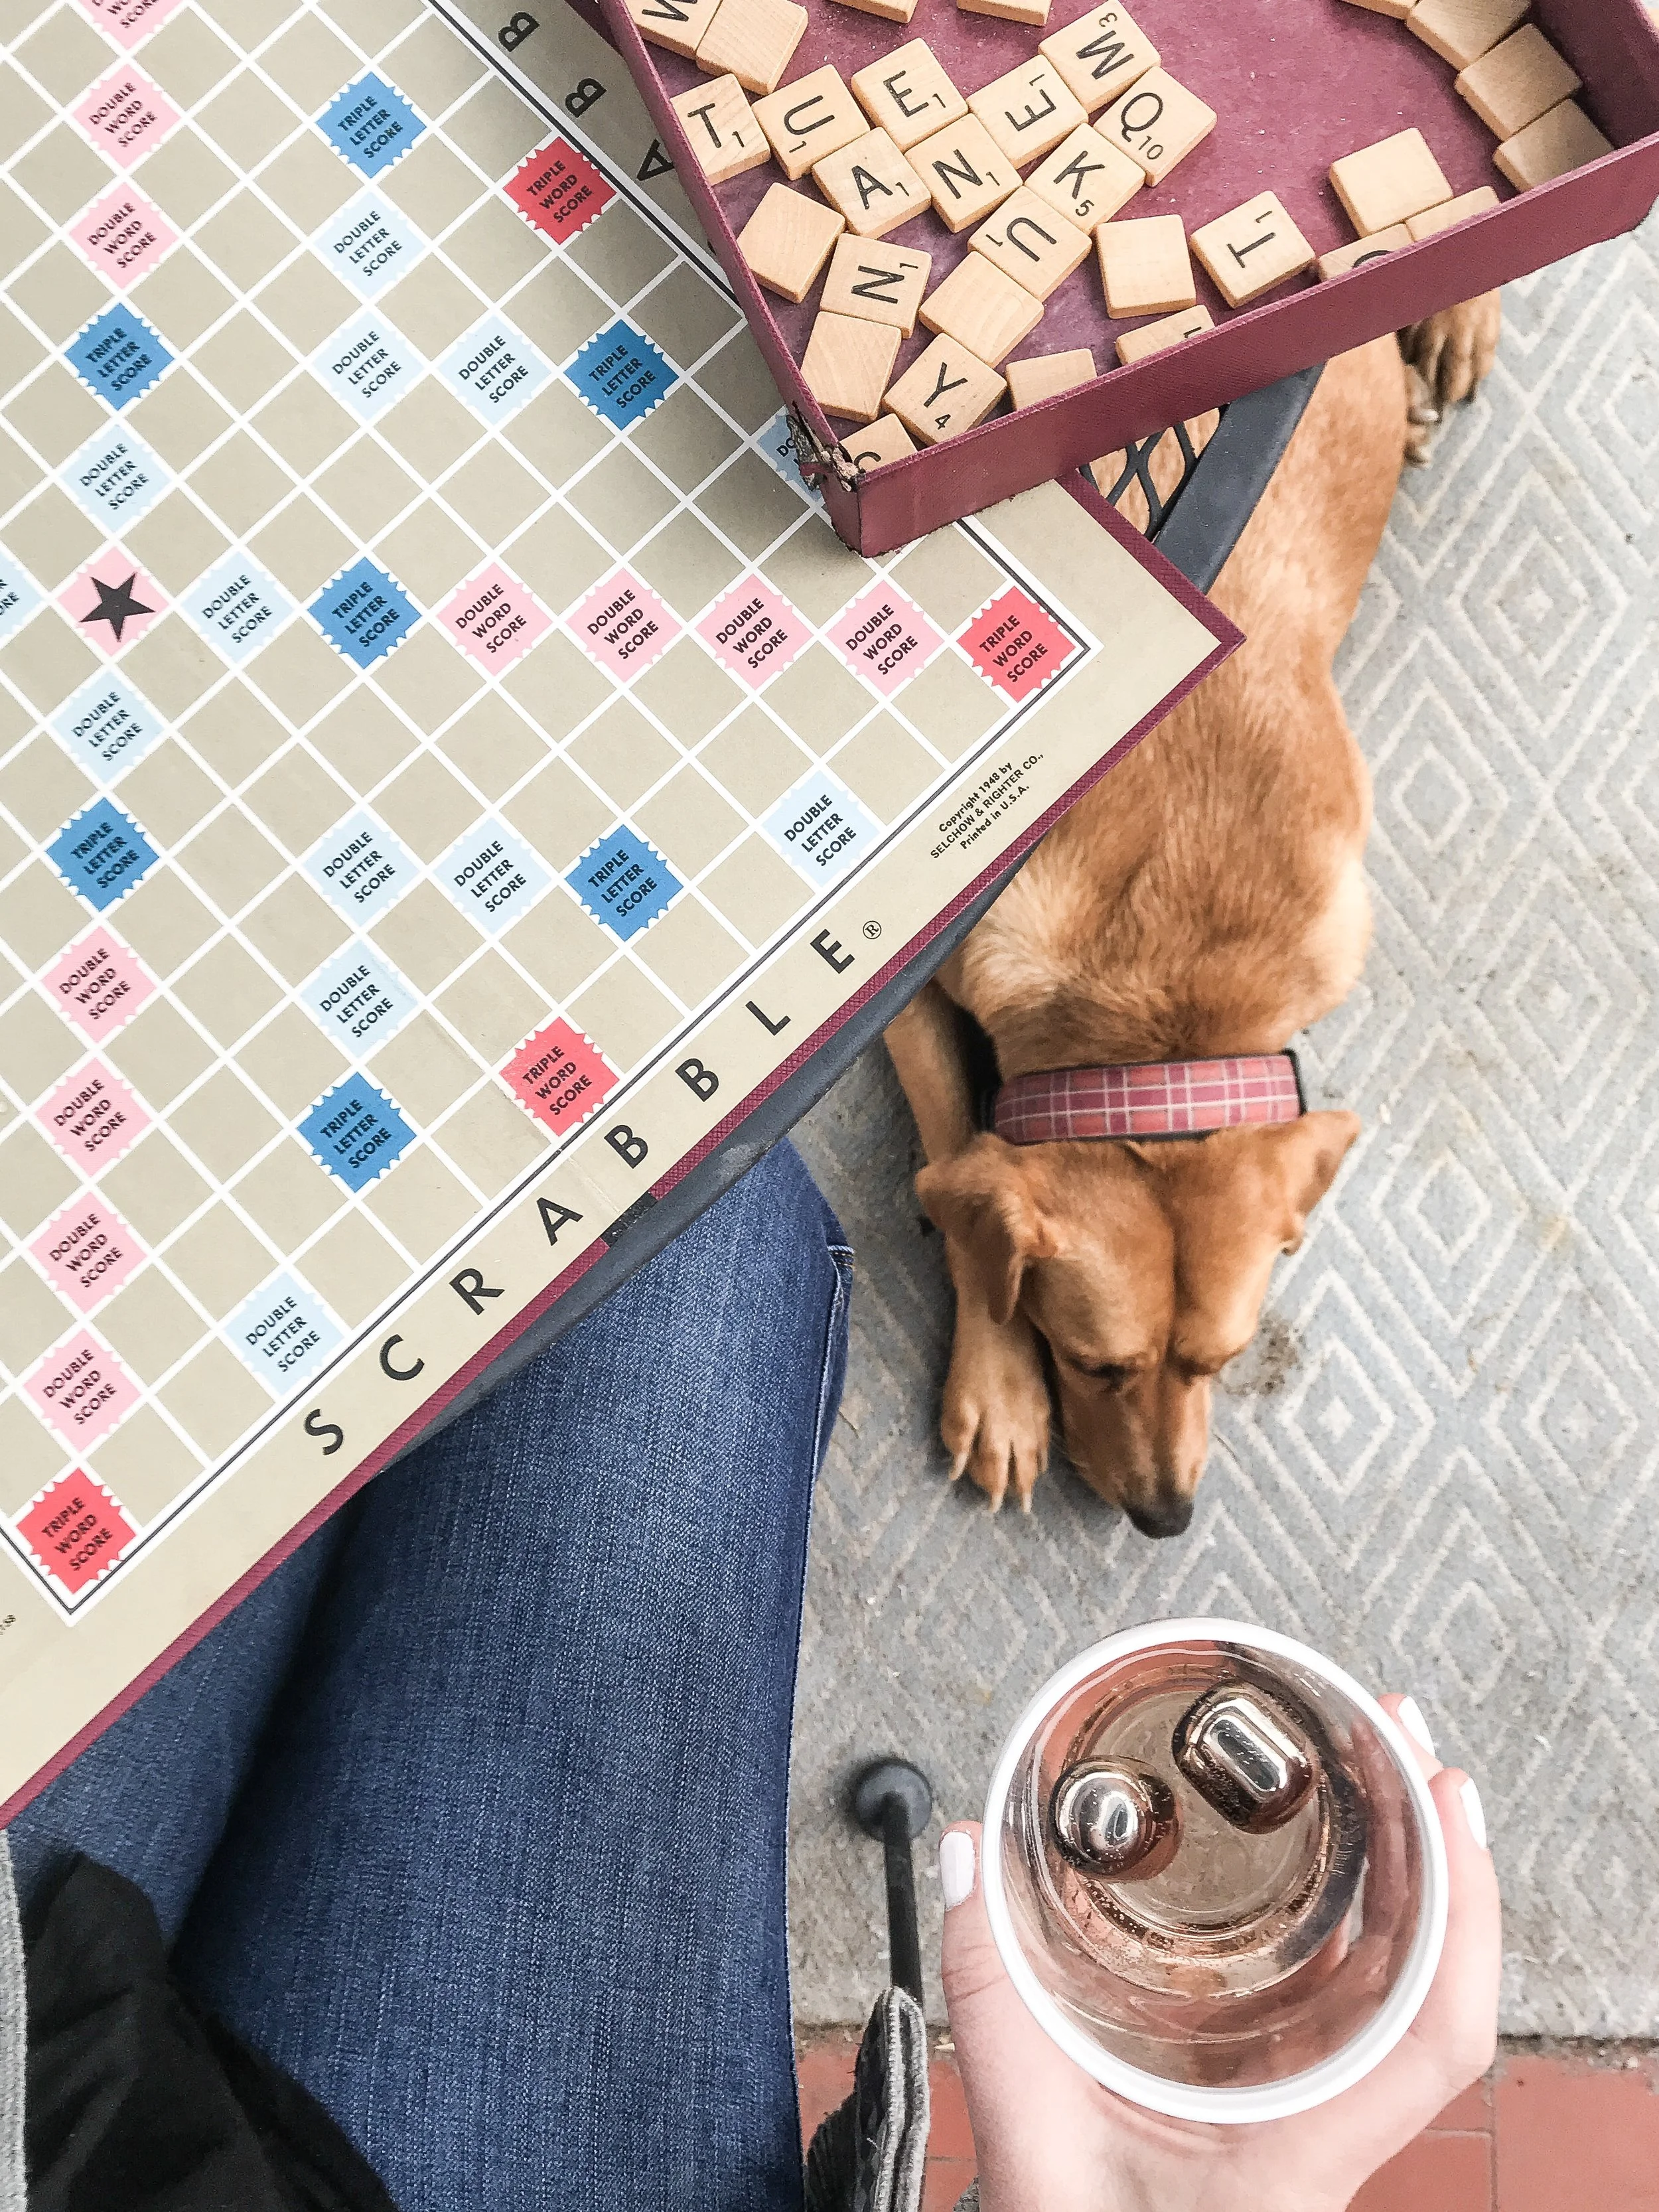
Nurturing our relationship is the main thing that makes me feel grounded in life. Brad and I have been together for nearly 15 years, married for nearly 12. And still, after all that time, my soul needs time with him to feel settled and safe. Both our date nights at home and our dates out and about, whether they happen weekly or only once a month, are something I am thankful for.

This grilled steak salad doesn’t exactly need a recipe, but I’ve written one anyway ;) Now, take this as a sign that you need to carve out some time for you and your partner to reconnect! This is not something to brush aside. Instead, make it a top priority and everything else will fall into place a little easier as a result.
Date Night Grilled Steak Salad
*to make this recipe Whole 30 friendly, simply skip the bread! Done and done.
Serves 2 (maybe with leftovers)
1 ribeye steak (16 oz)
1 medium head of butter lettuce (or your favorite greens)
cherry tomatoes on the vine (if you can find them)
1 ripe avocado, halved and pit removed
2 spring onions, trimmed and halved lengthwise
Sourdough bread, cut into 1 inch slices
Favorite dressing- we went with this store-bought dressing but we also love making our own!
Prepare your grill by bringing it to high heat. While you wait, season the steak on both sides with salt and pepper. Drizzle the tomatoes, bread slices, onions and avocado with olive oil. Wash the lettuce and tear into preferred size.
Begin by grilling the steak to desired doneness. We like medium rare, which takes about 3-4 minutes per side. Don’t move the steak once you place it on the grill. You’ll get a nicer crust and it will not stick it you let it be. Remove the steak and let rest for 10 minutes.
Add the tomatoes on the vine, the avocado slices, the spring onions, and the bread to the grill. Grill until just cooked and charred in places, being careful not to let anything burn (i.e. don’t multitask). Remove everything from the grill.
To assemble the salad, arrange the lettuce on a large platter. Slice the steak and arrange on top of the lettuce along with the remaining ingredients. Drizzle with dressing and serve with a nice (but affordable) red wine.
Dry Rub Recipe + Grilled Boneless Pork Loin Chops
We have been doing a lot of grilling this week. The temperatures climbed quite high in the beginning of the week making any sort of cooking in the kitchen completely miserable. Today is pleasantly cool which is a relief because I'm spending the entire day working on recipes for project I'm doing with United Noodles in Minneapolis. Lots of Japanese food happening today! But before I delve into a day of recipe testing, I want to share this perfect 4th of July recipe with you. It's really two recipes in one so it's twice as nice! If you're grilling this weekend, you're going to want this all purpose dry rub recipe that works for more than just pork loin chops. From fish and chicken to pork and beef you'll be rubbing everything with this flavorful, easy rub that you can make with spices from your pantry.
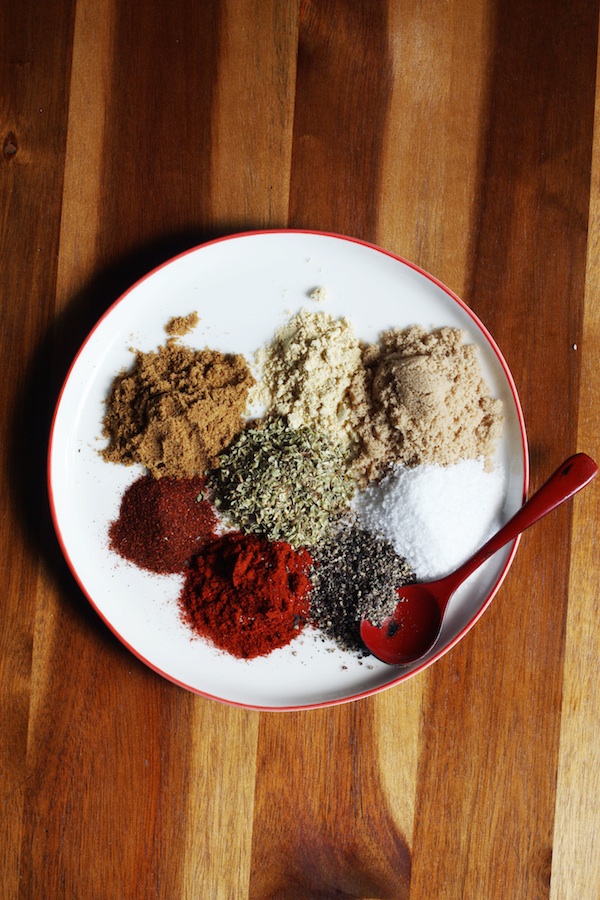
I started making this rub a few years ago. Initially we only used it on chicken drumsticks but I quickly found that it tasted great on just about anything. You can also vary the recipe depending on your taste preferences. More heat? Add a little more chili powder. Smokier flavor? Add more cumin and use smoked paprika instead of regular. My favorite dried herb to use is oregano but you could easily substitute anything from dried thyme to basil or even rosemary. Then you just mix it all together and store it in an airtight container to use as you please!


Let's talk about pork chops for a minute. I tend to shy away from cooking pork chops just because they tend to dry out and have a flavor slightly resembling cardboard. Are you a little skiddish around pork chops too? Please tell me I'm not the only one. Luckily I have some good news: pork chops can be juicy, delicious and flavorful! There are two important steps to making a perfect grilled pork chop: 1) BRINE. Do not, under any circumstance, skip this step. It adds flavor and helps the chop retain its juices during grilling. 2) DRY RUB. Yep. That layer of flavorful seasoning is crucial and helps create a flavorful crust and locks in and enhances all that tasty pork flavor.
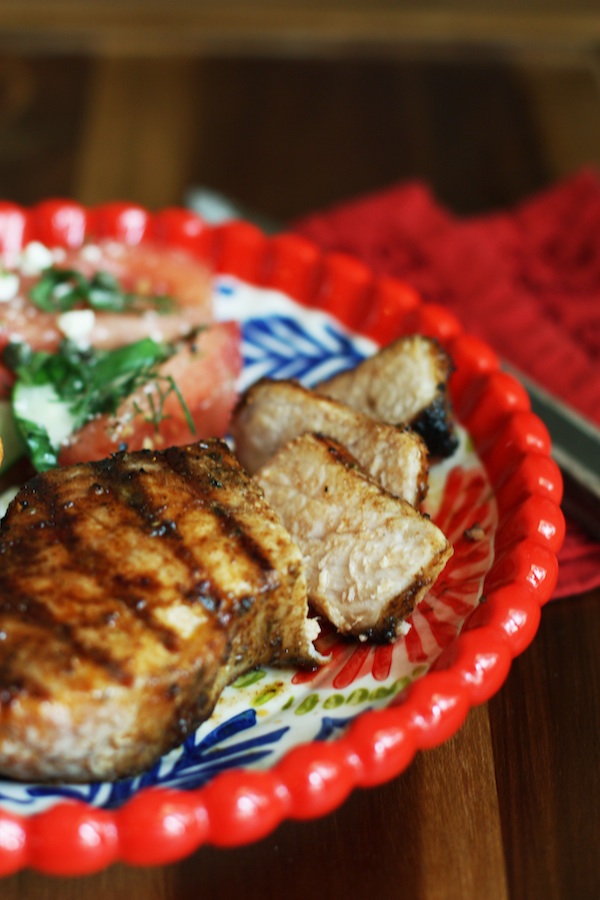
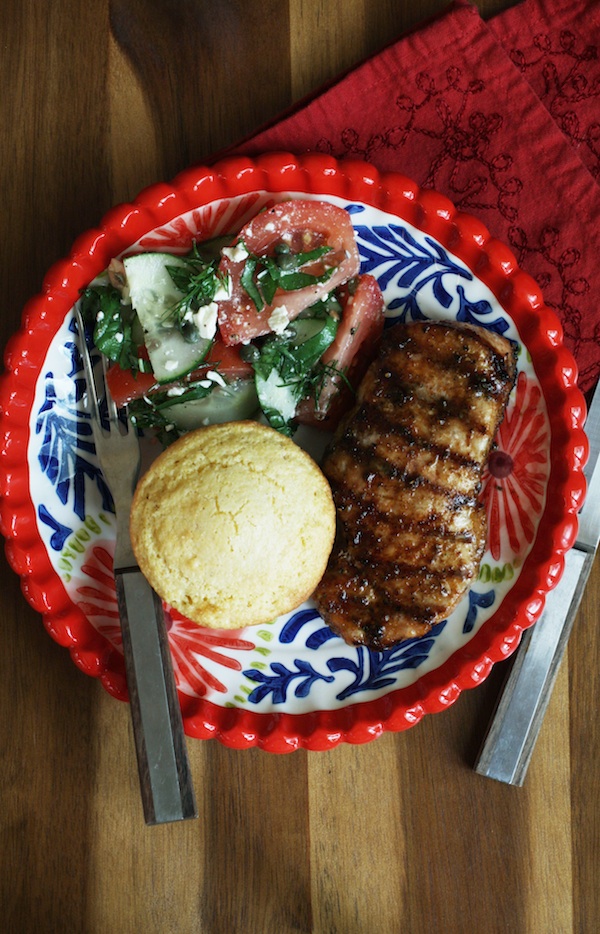
I used boneless pork loin chops here but you could do this with bone-in pork chops as well. I made some simple cornbread muffins (from a box...gasp!) and a simple salad of sliced cucumbers, tomatoes, and a vibrant vinaigrette made with plenty of fresh basil, dill and lemon thyme. Oh, and lots of feta. Don't forget the feta.
Alright, enough talking. On to the recipe!
Dry Rub & Grilled Pork Chops
Serves 4
Total time: 30 minutes
Ingredients
For the dry rub:
- 2 tablespoons brown sugar
- 1 1/2 tablespoons kosher salt
- 1 1/2 tablespoons cumin
- 1 tablespoon paprika
- 1 tablespoon dried oregano
- 1 1/2 teaspoons chipotle chili powder
- 1 1/2 teaspoons dried mustard powder
- 1 tablespoon olive oil (for use just before rubbing)
- 4 boneless pork loin chops about 1 1/2 inches thick
- 2 tablespoons kosher salt
- 1 tablespoon sugar
- 2 quarts water
For the pork loin chops:
- Combine all the ingredients except the olive oil in a small bowl.
- If not using right away, transfer to an airtight container and store in a cool place (the fridge is great) for up to 3 months.
- Fill a large bowl with 2 quarts water.
- Add the salt and sugar and stir until dissolved.
- Place the pork loin chops in the bowl and let sit for 1 hour at room temperature.
- Remove the pork chops from the brine and pat dry with paper towels.
- Put 2 tablespoons of the dry rub in a small bowl with the 1 tablespoon olive oil.
- Use your fingers to massage the rub all over the pork loin chops. It may not seem like enough but a little goes a long way!
- Preheat a charcoal or gas grill to medium-high heat. If using charcoal, put your coals on one side of the grill leaving the other half as your cool side. If using gas, only light one side of the grill.
- While the grill preheats, make a tin foil tent large enough to cover the pork chops. Alternatively, you can use a roasting pan.
- Place the pork loin chops directly over the heat source on your grill. Grill for about 3-4 minutes per side or until you see nice grill marks.
- Move the chops to the cool side of the grill and cover with your foil tent. Allow the chops to cook for 10-15 minutes or until an instant read thermometer reads at least 145 degrees Fahrenheit.
- Serve with a fresh veggie salad and cornbread!

Peanut Butter Burger with Egg & Bacon | Set the Table
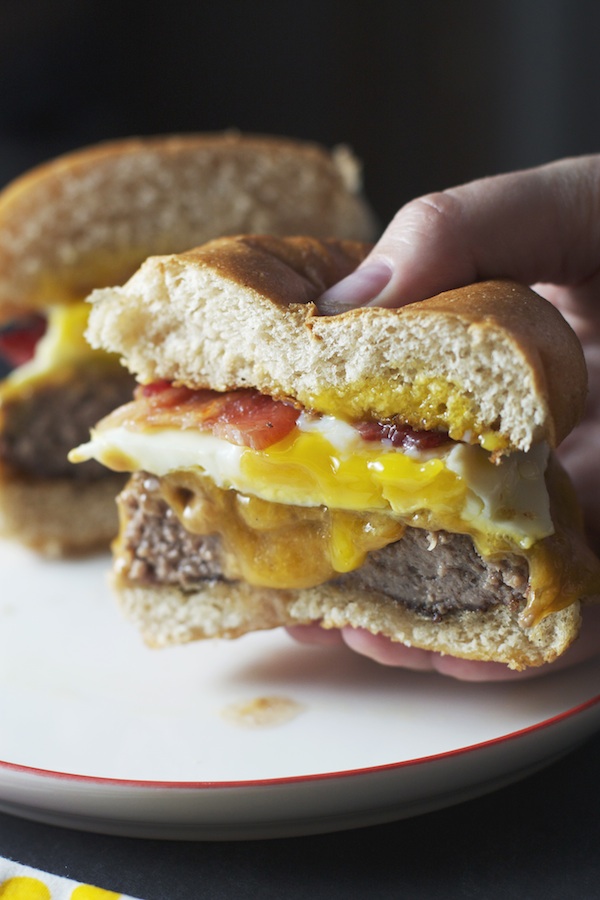
Peanut Butter Cheeseburger + Fried Egg
That's right. Peanut Butter Cheeseburger.
I think it’s a good idea to warn you that this post is a little unusual. It is far from healthy and possibly quite unusual to some. Let’s just say you’ll have to have a little extra trust that I wouldn’t steer you in the wrong direction.
OK...moving on.
Brad grew up here in Colorado and I grew up in Minnesota, which often leads to the question, “So how did you two meet?” Long story short, we met in the lovely, picturesque town of Decorah in northeastern Iowa. We both attended Luther College and, after 3 years of failed relationships there, we had sworn off dating all together. As cliché as it sounds, that is when we found each other. Brad threw a frisbee that went astray on the library lawn. It landed at my feet. I threw it back. And that was the beginning.
Neither of us were looking to get into a relationship, but it happened.

Peanut Butter Burger Ingredients
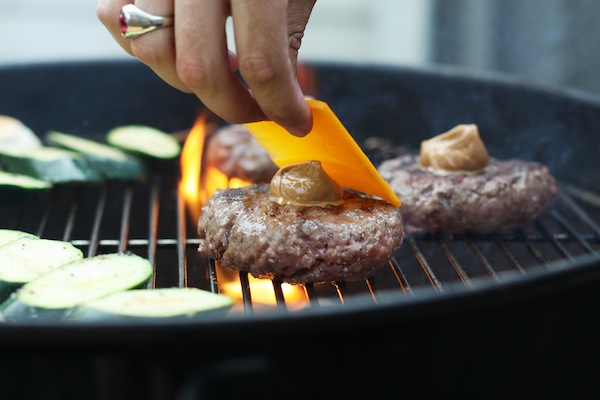
I’m pretty sure peanut butter hamburgers have a similar story. Two things that come from two different places manage to come together to make something that, in the end, makes perfect sense. You might be concerned. Perhaps you think I’m trying to trick you into trying something for a TV show featuring crazy food. Please believe me when I say that this combination of peanut butter, ground beef, and a fried egg is nothing short of wonderful.
Here’s the best way to think about it: Asian peanut sauce is made with peanut butter. Then, chicken or beef are dipped into it making a delicious dish from south Asia. So, really, this isn’t that weird.

Melty PB
Cheese time!
I had my first peanut butter burger at a little restaurant called T-Bock’s in our college town of Decorah. All of my friends knew exactly what it was. One of them ordered the peanut burger topped with a fried egg and the restaurant eventually named after him, calling it the “Gilmore”.
Brad and I often reminisce about the days when we would go to T-Bock’s and eat a Gilmore burger with a tall, cool Blue Moon. One day we realized that we didn’t have to wait until our next Iowa trip to enjoy the peanut buttery, beefy goodness. Duh. We could make it at home! We used natural peanut butter, sharp cheddar cheese, and of course added a fried egg. Here’s the secret: you must use the cheese to hold the melty peanut butter in place. Yes, you could skip it, but you’ll have a runny mess on your hands. And you’re already going all out so you might as well add cheese. And maybe some bacon. Am I right?
Peanut Butter Burger | Set the Table
I’m sharing this recipe with you because I don’t think it is fair to keep such a delicious treat a secret any longer. Be brave. Be bold. Try this out the next time you grill. You won’t be sorry!
Peanut Butter Cheeseburger + Fried Egg
Makes 4 burgers
- 1 pound 80% lean ground beef
- 4 tablespoons natural peanut butter (we used JIFF Natural PB, but try to find a brand that is creamy not hard)
- 4 slices sharp cheddar or American cheese
- 4 slices cooked, thick cut bacon
- 4 kaiser rolls
- 1 tablespoon olive oil
- Prepare your burgers as directed in the link above, or use your usual method and place them over medium coals.
- After about 3 or 4 minutes, flip the burgers and spoon 1 tablespoon of peanut butter in the middle of each patty.
- Next, place the cheese slices over the peanut butter. The cheese will melt, creating a peanut butter 'pocket' of sorts, holding the melted peanut butter in place.
- Cook the burgers until desired doneness.
- Meanwhile, brush the kaiser rolls with the olive oil and toast on a cooler section of the grill for a minute or two until they are golden and have nice grill marks but are not burned.
- Fry the eggs over medium heat until the whites are set but the yolks are runny.
- Sprinkle the eggs with salt and pepper, then place them on top of the cheese on each burger.
- Top with the bacon.
- Serve the burgers on the toasted kaiser rolls and enjoy!
Notes: We use a method from America's Test Kitchen to grill our burgers. Click here if you'd like to sign up (for FREE) which I highly recommend doing. You have unlimited access to their recipes, which are excellent.