Quantcast
  • Contact
  • Portfolio
  • Subscribe
  • Recipes
Menu

Set the Table Photography

photography
  • Contact
  • Portfolio
  • Subscribe
  • Recipes
×
Chocolate-Dipped-Coconut-Macaroons-Set-the-Table.jpg

Chocolate-Dipped Coconut Macaroons

Rachael White December 16, 2013

Christmas is SO CLOSE I CAN HARDLY STAND IT! My family is coming to Denver very soon, our gifts are wrapped and under the tree, and I the only thing I'm panicking about is the fact that there is no snow on the ground. I guess I can't control that though, can I? All in all, I'm feeling very Christmasy and warm and fuzzy and all that.

On of the most exciting parts of the season this year has been watching Riley's face every time he talks about presents, Santa, baby Jesus, Frosty the Snowman, and Rudolph the Red Nosed Reindeer. Experiencing joy like that through a 2 year old's eyes is something I can't begin to explain. It's magical.

Christmas-Joy.jpg

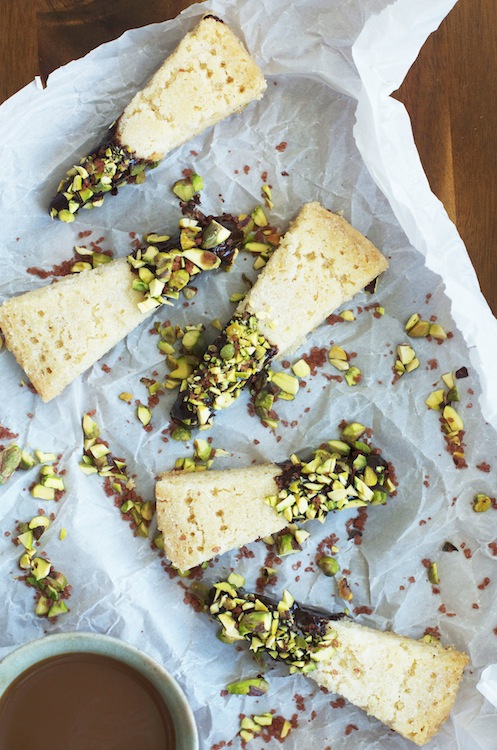
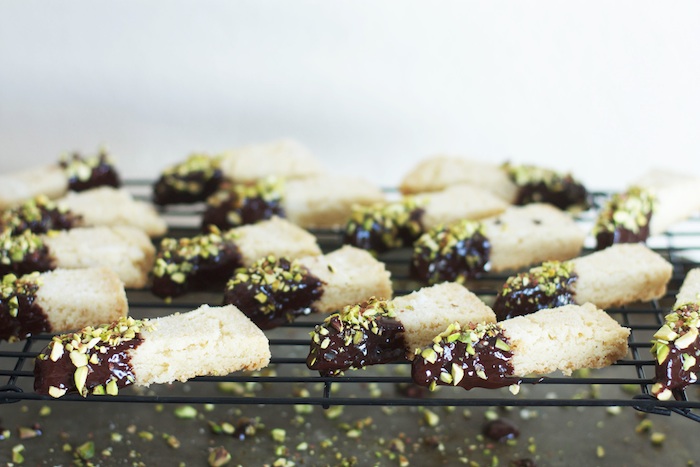
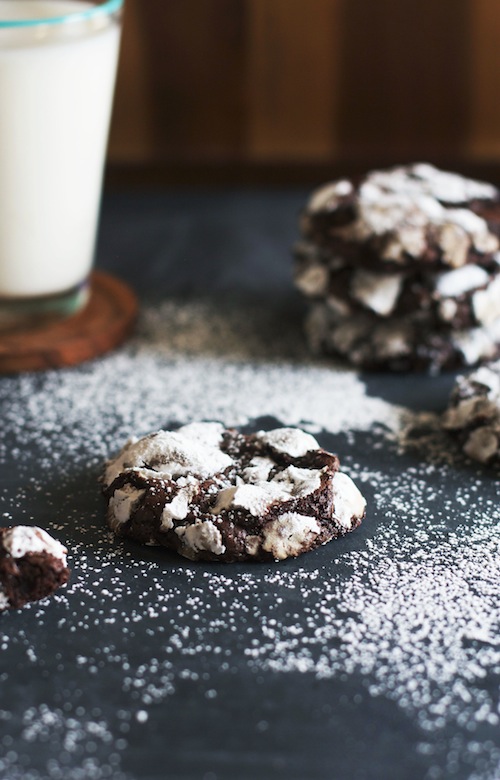
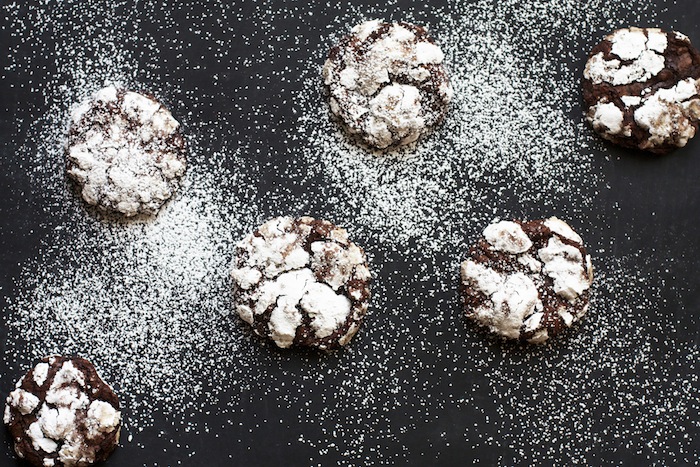
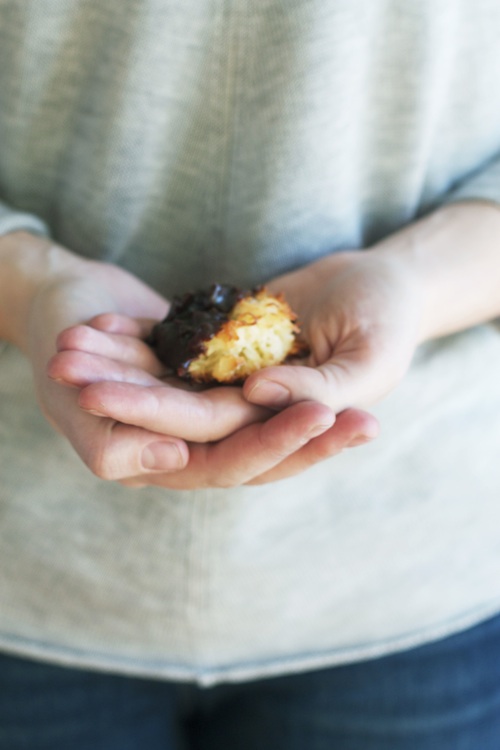
I've been trying to develop traditions for our family that we can do every year from what kind of cookies we make to the classic Christmas movies and music we play. These coconut macaroons dipped in chocolate have quickly become a family favorite. Even my husband, who doesn't like coconut, went crazy over these tasty little cookies.

Chocolate-Dipped-Macaroons-Set-the-Table.jpg

Coconut macaroons are and easy and fast treat to make for last-minute Christmas parties, gifts for friends, or just a simple sweet snack to keep around the house. The good news, aside from the fact that these are SO delicious, is that they are relatively low in fat when compared to other holiday baked goods. At least that's what I tell myself after I've eaten 3 of them...

Coconut-Macaroons-Set-the-Table.jpg

What are your favorite holiday traditions? Do you make cookies with your family? Do you go look at lights in your neighborhood? I'd love to hear what makes your season magical!

Chocolate Dipped Coconut Macaroons

Ingredients

For the ganache:

  • 2 eggs, beaten
  • 1/2 cup sugar
  • 1/8 teaspoon salt
  • 1 teaspoon vanilla extract
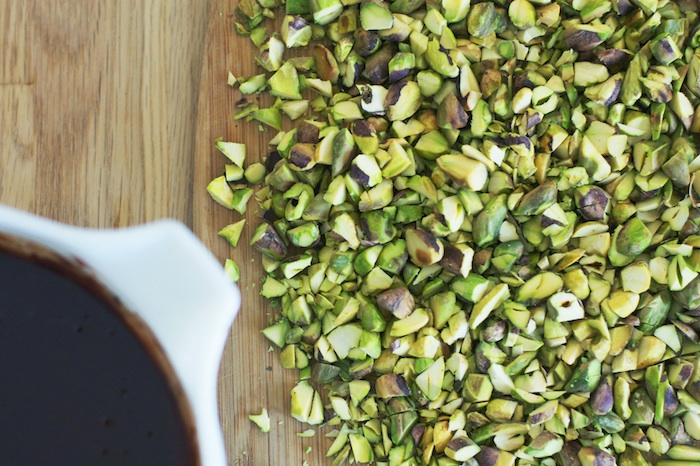
  • 2 2/3 cups sweetened shredded coconut
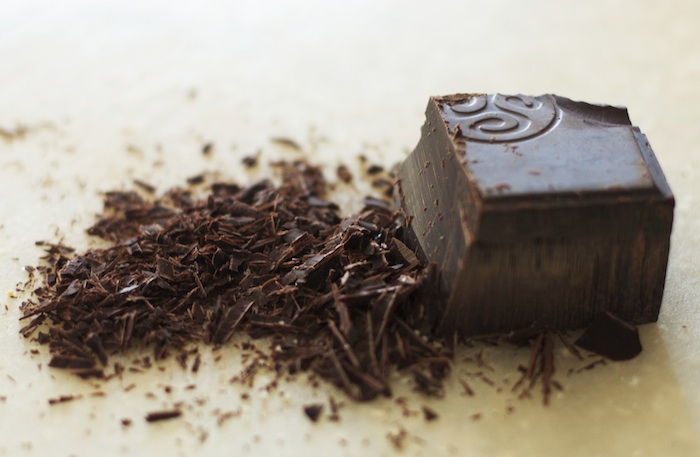
  • 7 oz bittersweet chocolate
  • 2 tablespoons unsalted butter
  • 3/4 cup heavy cream

Instructions

  1. Preheat the oven to 350 degrees F.
  2. Line a large, rimmed baking sheet with parchment paper.
  3. Place a cooling rack over a baking sheet and set aside.
  4. In a large bowl, whisk the eggs, sugar, salt and vanilla together until combined.
  5. Use a spatula to fold the coconut into the egg mixture.
  6. Use a teaspoon to scoop mounts of batter onto the prepared baking sheet.
  7. Bake the macaroons for about 20 minutes or until the coconut has turned golden brown and the edges become slightly crispy.
  8. Cool the macaroons on a cooling rack before dipping them in the chocolate.
  9. While the macaroons cook, combine the chocolate, heavy cream and butter in a medium, microwave safe bowl.
  10. Microwave for 30 second intervals, stirring after each interval, until the chocolate is melted.
  11. Dip the cooled macaroons in the chocolate and place on the cooling rack that has been set over the baking sheet.
  12. Allow the chocolate to set for about 2 hours before transferring to a platter.
Valentine party printables from Smilebox.
In Dessert Tags chocolate, Christmas recipes, coconut, DIY gift ideas, holiday baking, holiday cookies, holiday recipes
2 Comments
Shortcake-with-dark-chocolate-ganache-pistachios-red-sea-salt-Set-the-Table.jpg

Shortbread with Dark Chocolate Ganache, Pistachios + Red Gold Sea Salt

Rachael White December 10, 2013

I'm pretty sure the Victoria's Secret Fashion Show is on TV as I write this. That's right. I'm writing about cookies in my flannel pajamas, without any makeup, my hair piled on top of my head (still not dry from my super fast shower this afternoon during nap time), and my black lab just burped at me from her perch on the sofa. I don't think I need to elaborate on how different my life is from that of a VS model.

Chocolate-Dipped-Shortbread-Set-the-Table.jpg

What I will say is this: I would bet good money that none of them know how to make killer shortbread. At least I've got one up on them.

Seriously though. This shortbread turned out beautifully. It is light and airy with a perfect balance of buttery sweetness and a hint of salt. Many recipes call for cornstarch to help make the texture a little lighter than it would be using only flour, but I decided to take it a step further. Based on what I've learned about potato starch through Asian cooking, I decided to try it out in this shortbread recipe. Typically, I find potato starch has a more delicate, crisp result (very similar to a potato chip texture, actually). Cornstarch can get  a little heavy for my liking and sometimes leaves a sandy feeling in my mouth. I don't want any of that in my shortbread!

Shortbread-Dough-Set-the-Table.jpg
Dark-Chocolate-Set-the-Table.jpg
Pistachios-Dark-Chocolate-Ganache-Set-the-Table.jpg

As if shortbread wasn't rich and decadent enough on its own, I decided to dip it in dark chocolate ganache and pistachios. A little sprinkle of red gold Hawaiian sea salt and the cookies were absolutely perfect. This shortbread is festive enough for a Christmas cookie exchange and simple enough to make for a coffee date with friends (although I'd recommend making it the day before). The red gold Hawaiian sea salt is not exactly necessary, but it adds a nice smokey, salty flavor that contrasts nicely with the rich chocolate.

Shortbread-Set-the-Table.jpg

To shape the cookies, I used a method from Cook's Illustrated Baking (if you don't already own that book, you should get on it). If you're not into this shape, feel free to change it up.

Shortbread-Cookies-Dipped-in-Chocolate-Pistachios-Set-the-Table.jpg

If it's all the same to you, I'm going to keep not watching the Victoria's Secret Fashion whatever show and eat another cookie.

Cheers to that!

Shortbread with Dark Chocolate Ganache, Pistachios & Red Gold Sea Salt

Total time: 1 hour 20 minutes

Ingredients

  • 1 3/4 cups all-purpose flour
  • 1/4 cup plus 1 tablespoon potato starch
  • 2/3 cup sugar
  • 1/4 teaspoon salt
  • 2 sticks unsalted butter, cold, cut into 1/4 inch cubes
  • 7 oz dark chocolate, finely chopped
  • 3/4 cup heavy cream
  • 2 tablespoons unsalted butter
  • 1 cup toasted, chopped pistachios
  • red gold Hawaiian sea salt

Instructions

  1. Preheat the oven to 400 degrees F.
  2. Line a 9 inch cake pan with a circle of parchment paper and set aside.
  3. Line a baking sheet with parchment paper and set aside.
  4. Whisk the flour, potato starch, sugar (reserve 1 tablespoon for sprinkling later) and salt together in a large bowl.
  5. Cut the butter into the dry ingredients using a pastry cutter or two knives. When the mixture resembles wet sand, transfer it to the prepared 9 inch cake pan.
  6. Firmly press the dough into the pan with your fingers.
  7. Gently turn the dough onto the baking sheet lined with parchment.
  8. Place the baking sheet in the oven and reduce the temperature to 300 degrees F.
  9. Bake for 20 minutes.
  10. Remove from the oven and cut a circle in the center of the dough with a metal cookie cutter about 2 or 3 inches in diameter.
  11. Remove the circle of dough from the center and leave the cookie cutter in its place.
  12. Use a wooden skewer to etch lines into the dough creating 16 wedges.
  13. Return the shortbread to the oven for another 40 minutes.
  14. When the shortbread has finished cooking, sprinkle it with the remaining sugar and cut it using the lines you drew earlier as a guide. Transfer to a cooling rack and bring to room temperature.
  15. Meanwhile, make the ganache by heating the cream and butter in a small saucepan over medium heat until it just begins to steam. Remove from the heat.
  16. Stir the chocolate into the cream until it melts completely and the mixture is smooth.
  17. Place a cooling rack over a baking sheet lined with parchment and set aside.
  18. Dip each shortbread wedge first into the ganache, then sprinkle with pistachios and a pinch of the red gold salt.
  19. Place the wedges on the prepared cooling rack and allow the chocolate harden. It won't be like a chocolate shell, but it should be firm enough that it doesn't drip.


Valentine party printables from Smilebox.
In Dessert, Vegetarian Tags christmas cookies, dessert, holiday baking, holiday recipes
6 Comments
Homemade-Lefse-Set-the-Table.jpg

Homemade Potato Lefse

Rachael White December 9, 2013

Last week, Riley and I drove up to Evergreen. It's about a half hour drive from our house and on this particular day, it was absolutely gorgeous. The snow that had fallen earlier in the week was still coating every rock and tree in the mountains, making me catch my breath at every turn. My favorite part of the drive was seeing the stream that runs along with road, which is usually bubbling merrily on it's way regardless of the season, frozen over in most places. The few spots with visible running water added to the enchantment of the scene thanks to steam that slowly rose into the air. And did I mention that the sun was shining and the sky was a bright, vibrant blue? Well, it was. And it was magnificent.

I wasn't able to find a good place to stop and get a photo, so I hope my description helps you imagine what it looked like. It was glorious.

Here's a little taste of what life has been like for the past week...

Riley-in-the-Snow-Dec-2013.jpg

The reason we went to Evergreen was to make lefse with a new friend of ours. She is a fellow Minnesota transplant and one of her family traditions is to make lefse at Christmas time. If you're not familiar, lefse is a Norwegian flatbread made with potatoes, flour and milk or cream. The dough is made into golf-ball size rounds, then rolled very thinly and placed on a griddle where it gently cooks until brown spots are visible. The end result looks very similar to a tortilla but the texture is much more tender and delicate.

There are other versions made without potato, though I don't recall having tasted that kind before. I do recall Christmases as a kid when my uncle's parents would bring homemade lefse as their contribution to the holiday buffet. It was always folded neatly in triangles that were filled with creamy butter and nutty, sweet brown sugar. There is almost nothing in this world better than that combination.

Making-Lefse-Set-the-Table.jpg

This was my first experience making lefse and I was pleased to find it is not difficult at all. It does take a little practice finding the right consistency for the dough (my friend Andrea fortunately has lots of experience with this). It helps to do a test run with one or two balls of dough that have been rolled out to see if the dough needs more flour. If the dough seems exceptionally sticky as you're rolling it out, you may want to add a bit more before forming the rest of the balls.

I loved using the traditional equipment to make the lefse, but I'm sure you could do it without a lefse stick or traditional griddle. (If you are interested in buying the traditional gear, click here.)

lefse-with-brown-sugar-butter-Set-the-Table.jpg
Homemade-Lefse-with-Brown-Sugar-and-Butter-Set-the-Table.jpg
Patiently-Waiting-for-Lefse.jpg

It took some trial and error experiences for us, but in the end we came out with a nice batch of beautiful, delicious lefse to have at home. Despite the fact that this is the most simple and comforting snack on the planet, Riley didn't quite warm up to giving them a taste.

Someday he will appreciate them, I'm sure.

Riley-and-his-lefse.jpg
lefse-Set-the-Table.jpg

I'm hoping this will become a new tradition for us. It was such a blast chatting about lutefisk, lefse, and other Minnesota oddities with someone from the motherland. Thanks, Andrea, for introducing me to the art of lefse-making!

I don't have my own personal recipe for lefse, but click here for a great one posted by The Kitchn.

In Breakfast & Brunch, Dessert, Sides + Condiments, Vegetarian Tags holiday recipe, holiday traditions, Minnesota
1 Comment
Apple-Crisp-with-Maple-Syrup-Pomegranate-Seeds-Set-the-Table.jpg

Apple Crisp with Maple Syrup & Pomegranate

Rachael White November 26, 2013
Bowl-of-Apples-Set-the-Table.jpg
Sliced-Apples-for-Crisp-Set-the-Table.jpg

For our first Thanksgiving in Japan, I made apple crisp. We didn't have an oven, so I ended up putting 2 very small pans of apple crisp in our fish oven which is essentially a tiny broiler. I cooked the apples on the stove-top, put them in 2 pans that would fit in the fish oven, and topped them with butter, brown sugar, oats and cinnamon. With the fish oven on it's very lowest setting, I carefully cooked the crisp until the topping was a splotchy golden brown and only burned in a couple spots. I was pretty pleased that I didn't burn our tiny apartment right to the ground.

Apple-Crisp-Topped-with-Butter-Set-the-Table.jpg
Apple-Crisp-Set-the-Table.jpg

Let's just say that I don't take my apple crisp for granted these days. It's always been one of my favorite desserts, but after finding out how difficult apple crisp was to replicate in Japan, I seem to have grown even more fond of it. Having a regular sized oven that cooks more than a single fish is helpful, too.

If you're in charge of bringing a dessert for Thanksgiving, this is a great option. It's easier than making a pie but just as delicious. The addition of maple syrup and bright pomegranate seeds makes it a feast for the eyes as well as the tummy.

Apple-Crisp-with-Maple-Syrup-and-Pomegranate-Set-the-Table.jpg

Apple Crisp with Maple Syrup & Pomegranate

Ingredients

  • 5-6 apples, peeled, cored and cut into 1/2 inch slices(I prefer a combination that includes granny smith and another sweeter variety)
  • 1/4 cup flour
  • 1/2 teaspoon salt
  • 1 tablespoon ground cinnamon
  • 1/8 teaspoon nutmeg
  • zest of 1 orange
  • 1 1/2 cups old fashioned rolled oats
  • 1/3 cup flour
  • 1/2 cup brown sugar
  • 1/2 teaspoon salt
  • 1 teaspoon cinnamon
  • 1 stick of cold butter, cut into 12 slices
  • Maple Syrup
  • Pomegranate Seeds

Instructions

  1. Preheat the oven to 375 degrees Fahrenheit.
  2. In a large bowl, whisk the flour with the salt, cinnamon, nutmeg and orange zest. Add the apple slices and toss to combine.
  3. In another bowl, combine the oats with the brown sugar, cinnamon, and salt.
  4. Add half of the butter, using your fingers to work it into the dry ingredients until almost completely incorporated (you shouldn't have many dry places).
  5. Next, spread the apples in a buttered baking dish and top with the oat topping.
  6. Place the remaining butter slices over the topping.
  7. Bake until the top is golden and crisp and the filling is bubbly, about 35-45 minutes.
  8. Remove from the oven and allow the crisp to sit for about 10 minutes before serving.
  9. Serve topped with maple syrup and pomegranate seeds.
In Dessert, Vegetarian Tags apples, easy dessert recipe, holiday baking, holiday recipe, Thanksgiving
1 Comment
Flourless-Chocolate-Crinkle-Cookies.jpg

Flourless Chocolate Cookies

Rachael White November 24, 2013

Last week, while the snow was falling outside my kitchen window, I made cookies. As I measured, stirred, shaped, and baked, I thought of Minnesota mornings when I was growing up. I would wake up and the light coming through my bedroom window would be different. It was a cleaner, softer white than that of a sunny fall morning. This was before the time of smart phones and before I cared much about watching the weather forecast on TV, so I never knew what I would wake up to. The morning after the first substantial snow of the season was filled with feeling of joy and excitement that is difficult to replicate as an adult. From there, my mind went to making snow men in the yard, drinking hot chocolate with mini marshmallows floating on the top and slowly turning to foam, and the smell of firewood coming from the fireplace. It's been a long time since I've experienced a snow like those of my childhood, but last week was pretty close.

Gluten-Free-Chocolate-Cookies.jpg

There is something endlessly magical about waking up to a world where the usual street noise is muted and everything is covered in white. For me, it is comforting and makes me feel at home. I know a lot of people (perhaps some of you who are reading this right now) despise the snow and cold and driving in all of the winter weather. I wish I could help you remember what it is you loved about the snow as a child. If you didn't grow up with snow, perhaps you can think back to the first time you saw it. So much beauty. So much peace. So much joy.

Gluten-Free-Chocolate-Cookie-Recipe.jpg

These cookies make me think of the first snow. Deep, dark chocolate dough is shaped into a ball and tossed in some powdered sugar. As the cookies bake, they spread ever so slowly, revealing cracks that peak through the bright white surface. It's a little like the grass that barely peaks through the fresh snow as it piles up that first time.

I think we should all make these cookies. Let's bake them for our friends, neighbors, children, parents...and as we bake, let's think about what gave us joy as children that we tend to overlook as adults. It can't hurt, right?

Flourless Chocolate Cookies

Ingredients

  • 4 oz dark chocolate, finely chopped
  • 3 egg whites
  • 2 1/2 cups powdered sugar
  • 2/3 cup cocoa powder
  • 1 tablespoon cornstarch
  • 1/4 teaspoon salt

Instructions

  1. Preheat the oven to 400 degrees Fahrenheit.
  2. Line 2 large baking sheets with parchment paper.
  3. Put the dark chocolate in a microwave safe bowl. Working in 20 second intervals, melt the chocolate. Stir after each 20 seconds until the chocolate is smooth.
  4. Beat the egg whites with an electric mixer until stiff peaks form.
  5. With the mixer running on low, slowly add 1 cup of the powdered sugar. Beat until combined.
  6. In a separate bowl, whisk the cocoa powder, corn starch, salt and another cup of the powdered sugar.
  7. Gradually add the cocoa mixture to the egg whites with the mixer running on low. Beat until combined.
  8. Fold in the melted chocolate until incorporated. The dough will be dry and stiff but that's a good thing.
  9. Place the remaining powdered sugar on a small plate.
  10. Roll the dough into balls about 1 inch in diameter. Roll in the powdered sugar and place on your parchment lined baking sheet. Place the dough balls 2 inches apart.
  11. Bake until the cookies begin to crack on the top, 8-10 minutes.
  12. Remove from the oven and allow them to cool slightly on the baking sheet.
  13. Transfer to a cooling rack and cool completely.
Valentine party printables from Smilebox.
In Dessert, Vegetarian Tags baking, chocolate, cookies, gluten free, holiday baking, holiday recipes
5 Comments
Cranberry Turnover Recipe

Cranberry Turnovers with Cinnamon Glaze

Rachael White November 20, 2013

I love this time of year. Even though the trees have lost their colorful leaves and there is no snow on the ground (yet) to cover the many shades of brown, I find myself feeling thankful for the cooler air, the clear, bright blue skies, and the feeling that everyone is cozying up with their families filling their bellies with comforting foods and curling up under warm blankets. In our own home, I'm watching Riley make the transformation from baby to toddler to little boy. His sweet snuggles are few and far between because, let's face it, there are more exciting things to do. But the way he says mommy melts my heart to a gooey puddle on the floor. The overriding emotion I have is, appropriately, thankfulness for all of these things and much more. My heart is full.

Cranberry-Turnovers.jpg

This is the first Thanksgiving in 5 years that I haven't hosted. It's kind of a strange feeling because typically this time of year is filled with menu planning, cleaning, and usually trying to tackle a random house project that probably isn't necessary but seems like a good idea at the time. I think I am a bit of a bite-off-more-than-I-can-chew type of person in that respect. Not hosting thanksgiving has also made it a little harder to get in the holiday spirit. My sister and I have always been the worst offenders when it comes to listening to Christmas music too early. Not so for me this year. One of our neighbors put up their Christmas lights last weekend and I said to Brad, "Can you believe they already have their lights up?" When he reminded me that Thanksgiving was mere days away I went into a little bit of shock and tried to force myself into the holidays by having a peppermint mocha, a Christmas Ale, and listening to a little Christmas music. No, not all at once.

Cranberry-Turnovers-with-Cinnamon-Glaze.jpg

Making these delicious cranberry turnovers with cinnamon glaze may have worked better than any other attempt to prepare for the upcoming holiday season. The bright color of the cranberry filling (which is actually the cranberry sauce from Monday's post here) and the warm cinnamon icing created a lovely dessert full of seasonal flavors. Store-bought puff pastry folded into triangles and baked to a beautiful golden brown makes for an easy and beautiful dessert for Thanksgiving. Or breakfast for whenever. I won't judge.

Cranberry-Popovers.jpg

This is a perfect way to bring a little Thanksgiving into your home even if you aren't hosting. So, whip up a batch of cranberry sauce (it only takes about 15 minutes), followed by these turnovers, and ending with a cocktail coming your way on Friday! Who knew cranberry sauce could do so much? I'm thankful for you, cranberries.

Cranberry Turnovers with Cinnamon Glaze

Ingredients

  • 1 cup chilled cranberry sauce (recipe here)
  • 2 sheets puff pastry, thawed
  • 1/3 cup heavy cream
  • 1 1/2 cups powdered sugar
  • 2 teaspoons ground cinnamon
  • 3 tablespoons milk
  • 1 teaspoon vanilla extract

Instructions

  1. Preheat the oven to 400 degrees F.
  2. On a lightly floured surface, unfold the pastry sheets and cut each sheet into 4 squares.
  3. Place the squares on a parchment lined baking sheet (use two baking sheets if you need to).
  4. Spoon 1 tablespoon of the cranberry sauce in the center of each pastry square. Fold the pastry over the filling to form a triangle.
  5. Seal the edges with a fork.
  6. Brush the tops of the triangles with the heavy cream.
  7. Use a sharp paring knife to cut 3 slits in the top of each turnover.
  8. Bake the turnovers until they are puffy and golden brown, about 10-12 minutes.
  9. While the turnovers are baking, combine the ingredients for the glaze in a small bowl and stir until smooth. Set aside.
  10. Remove the turnovers from the oven and let cool slightly.
  11. Transfer the turnovers to a cooling rack set over a baking sheet.
  12. Drizzle with the glaze and allow them to cool for at least 5 more minutes before eating.
  13. The turnovers can be enjoyed warm or at room temperature. They are best when enjoyed within 2 days.
In Breakfast & Brunch, Dessert, Vegetarian Tags cranberry turnover, entertaining recipes, holiday baking, holiday recipes, pastry
1 Comment
← NewerOlder →

Search Posts


Featured Posts

Summary Block
This is example content. Double-click here and select a page to feature its content. Learn more
Featured
Jan 28, 2026
Cursus Amet
Jan 28, 2026
Jan 28, 2026
Jan 21, 2026
Pellentesque Risus Ridiculus
Jan 21, 2026
Jan 21, 2026
Jan 14, 2026
Porta
Jan 14, 2026
Jan 14, 2026
Jan 7, 2026
Etiam Ultricies
Jan 7, 2026
Jan 7, 2026
Dec 31, 2025
Vulputate Commodo Ligula
Dec 31, 2025
Dec 31, 2025
Dec 24, 2025
Elit Condimentum
Dec 24, 2025
Dec 24, 2025
Dec 17, 2025
Aenean eu leo Quam
Dec 17, 2025
Dec 17, 2025
Dec 10, 2025
Cursus Amet
Dec 10, 2025
Dec 10, 2025
Dec 3, 2025
Pellentesque Risus Ridiculus
Dec 3, 2025
Dec 3, 2025
Nov 26, 2025
Porta
Nov 26, 2025
Nov 26, 2025

Powered by Squarespace