Quantcast
  • Contact
  • Portfolio
  • Subscribe
  • Recipes
Menu

Set the Table Photography

photography
  • Contact
  • Portfolio
  • Subscribe
  • Recipes
×
Nancy-Drew-Blondies-Set-the-Table.jpg

Hand Made Baking: Nancy Drew Blondies

Rachael White February 9, 2015

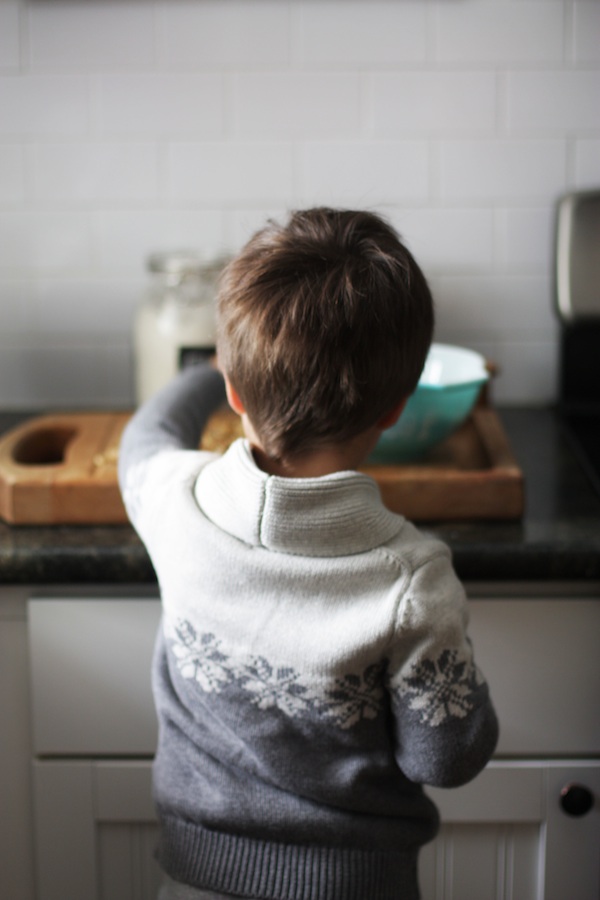
We are three weeks into this whole we-have-two-kids life. It has both flown by and moved in slow motion. (Trust me, that is totally possible.) While we certainly experience difficult moments each and every day, this has proven to be easier on us than the first time around. Perhaps it has something to do with the fact that we were prepared for all the sleep deprivation, the constant nursing, and the general upheaval of life as we knew it. Whatever the reason, I'm relieved that this little bundle has slid relatively easily into our lives. Riley is being an amazing big brother. He brings little gifts to Braden throughout the day, including his favorite blankie, and doesn't get upset (yet) when his baby brother is crying and inconsolable.

3-wks-old_03.jpg

Another bonus has been that my healing post-Cesarian section has been rather speedy. Could it be that these Nancy Drew Blondies, which I baked and handed out to the nurses at the hospital, had a hand in all of this? I'm going to say yes. At the very least, this little treat brought a smile to the team of nurses that took care of us during our hospital stay. I wanted to make them feel comforted and appreciated because I knew they would make me feel the same way. This recipe from my friend Kamran's book, Hand Made Baking, did not let me down!

IMG_1626.jpg
Kamran-Siddiqis-Nancy-Drew-Blondies-Set-the-Table.jpg

Kamran was one of the first food bloggers I really connected with when I started this crazy gig several years ago. I've always admired his grace, both in his craft and his character. He is a wildly talented person with so many good things, recipes and otherwise, to share with the world. When I received his book in the mail and read the dedication he wrote to me (yes, I'm going to humble-brag about that) I immediately teared up. Seeing someone you care about and respect have success like his is such a wonderful thing. One look inside the pages of his book and you can see the immense care and passion he has poured into every photo and recipe.

Kamran, you've just begun what I'm sure will be an incredible career. I'm humbled and honored to be even a small part of your journey. Thank you.

Blondies-from-Handmade-Baking-Set-the-Table.jpg

If you are looking for a Valentine's Day gift for your partner, a friend, or yourself, I think Hand Made Baking is perfection. I've made several recipes, all of which have been flawless, and have no doubt that if you baked any of the wonderful items from this book for your Valentine, you'd win.

Blondie-Recipe-Set-the-Table.jpg

If you'd like to purchase the book, click here. You won't regret it!

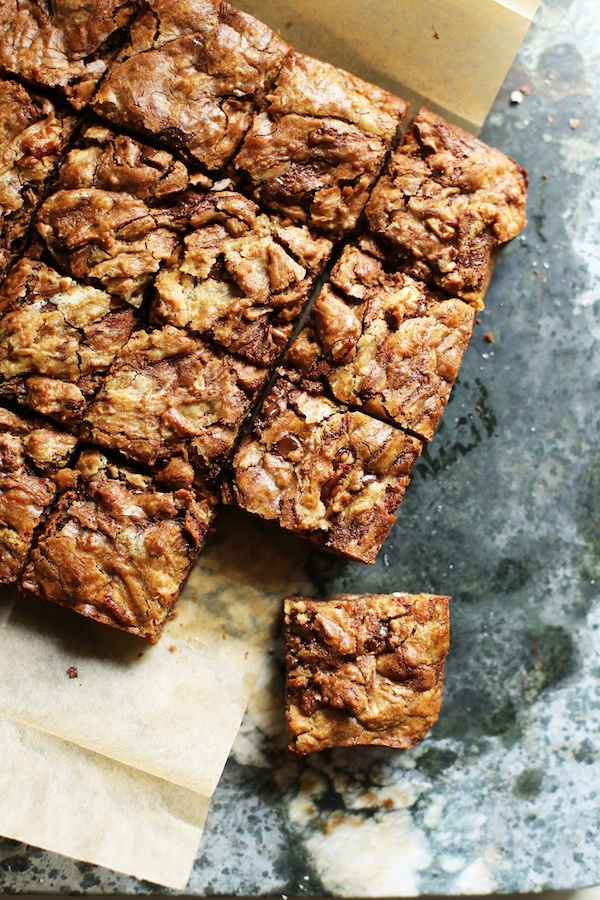
Nancy Drew Blondies from Hand Made Baking by Kamran Siddiqi

Makes 16-36 blondies

  • 6 tablespoons unsalted butter
  • 1 cup packed light brown sugar (or muscovado sugar)
  • 1 1/2 teaspoons pure vanilla extract
  • 1/4 teaspoon salt
  • 1 large egg, cold
  • 1 cup whole wheat pastry flour or all-purpose flour
  • 1/2 cup white chocolate chips
  • 1/2 cup milk chocolate chips (or dark, which is what I used)
  • 1/3 cup walnuts, lightly toasted and chopped (or pecans, which is what I used)

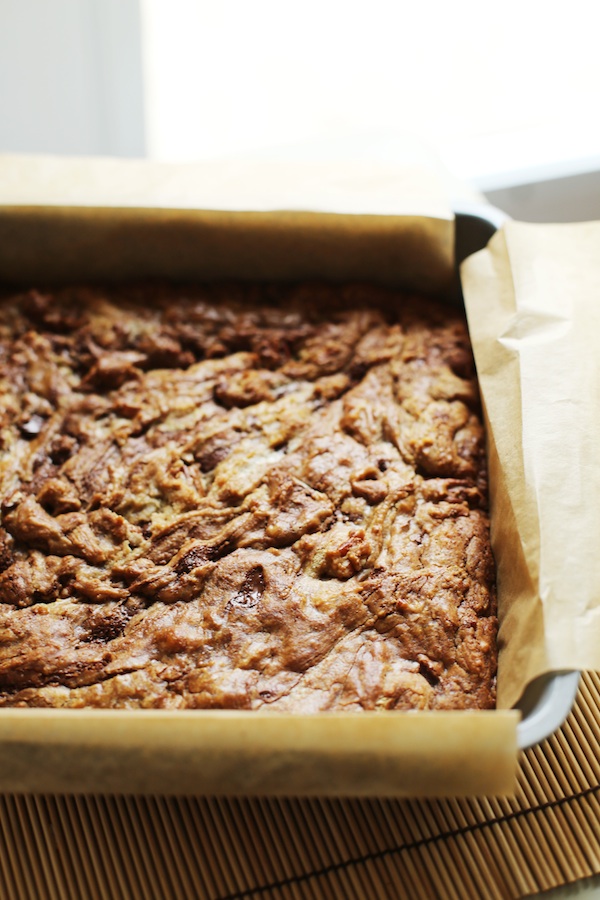
Place a rack in the upper third of the oven. Preheat to 350 degrees. Line an 8 inch square baking pan with parchment paper (or aluminum foil), leaving an overhang around each side.

In a medium saucepan, melt the butter over low heat. Remove the pan from the heat and use a wooden spoon to mix in the brown sugar, vanilla, and salt until smooth. Quickly stir in the egg. Add the flour, white chocolate chips, milk (or dark) chocolate chips, and walnuts (or pecans). Stir everything until just incorporated. Transfer the batter to the prepared pan and spread in an even layer.

Bake for 25-30 minutes until golden and set in the middle.

Allow to cool completely in the pan before lifting the ends of the parchment paper to transfer the blondies to a cutting board. Cut into 16, 25, or 36 squares, depending on which size you prefer. I went for close to 25.

In Dessert Tags baking, book review, chocolate, dessert
2 Comments
Orange-Walnut-Russian-Tea-Cakes-Set-the-Table.jpg

Orange-Walnut Russian Tea Cakes

Rachael White December 1, 2014

I have so many memories of lying in bed at night at the beginning of winter hoping that in the morning would bring a blanket of fresh snow. When it happened, there was an excitement that started deep in my belly and spread in excited tingles all the way to my finger tips. I always knew there was snow before even glancing out the window that there was snow because the light changed completely. It always felt new and fresh after weeks of golden autumn sun. The first snow of the season calls for something special. Hot chocolate for breakfast, cookies baking in the oven, and Christmas music on in the background. We had a day like that a while back, and I immediately took advantage by spending the morning making Orange-Walnut Russian Tea Cakes with my favorite little kitchen assistant.

Russian-Tea-Cakes-with-Pecans-Orange-Zest.jpg

We also wore wintery sweaters. You can't have a snow day without the proper attire, am I right?

Snow-Day-Cookies-Set-the-Table.jpg

My mom used to make Russian Tea Cake cookies around Christmas time and I remember the way the powdered sugar stuck to my fingers. Something about their snowball appearance made it seem like winter was officially official. I took my mom's recipe and updated it a little with the addition of fresh, bright orange zest. The orange in combination with the walnuts combines all the wonderful things about winter in one tasty little cookie. They are easy for kids to help with and make the perfect introduction to holiday cookie baking season.

Russian-Tea-Cakes-with-Orange.jpg
Russian-Tea-Cake-Making-Set-the-Table.jpg

Between the snowflakes floating softly outside the window and this sweet little boy helping me make sweet treats, this snow day was the best thing ever. I'm wishing extra hard for more days like this in the coming weeks.

Tea-Cakes-with-Walnuts-Orange-Set-the-Table.jpg

Orange-Walnut Russian Tea Cakes

Makes 2 dozen cookies

  • 1 cup butter or margarine, room temperature
  • ½ cup powdered sugar
  • 1 teaspoon almond extract
  • 2 ⅓ cups all-purpose flour
  • 1/4 teaspoon nutmeg
  • ¾ cups roughly chopped walnuts
  • zest of one large orange
  • ¼ teaspoon salt
  • 1-2 cups powdered sugar for rolling

1. Heat oven to 400ºF. 2. Mix butter, 1/2 cup powdered sugar and the almond extract in a large bowl. Stir flour, nutmeg, walnuts, zest and salt in another bowl. Add the dry ingredients to the butter and sugar mixture until the dough comes together. 3. Gently roll dough into 1 1/2 inch balls. Place them on a parchment lined cookie sheet with about an inch of space between each cookie. 4. Bake 10 to 12 minutes. Keep a close eye on the cookies so they don't turn golden on top- that means they're overcooked! Cool the cookies for about 5 minutes on a cooling rack. 5. Roll warm cookies in powdered sugar and cool them completely on wire rack before arranging on a plate. If the first pass through the powdered sugar didn't quite stick, you can roll them a second time once they have cooled.

In Dessert, Kid Friendly Tags christmas cookies, Christmas recipes, holiday baking, holiday recipe
7 Comments
Cranberry-Pecan-Upside-Down-Cake-Recipe1.jpg

Cranberry Pecan Upside Down Cake

Rachael White November 20, 2014

So Thanksgiving is in ONE WEEK. Just wanted to throw that out there. In case, you know, it slipped your mind or something. Also, cranberry pecan upside down cake. I mean, wowzers. Upside down cakes are pretty amazing in general, but this one is perfection. Tart cranberries, toasty brown sugar, and crunchy, buttery pecans make the perfect topping to a white cake batter that's been spiced up with a little cinnamon and nutmeg. I don't mind telling you that I'm eating a slice of this awesomeness as I type and I don't feel bad about it.

I'll feel bad about it at 3am when I've eaten my 5th Tums. Because pregnancy heartburn.

Cranberry-Upside-Down-Cake-Set-the-Table1.jpg

I've never been one of those people to proclaim what I'm thankful for each and every day during the month of November. I think it's a wonderful thing when people do, I just have never been one of those people. This year, I'm trying to be different. I'm trying to spend more time every day looking for reasons to be thankful and happy. Lucky for me, I don't have to look too far for those little things that make life sweeter.

No cake necessary.

But sometimes it helps.

Cranberry-Pecan-Upside-Down-Cake-Set-the-Table1.jpg

While I baked this cake, Riley ran around the kitchen singing Frosty the Snowman. That was a good moment. It was a great one, in fact. There is nothing like the smell of something delicious baking in the oven and the sweet sound of an almost-3-year-old voice sweetly singing. I hope that, if you make this any time during the holiday season, this cake brings with it plenty of moments to be thankful for.

Cranberry-Upside-Down-Cake-for-Thanksgiving-Set-the-Table1.jpg

Cranberry-Pecan Upside Down Cake

Makes 1 cake (8-12 servings)

*Note: The batter for this cake is slightly adapted from David Lebovitz's recipe, which can be found here.

topping:

  • 4 tablespoons unsalted butter
  • 3/4 cup brown sugar
  • 7.5 oz fresh cranberries
  • 2/3 cup pecan halves

cake:

  • 8 tablespoons unsalted butter
  • 2/3 cup sugar
  • 1 1/2 teaspoons vanilla extract
  • 2 eggs
  • 1 1/2 cups flour
  • 1 1/2 teaspoons baking powder
  • 1 teaspoon cinnamon
  • 1/2 teaspoon nutmeg
  • 1/4 teaspoon salt
  • 1/2 cup milk (2% or whole)

Preheat the oven to 350 degrees Fahrenheit.

Begin by making the topping. Melt the butter in a 9 inch cast iron skillet with 2 inch sides. Add the brown sugar and bring to a simmer, stirring constantly. Remove from the heat and let sit for 5 minutes before arranging the pecan halves and cranberries over the top of the brown sugar butter mixture.

Cream the butter and sugar together in a medium bowl. Add the eggs, one at a time, and the vanilla, mixing fully into the butter and sugar.

In a separate bowl, whisk together the flour, baking powder, spices and salt. Add half the flour to the butter mixture and stir with a spoon to combine. Pour the milk into the batter and stir. Add the remaining flour and mix until just incorporated.

Pour the batter over the cranberries (directly in the cast iron skillet) and gently spread in an even layer.

Bake 35-45 minutes or until the cake is golden on top and a toothpick inserted in the center comes out clean.

In Dessert, Entertaining Tags cake recipes, holiday baking, holiday planning, Thanksgiving Dinner, Thanksgiving recipe
Comment
No-Sugar-Added-Apple-Butter-Set-the-Table.jpg

Apple Butter

Rachael White November 3, 2014
No-Sugar-Added-Apple-Butter-Recipe-Set-the-Table.jpg

I love so many things about this time of year. So. Many. I don't even know where to start. Sometimes, I sit down to write a blog post and my mind just starts spinning with all the crisp-air-apple-pie-pumpkin-spice-boots autumny things. It's hard to narrow it down, as you may be able to tell. I'm not sure how long this will last, but this time of year also brings me back to fall Tokyo. It felt like an eternity before the leaves would start changing and the weather became perfectly chilly for things like hot chocolate, yakiimo, and roasted chestnuts. There were streets lined with Gingko trees that became shockingly yellow, creating an amazing golden light that you don't expect to see in a massive city. My favorite trees, no matter the season, were Japanese maples. Their small, star-like leaves were memorizing. I used stand beneath the branches and stare up at the bright red stars, their little points overlapping and creating perfect patterns and an endless blanket of autumn beauty against a brilliantly blue sky.  That, among other things, is where my mind wanders when I start making my fall favorites like pumpkin muffins (coming soon!) and this apple butter.

Apple butter is one of those things I make when I have an overabundance my favorite fruit. When fall arrives, I stock up on all my favorite apples and I'm blessed to have friends who bring bags of apples from their backyard trees. I'm convinced I could never have enough apples around, but having the space to store them is another issue entirely. So, when I start to feel a bit cramped, this apple butter is a perfect way to make the house smell incredible. It also helps me hold on to my favorite seasonal flavors for as long as humanly possible.

What makes this apple butter better than all the rest? Yep. I heard you.

Most recipes call for quite a lot of brown sugar, which is delicious but not so much good for a person who might need to have apple butter every day. *raises hand guiltily* Instead of packing this apple butter with sugar, I added several dates to provide a sweetness quite similar to brown sugar without all the...well...sugar.

Here's what you should do as soon as possible: get the ingredients you need for the apple butter, get them going over low heat on your stove-top or in your slow cooker, and sip on some hot cider while mulling over all the reasons why this is greatest time of year. Because, let's be honest, it just is.

Apple-Butter-Recipe-Set-the-Table.jpg

Apple Butter

Makes about one 12 oz jar

  • 6 large apples, cored, cut into wedges, peel left on
  • 6 pitted dates
  • 2 teaspoons cinnamon
  • 1/2 teaspoon nutmeg
  • 1/4 teaspoon allspice
  • 1/4 teaspoons kosher salt
  • 1 cup water

Combine all ingredients in a medium saucepan over medium low heat. Bring to a simmer, cover, reduce heat and cook for 30 minutes until the apples and dates are softened. Remove from the heat and blend with an immersion blender until smooth. Place the lid slightly ajar on the pan, return to low heat and gently simmer, stirring occasionally, until the apple butter has thickened, about 30-45 minutes. Add more liquid as needed so the apple butter doesn't burn or become too paste-like.

Remove the apple butter from the heat and cool completely before putting in a jar with a tight-fitting lid. The apple butter will keep in the refrigerator for about 2 weeks and tastes fantastic spread on toast, muffins, or with savory items like pork tenderloin or chicken.

*To make this in a slow cooker, add all ingredients and set on low for 8 hours. Purée the ingredients, set the lid slightly ajar, and continue cooking for another hour on low heat.

In Dessert, No Added Sugar, Sides + Condiments, Vegetarian Tags apples, fall apple recipe, no sugar added
2 Comments
Irish-Apple-Cake-Set-the-Table.jpg

Irish Apple Cake

Rachael White October 29, 2014

After a couple of pretty hectic and overwhelming weeks, I was able to spend a few quiet moments in my kitchen today calmly baking and sipping tea while listening to music that did not involve Disney or Raffi. I had forgotten how therapeutic it can be to cook for no other reason than "just because". I kept things simple and seasonal with this beautiful and delicious Irish Apple Cake. Every step, from peeling and slicing the apples, creaming the butter and sugar, and crumbling the topping made me feel a little more like myself. The house smelled like warm cinnamon and apples, which was perfect on one of the first truly fall-like days we have had so far. Crisp, cool October air wafted through my kitchen window and I think I breathed a little deeper than usual in an effort to savor every wonderful smell.

Irish-Apple-Cake-with-Streussel-Topping-Set-the-Table.jpg

Aside from needing the simple therapy baking provides, I also felt it was appropriate to bake a cake during my first week of the third trimester. Baby is moving and grooving, kicking my ribcage whenever possible, and making it difficult to get a full night's sleep. This little boy is so active already that I'm beginning to think the whole second-child-is-easy-going rumor is a total lie. I guess we'll see what happens when he arrives! Until then, I'm going to keep drinking lots of chamomile tea, following every meal with a couple of Tums and taking advantage of random energy boosts to do very important things. Like baking cake.

1501755_894412169273_4589932014322374568_n.jpg

As I was researching recipes for Irish Apple Cake, I realized that they are all slightly different. Some have crumble topping while others do not. Some call for brown sugar while other use white. It seems that apple cake is different from home to home. I based my recipe on this one from The View from Great Island. 

Irish-Apple-Cake-Recipe-Set-the-Table.jpg

I may or may not have had this for breakfast this morning. I blame the baby.

Irish Apple Cake

For the streussel topping:

  • 2 large Granny Smith apples, peeled and thinly sliced
  • 1/2 cup unsalted butter, room temperature
  • 1/4 cup sugar
  • 1/4 cup light brown sugar
  • 2 large eggs
  • 1/4 cup buttermilk
  • 1 1/4 cups all purpose flour
  • 1 tsp baking powder
  • 1 tsp cinnamon
  • 1/4 teaspoon nutmeg
  • 1/8 tsp salt
  • confectioner's sugar
  • 3/4 cup flour
  • 1/4 cup old fashioned rolled oats
  • 1 stick unsalted butter, chilled and cut into small cubes
  • 1/2 cup light brown sugar

Instructions

  1. Preheat the oven to 350 degrees Fahrenheit.
  2. Butter and flour a 9 inch spring-form pan.
  3. Cream together the butter and sugars until light and fluffy, about 2-3 minutes.
  4. Add the eggs, one at a time, and beat until fully incorporated.
  5. In a separate bowl, combine the flour, baking powder, cinnamon, nutmeg and salt. Fold the dry ingredients into the bowl with the butter and sugar. Add the buttermilk and stir until just combined.
  6. Pour the batter into prepared spring-form pan and spread into an even layer.
  7. Make the streussel topping by combining the flour, rolled oats, butter and sugar in a small bowl. Use your finger tips to work the butter into the dry ingredients until you have a crumbly mixture.
  8. Layer the apples over the cake batter and sprinkle with the streussel topping.
  9. Bake 50-60 minutes or until the top is golden brown and a toothpick inserted into the center of the cake comes out clean.
  10. Sprinkle with powdered sugar before serving.
In Dessert Tags apples, cake recipes, fall baking, seasonal
4 Comments
Pumpkin-Pie-Latte-Set-the-Table.jpg

Homemade Pumpkin Pie Latte

Rachael White September 10, 2014

This morning I went to one of the few truly local, quality coffee shops in our neighborhood. They serve coffee that has been roasted in Boulder, all the employees are volunteers, their food is almost all made in-house, and the money they make goes to providing clean water to those in need in Africa. To make the whole thing even more wonderful, they have a killer Pumpkin Pie Latte made with ACTUAL PUMPKIN. It is my new fall obsession and I don’t know that I can ever go back to the run-of-the-mill “pumpkin” stuff. And just to be clear, I have been obsessed with the pumpkin latte concept since it began. I mean, completely and utterly obsessed to the point that I felt a palpable sadness when we lived in Tokyo and couldn’t get anything similar.

Homemade-Pumpkin-Pie-Latte-Set-the-Table.jpg

Aside from my obsession with their current seasonal latte flavor, this little coffee shop made me smile this morning thanks to the kindness of three people. The first was a fellow mom, sans-children, picking up some coffee before she started her day. She glanced at my growing belly and asked if I was expecting and the conversation continued from there. She told me about her two kids, we shared sympathies for rough mornings of tantrums and trips to the grocery store that leave us wondering why we do these things. Then we moved to those sweet moments that make it all worth it: there are the impossibly wonderful little kisses, the hugs that never last long enough, and the countless other ways kids remind us why we get into this whole parenting thing. It was a brief conversation, but it was comforting to me. As this fellow mom grabbed her coffee and prepared to carry on with her day, she wished me the best of luck and she meant it.

The next encounter was another customer who had just walked in to order his coffee with a friend. I was leaning against the door frame near the coffee-pick-up counter, absent-mindedly rubbing my belly, and he said, “That is the sweetest thing ever.” I smiled quietly to myself and realized that, yes, it is the sweetest thing ever. It was a little sad for me when I was no longer pregnant with my son because I missed that quiet connection. Of course, I developed a connection that is much stronger with him in the weeks and months that followed his birth, but there is nothing like the feeling when they are still inside.

As I grabbed my pumpkin pie latte from the counter, the barista, who I’d seen the day before, said the usual “have a great day”, but he followed it up with something I wasn’t expecting. He said, “It was really nice to see you two days in a row”.

Pumpkin-Latte-Recipe-Set-the-Table.jpg

None of these encounters lasted all that long, but each one of them made me love that little coffee shop and the people that frequent it. It made me appreciate the fact that finding a little local spot rather than a chain can absolutely change your outlook on what would otherwise be a normal, run-of-the-mill day.

Today, I’m sharing my own version of a Pumpkin Pie Latte since I know the majority of you cannot come out to Old Towne Arvada and get one at my favorite little spot. And most of us cannot afford the $4 bill too often. I’d like to encourage you to make this for your friends. Share it with them and let the warm spices do their work to make them feel comforted and warm inside. And while you’re at it, take a moment to say something loving and kind to them.

Because loving one another can't hurt, right?

Homemade Pumpkin Pie Latte

Serves 1

Total time: 10 minutes

Ingredients

  • 1/2 cup pumpkin puree
  • 1 tablespoon pumpkin pie spice, plus extra for garnishing
  • 1/2 cup maple syrup
  • 6 oz whole milk (or 2%)
  • 2 oz espresso or very strongly brewed coffee
  • 2 tablespoons whipping cream, whipped and left unsweetened

Instructions

  1. In a small saucepan, combine the pumpkin and the pumpkin pie spice over medium heat.
  2. Stir with a spatula or wooden spoon until heated through. This lets the spices really bloom and makes the pumpkin have a more intense, less raw flavor.
  3. Add the maple syrup and stir for about 3 minutes until the mixture resembled a thick (but not too thick) syrup. This is a lot like making a simple syrup for cocktails.
  4. Meanwhile, put the milk in a glass measuring cup that is microwave safe and heat for about 1 minute and 30 seconds until steaming but not scorched.
  5. Add 1 or 2 tablespoons of the pumpkin syrup to the milk and whisk to combine.
  6. Add the espresso to a coffee mug and top with the milk/pumpkin mixture. Stir to combine.
  7. Top with a dollop of whipped cream and a sprinkle of pumpkin pie spice.
  8. Enjoy immediately!
In Breakfast & Brunch, Dessert, Entertaining, No Added Sugar, Vegetarian Tags coffee, fall recipe, pumpkin
18 Comments
← NewerOlder →

Search Posts


Featured Posts

Summary Block
This is example content. Double-click here and select a page to feature its content. Learn more
Featured
Jul 29, 2025
Cursus Amet
Jul 29, 2025
Jul 29, 2025
Jul 22, 2025
Pellentesque Risus Ridiculus
Jul 22, 2025
Jul 22, 2025
Jul 15, 2025
Porta
Jul 15, 2025
Jul 15, 2025
Jul 8, 2025
Etiam Ultricies
Jul 8, 2025
Jul 8, 2025
Jul 1, 2025
Vulputate Commodo Ligula
Jul 1, 2025
Jul 1, 2025
Jun 24, 2025
Elit Condimentum
Jun 24, 2025
Jun 24, 2025
Jun 17, 2025
Aenean eu leo Quam
Jun 17, 2025
Jun 17, 2025
Jun 10, 2025
Cursus Amet
Jun 10, 2025
Jun 10, 2025
Jun 3, 2025
Pellentesque Risus Ridiculus
Jun 3, 2025
Jun 3, 2025
May 27, 2025
Porta
May 27, 2025
May 27, 2025

Powered by Squarespace