Quantcast
  • Contact
  • Portfolio
  • Subscribe
  • Recipes
Menu

Set the Table Photography

photography
  • Contact
  • Portfolio
  • Subscribe
  • Recipes
×
Peanut Butter Burger with Egg & Bacon | Set the Table

Peanut Butter Cheeseburger + Fried Egg

Rachael White May 28, 2013

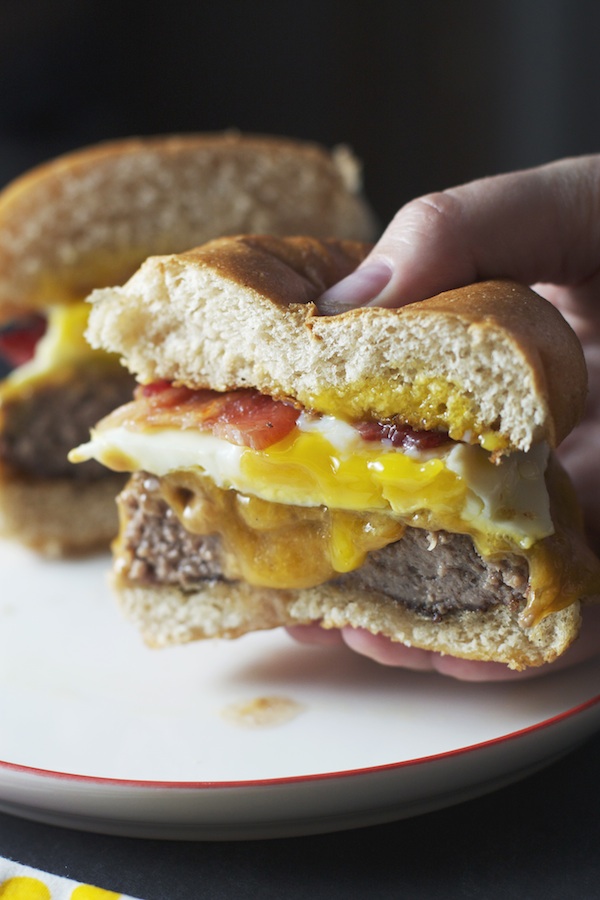
That's right. Peanut Butter Cheeseburger.

I think it’s a good idea to warn you that this post is a little unusual. It is far from healthy and possibly quite unusual to some. Let’s just say you’ll have to have a little extra trust that I wouldn’t steer you in the wrong direction.

OK...moving on.

Brad grew up here in Colorado and I grew up in Minnesota, which often leads to the question, “So how did you two meet?” Long story short, we met in the lovely, picturesque town of Decorah in northeastern Iowa. We both attended Luther College and, after 3 years of failed relationships there, we had sworn off dating all together. As cliché as it sounds, that is when we found each other. Brad threw a frisbee that went astray on the library lawn. It landed at my feet. I threw it back. And that was the beginning.

Neither of us were looking to get into a relationship, but it happened.

Peanut Butter Burger Ingredients

I’m pretty sure peanut butter hamburgers have a similar story. Two things that come from two different places manage to come together to make something that, in the end, makes perfect sense. You might be concerned. Perhaps you think I’m trying to trick you into trying something for a TV show featuring crazy food. Please believe me when I say that this combination of peanut butter, ground beef, and a fried egg is nothing short of wonderful.

Here’s the best way to think about it: Asian peanut sauce is made with peanut butter. Then, chicken or beef are dipped into it making a delicious dish from south Asia. So, really, this isn’t that weird.

Melty PB
Melty PB
Cheese time!
Cheese time!

I had my first peanut butter burger at a little restaurant called T-Bock’s in our college town of Decorah. All of my friends knew exactly what it was. One of them ordered the peanut burger topped with a fried egg and the restaurant eventually named after him, calling it the “Gilmore”.

Brad and I often reminisce about the days when we would go to T-Bock’s and eat a Gilmore burger with a tall, cool Blue Moon. One day we realized that we didn’t have to wait until our next Iowa trip to enjoy the peanut buttery, beefy goodness. Duh. We could make it at home! We used natural peanut butter, sharp cheddar cheese, and of course added a fried egg. Here’s the secret: you must use the cheese to hold the melty peanut butter in place. Yes, you could skip it, but you’ll have a runny mess on your hands. And you’re already going all out so you might as well add cheese. And maybe some bacon. Am I right?

Peanut Butter Burger | Set the Table

I’m sharing this recipe with you because I don’t think it is fair to keep such a delicious treat a secret any longer. Be brave. Be bold. Try this out the next time you grill. You won’t be sorry!

Peanut Butter Cheeseburger + Fried Egg

Makes 4 burgers


  • 1 pound 80% lean ground beef
  • 4 tablespoons natural peanut butter (we used JIFF Natural PB, but try to find a brand that is creamy not hard)
  • 4 slices sharp cheddar or American cheese
  • 4 slices cooked, thick cut bacon
  • 4 kaiser rolls
  • 1 tablespoon olive oil
  1. Prepare your burgers as directed in the link above, or use your usual method and place them over medium coals.
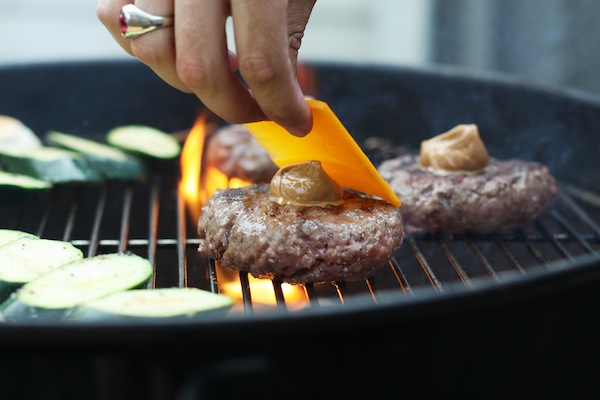
  2. After about 3 or 4 minutes, flip the burgers and spoon 1 tablespoon of peanut butter in the middle of each patty.
  3. Next, place the cheese slices over the peanut butter. The cheese will melt, creating a peanut butter 'pocket' of sorts, holding the melted peanut butter in place.
  4. Cook the burgers until desired doneness.
  5. Meanwhile, brush the kaiser rolls with the olive oil and toast on a cooler section of the grill for a minute or two until they are golden and have nice grill marks but are not burned.
  6. Fry the eggs over medium heat until the whites are set but the yolks are runny.
  7. Sprinkle the eggs with salt and pepper, then place them on top of the cheese on each burger.
  8. Top with the bacon.
  9. Serve the burgers on the toasted kaiser rolls and enjoy!

Notes: We use a method from America's Test Kitchen to grill our burgers. Click here if you'd like to sign up (for FREE) which I highly recommend doing. You have unlimited access to their recipes, which are excellent.


In Lunch & Dinner Tags burger recipe, Grilling Recipes, Peanut Butter
14 Comments
Grilled Cheese & Arugula Pesto

Grilled Cheese + Arugula Pesto

Rachael White May 22, 2013

I am embarrassingly clumsy. Without a doubt, there is more truth to that statement now that I'm a mom. A chair could be sitting in front of me and I will absolutely walk right into it at full speed, stubbing my toe and creating a new bruise on my knee.  There are some days when Brad can't do anything but chuckle at me because I am running into and tripping on everything in the room. Eventually I reach a point when I have to give up and sit down to collect myself. I feel like this happens because I'm trying to do approximately 2 million things simultaneously. We all do that sometimes, don't we? It's possible that the only solution is to slow down, be aware of our surroundings, and eat a grilled cheese sandwich and watch a Disney movie.

Yes, that is acceptable at your age.

There's something about grilled cheese that immediately brings me back to being a kid cuddled up with my favorite blanket on the couch. Life was slower. I had bruises but they were from playing outside, not a result of mindlessly running into furniture.

Arugula Pesto
Arugula Pesto

There is nothing wrong with the classic grilled cheese of my youth. Buttered, toasted bread and melty cheese is never a bad thing. But sometimes it is fun to put a new twist on a childhood favorite. Arugula pesto is one of those things, like basil pesto, that is so easy to make and instantly brings a level of elegance to a meal. It can be used as a pizza sauce, drizzled over scrambled eggs, and in this case, a way to give grilled cheese a face lift. I'm also toying with the idea of gnocchi tossed with fresh peas and arugula pesto. Yes?

Arugula Pesto Grilled Cheese

Even if you are not clumsy and you manage to move from place to place with ease, I feel confident you will find the perfect moment to make this grilled cheese sandwich. Remember to take your time, as you should in life, when you are making this. Toast the bread slowly, which helps create a more evenly golden and crispy crust and helps the cheese to melt perfectly.And don't be stingy with the butter. That is key.

I will never outgrow grilled cheese. Or Disney movies. And I'm OK with that. What are your favorite comfort food/movie combinations? I'd love to hear about them!

Grilled Cheese with Arugula Pesto

Makes 1 sandwich

2 slices honey whole wheat bread

3 T butter, room temperature (easier for spreading)

1/3 cup shredded mozzarella cheese

2 tablespoons arugula pesto (recipe below)

Take 2 tablespoons of butter and spread it evenly on both sides of each piece of bread. In a heavy skillet (I use cast iron) melt the remaining 1 tablespoon of butter over medium-low heat. Place the two slices of bread in the pan and toast until golden brown, about 3 or 4 minutes. Turn the bread slices over and begin toasting the other side. While the bread toasts, spread the pesto on one of the slices. On top of the pesto, add the mozzarella cheese in an even layer. Top with the other slice of bread with the more toasted side on the inside of the sandwich. Toast the sandwich for about 2 minutes on each side or until the bread has a golden crust. Cut in half and serve immediately.

Arugula Pesto

3 cups arugula

1/3 cup toasted pine nuts

3 garlic cloves, peeled

1/2 cup grated Parmesan cheese

2/3 cup olive oil

salt and pepper

In the bowl of a food processor, add the arugula, pine nuts, garlic and Parmesan cheese. Pulse until coarsely chopped. With the machine running, slowly stream the olive oil into the arugula mixture. Process until smooth and creamy. Season to taste with salt and pepper. Use immediately or store in an airtight container in the refrigerator for 1 week.

In Lunch & Dinner, Vegetarian
6 Comments
French Bread Pizza with basil

French Bread Pizza + Basil

Rachael White May 15, 2013

Growing up, my family and I enjoyed pizzas most Friday nights. We would gather in the TV room, my sister and I on the emerald green carpet and my parents on the two-person sofa, watching Family Matters, Boy Meets World and Step-by-Step. We would laugh until we cried, not always at the corny sitcoms but at the jokes we made with each other. I still love spending time with my parents and sister like that. I doubt that will ever change. My hope, deep in my heart, is that I can help create similar memories for my family. The kind of memories that make us all remember that we are blessed to be able to act like the crazy, weird people we are without shame. I think French bread pizza might be the answer.

Sprinkling Cheese
Sprinkling Cheese
Prepared French Bread Pizzas

This is one of the easiest meals that I routinely make for dinner. Lately, it has been appearing on the dinner table once a week, usually on the nights when I know Brad will be working late. Any time I see some nice French bread at the grocery store, I go ahead and buy it so I can put it in the freezer for the next French bread pizza night. Then there's shredded mozzarella cheese, which I try to keep around always, and pizza sauce. This may surprise some of you, but I use store-bought pizza sauce. Sometimes that's just the way to go. For sanity's sake.

French Bread Pizza
French Bread Pizza

From start to finish, these pizzas take barely 10 minutes to put together and there are hardly any dishes to clean up afterwards. One of my favorite things about meals like this is that they act like a blank canvas. You can add vegetables that need to be used up, like broccoli florets or baby spinach, or leftover roast chicken. You can be as creative or as simple as you like. The classic combination of sauce, mozzarella and fresh basil never gets old in my opinion, and I often sprinkle red pepper flakes on top of my pizza. Or hot sauce. Lots of delicious hot sauce.

Having friends over for dinner? Why not make a variety of toppings available so everyone can make their own French bread pizzas? Pizza and beer cannot be a bad thing for a party.

I've been thinking about why pizza nights are always so much fun and I think I know the answer. It's because no one has to spend a ton of time preparing food, doing dishes, or generally stressing over what to have for dinner. Everyone is relaxed and happy. I may not be right about many things, but I'm pretty sure I'm right about that.

French Bread Pizza + Basil


Makes 4 Servings

  • 1 loaf sourdough French bread
  • 1 cup pizza sauce
  • 1 1/2 cups shredded mozzarella cheese
  • 2 tablespoons olive oil
  • course salt
  • 1 garlic clove
  • fresh basil, chopped or cut into strips
  • red pepper flakes, to taste
  1. Begin by preheating the broiler.
  2. Cut the bread in half the short way, then cut each half again as though you were going to make a sandwich. Brush the cut sides with the olive oil and sprinkle with coarse salt. Place the bread on a baking sheet and put under the broiler until the bread is lightly golden. Rub the cut sides of the bread with the garlic clove.
  3. Next, spoon some pizza sauce on each piece of bread then sprinkle with the cheese. Return to the oven under the broiler and, watching closely, cook until the cheese is melted and bubbly.
  4. Sprinkle the cooked pizza with fresh basil and red pepper flakes. Serve and enjoy!


In Lunch & Dinner, Vegetarian Tags easy dinner recipes, french bread, pizza
5 Comments
Japanese Asparagus with Black Sesame

Asparagus + Black Sesame

Rachael White May 8, 2013

I’ve heard stories from Brad and my in-laws about asparagus hunting in Iowa. Brad’s grandparents live there and have been known to pull their car over at the sight of the green asparagus stalks reaching upwards from the depths of a ditch. Unfortunately, I haven’t had the opportunity to partake in this activity but I love hearing about it. What is more wonderful than the idea of foraging for food because you found it growing where it naturally wants to be at the proper time of year without having traveled hundreds of miles to be wrapped in two thick rubber bands and placed in the produce department in a grocery store chain.

Asparagus & Black Sesame

Spring seems to have finally settled in for most of us, making this the perfect time to enjoy asparagus. There are so many wonderful asparagus recipes out there right now, so I wanted to bring something different to the table. This beautiful Japanese method of preparing asparagus results in a bright, flavorful dish that is as wonderful to eat as it is to look at. The bright green becomes more vibrant with the black specks of sesame seeds that coat each spear.

I love this recipe because of the flavor and appearance but also because it gives me an excuse to break out my suribachi. A suribachi is a Japanese mortar and pestle that has an unglazed, textured surface. Using a wooden pestle, the sesame seeds in this case are rubbed against the grooves in the bowl until they look like black sand. Then, mirin and soy sauce are added making the mixture look a lot like wet potting soil. Riley loves soil. Therefore, he was very interested in “helping” me get the black sesame mixture out of my suribachi using the bamboo brush.

Suribachi Helper
Suribachi Helper

This is a very easy way to prepare asparagus and works perfectly as a side dish to salmon and rice, or even topped with a fried egg. If you don't have any asparagus on hand, you could also prepare green beans using this method. Just as beautiful and tasty!

Asparagus with Black Sesame

Asparagus + Black Sesame

Recipe adapted from Elizabeth Andoh's Washoku: Recipes from the Japanese Home Kitchen

*Don't worry if you don't have a suribachi. You can use a food processor or spice grinder to grind the sesame seeds, then just transfer them to a small bowl and stir in the liquid ingredients.

  • 1 bunch of asparagus (thinner is better, but you can use whatever is available)
  • 2 tablespoons black sesame seeds
  • 2 teaspoons mirin
  • 2 teaspoons light soy sauce

Bring a large pot of salted water to a boil. While the water heats up, break the woody ends off of your asparagus by holding onto each end and bending it until it naturally breaks. The bottom portion is the woody stuff that you don't want to use. Next, cut the asparagus into 1 1/2 inch pieces on an angle. Put the asparagus tips in a separate pile. When your water is boiling, add the asparagus except for the tips. After one minute, add the tips and continue cooking for another minute.

Drain the asparagus and transfer to a bowl to cool to room temperature.

While the asparagus cools, toast the sesame seeds in a dry pan over medium high heat. Once you start to smell the nutty scent of the seeds, remove them from the heat and transfer them to a suribachi. Grind the seeds until some are still intact and others are completely ground. Add the mirin and soy sauce and continue to grind until the mixture resembles wet soil. If needed, add a touch of water.

Scrape the black sesame mixture into the bowl with the asparagus and toss gently to coat. Mount the asparagus on small plates and serve room temperature or cold.

In Lunch & Dinner, Vegetarian, Cocktails and Appetizers
4 Comments
Tomato & Goat Cheese Shortcake

Tomato Scallion Shortcakes + Whipped Goat Cheese

Rachael White May 6, 2013

My days are typically spent, as one might imagine, doing all sorts of mommy things. Stopping toddler from pulling place mats with stuff on them off the table. Stopping toddler from poking the dog in the eye. Stopping toddler from drinking dog water. Stopping toddler from reaching for my morning coffee. Having a dance party with said toddler to the tune of The Most Wonderful Thing About Tiggers. Singing You Are My Sunshine before nap time as toddler sings along with the sweetest sounding “doo” as he snuggles his blankie. Somewhere in there do laundry, cook, clean, photograph, write, and maintain some level of sanity.

Despite the overwhelming nature of parenting a tiny human, I adore all of these busy moments because they are fleeting. Riley goes through stages so quickly and I just know...I know...that one day I’ll be wishing I could experience all of these things again. Even the dog water part. Probably.

Tomato & Whipped Goat Cheese Shortcake

Even though I love these moments, it is the most fantastic feeling to sit down to a simple, adult meal. Sometimes this means sitting down with some of my favorite cookbooks in search of a meal that is easy, satisfying, and out of the ordinary. These tomato scallion shortcakes from Smitten Kitchen fit these requirements perfectly and are now a favorite in our house. Brad, who isn’t actually much of a tomato person, loved them. Riley, lucky boy that he is, got to taste the biscuits fresh out of the oven. They were “ho-T” in his words.

Tomato Shortcakes Smitten Kitchen

Let's just talk about the biscuits for a second: they were SO light and flaky I almost didn't know what to do with myself. As they baked, the tops became a lovely golden brown and they puffed up like a dream. I'm not sure that anything could be better and more comforting than a buttery, warm, flaky biscuit just out of the oven. And these were no exception.

Cherry and Pear Tomatoes

The tomatoes are dressed lightly with olive oil, vinegar (the recipe called for red wine vinegar, but I used Champagne vinegar because it's what I had), salt and pepper. Then, they are scooped onto half of a biscuit. Immediately the bread begins to absorb the lovely vinaigrette and tomato juices. Then, the tomatoes are topped with a light, creamy whipped goat cheese before being capped with the top half of the biscuit. Beautiful.

We enjoyed our shortcakes on the patio as the sun slowly sank, leaving the air crisp and cool. The sweet, juicy tomatoes with the creamy, tangy goat cheese and flaky biscuits created the perfect balance of textures and flavors. Add white wine and a nice salad and you’ve got a fantastic meal. It was the perfect way for us to end a very busy day/week.

I know I'll be making various versions of this recipe throughout the summer- adding basil to the tomatoes, using bunches of chives in the biscuits, or maybe even dill, and perhaps sprinkling a little crispy prosciutto over the top (Brad's current wish). I've been thinking about what a great first course this would be for a spring or summer dinner party, too. It's so easy,  wonderfully colorful and elegant.

Here's the deal: if you haven't already purchased Deb's cookbook, get on it! It is full of beautiful recipes like this one and will no doubt become a family favorite.

Have you tried any cookbook recipes lately that you can't wait to make again and again? I'd love to hear about them in the comments below! I'm always looking for new books to add to my collection, much to my husband's dismay...

Tomato Scallion Shortcakes with Whipped Goat Cheese

Recipe very slightly adapted from The Smitten Kitchen Cookbook

Scallion Biscuits

2 cups plus 2 tablespoons all-purpose flour

2 tablespoons baking powder

3/4 teaspoon table salt

5 tablespoons unsalted butter, frozen for about 30 minutes (I'll explain later...don't worry)

2 scallions, thinly sliced (I added more because, well, I love scallions)

1 cup whole milk

Tomato Salad

1 tablespoon olive oil

1 1/2 tablespoons champagne vinegar

1/8 teaspoon course salt

Freshly ground black pepper

1/2 pound cherry tomatoes in assorted colors (I used cherry and pear tomatoes)

Toppings

3 tablespoons whipping cream

4 ounces goat cheese, softened

Preheat the oven to 425 and line a baking sheet with parchment paper.

In a large bowl, whisk together the dry ingredients for your biscuits. Now, take your frozen butter and use a cheese grater to grate it into your dry ingredients. Use your fingers to evenly distribute the butter so the mixtures forms course crumbs. Stir in the sliced scallion(s), then add the milk and stir until the mixture is just evenly wet. Turn the dough onto a lightly floured surface and pat to 3/4 to 1 inch thickness. Use a round cutter, about 3" in diameter, and cut 6-8 biscuits. Place each biscuit on the prepared baking sheet. Bake for about 15 minutes or until the biscuits have turned goden brown on top.

While the biscuits are baking, combine the olive oil, vinegar, salt and pepper in a medium bowl. Cut the tomatoes into halves or quarters, depending on their size, and add them to the bowl tossing lightly to coat. Set aside.

In another bowl, whip the cream using an electric hand mixer until soft peaks form. Add the softened goat cheese and continue to beat the mixture until it is fluffy. Set aside.

When the biscuits are done, allow them to cool on the pan for 2 or 3 minutes until they are still warm but comfortable to handle. Cut each biscuit in half and put on a plate. Top the bottom half with a scoop of the tomatoes, then a dollop of the goat cheese and cover with the top half of the biscuit. Garnish with additional scallions if desired. Serve immediately!

In Lunch & Dinner, Vegetarian, Cocktails and Appetizers Tags biscuits, goat cheese, tomatoes, vegetarian
9 Comments
Miso Ice Cream Pies
Miso Ice Cream Pies

Dinner Parties + Miso Ice Cream Pies

Rachael White May 1, 2013

With images of a warm, summery weekend still in the back of my mind and the remains of a little sun burn on my shoulders, I’m trying to wrap my head around what is happening outside right now. It’s snowing. Big fat flakes that are piling up fast. It’s May 1st and we are expecting somewhere between 5 and 10 inches. Personally, I love it but I am worried about the light blue bird egg that recently appeared in one of my hanging baskets. I didn’t bring it inside because I want to make sure the birds continue to take care of the little egg. Here’s hoping both the egg and the plant survive...

Over the weekend, not only were we able to enjoy some pretty amazing weather, we also brought out some of our treasures from life in Japan that we have been saving for a dinner party. We had collected some fun stuff for hosting a Japanese dinner party and hadn’t had the chance to break them out until now. It was time. We have an antique kimono panel that we use as a table runner:

Table Settings
Table Settings

And little Dachshund-shaped chopstick holders that were handmade in Kyoto...

Chopstick Dogs
Chopstick Dogs
Place setting
Place setting

And we hung lights outside, even though it was a bit cool once it got dark to sit outside. Still, the glow added a nice, festive feel to the evening.

Party Lights
Party Lights

When it comes right down to it, the table was a bit eclectic between the dishes and decorations, but that is actually quite fitting for a Japanese-inspired table. Often times, dining out involves many small dishes piling up at the table. If you’re dining in a really small, traditional izakaya, those dishes often do not match. But there is an endearing quality to all the different patterns and shapes that litter the table top as you devour skewers of yakitori, plates of gyoza, and glasses of Kirin beer.

For our dinner party this weekend, I served my favorite Japanese-inspired dishes to 8 diners. We began the evening by making a toast with sparkling saké and nibbled on edamame crostini flavored with lemon and mint...

Edamame Crostini
Edamame Crostini

Next, we enjoyed the lovely, mild flavor of scallop and corn gyoza with spicy sriracha sauce. Match made in heaven.

Scallop-Corn-Gyoza
Scallop-Corn-Gyoza

Then moved on to perfectly grilled (by Brad) chicken yakitoriwith a fresh, flavorful yet light Asian slaw...

Chicken-Yakitori
Chicken-Yakitori

Roasted salmon with miso butter and peas (apologies for the iPhone photo- I posted this on Instagram)...

Salmon with Miso Butter

And finally, a dessert with some umami, miso ice cream served on top of brownies. My original idea was to make mini ice cream pies, but after making the first 4 pies, my crust crumbled like sand when I tried removing it from the mini molds. So, I made an emergency batch of brownies and topped it with a scoop of brown sugar miso ice cream. If you haven’t tried this recipe that I posted on Tokyo Terrace a while back, you really must. It is the most lovely ice cream- different enough to mix up your usual ice cream routine without being totally weird. Sweet, white miso is my favorite, but you could experience with other shades of miso as well.

We enjoyed the 4 successful mini ice cream pies last night with Brad's parents. They were wonderful and will definitely become a frequent rotation in my entertaining repertoire.

Ice Cream Pies
Ice Cream Pies

I won’t post the recipe I originally used for the chocolate cookie crust, since it obviously did not work very well for me. But here is another one from Food & Wine that I have had a lot of success with in the past. I’d stick with that.

The crisp chocolate crust with the creamy ice cream and rich whipped cream make a decadent, elegant dessert with layers of subtle flavor that guests will love. I especially love that you can make this in advance. Just assemble the pies, place on a cookie sheet and wrap well with plastic wrap before putting them in the freezer. They will last about 3 or 4 days this way. And if you aren’t interested in making your own ice cream, find your favorite store-bought flavor and use that in place of the miso ice cream in this recipe. Strawberry, salted-caramel, mint chocolate chip...they would all work beautifully!

What are you favorite dinner party recipes? I'd love to hear what you all make for company!

Mini Miso Ice Cream Pies

Makes 4 individual pies using 4-inch molds, a or one 8-inch or 9-inch pie or tart

1 quart brown sugar miso ice cream (click here for recipe), chilled in the freezer and then softened so it can be easily spooned into the crust

1 recipe chocolate cookie crust (click here for recipe)

1 cup heavy whipping cream

1 tablespoon sugar

1/2 teaspoon vanilla extract

Begin my making the crust. Once it has chilled, spoon the ice cream evenly into the 4 mini crusts, or your one larger crust. Place the pies on a cookie sheet and put them in the freezer for about 3 hours. If you are going to wait a few days to serve them, wrap them in plastic wrap after the 3 hours and leave them in the freezer until you are ready to serve them.

Before serving, place the whipping cream in a medium bowl or the bowl of an electric mixer. Mix on medium high speed until the cream begins to thicken. Add the sugar and vanilla and continue to mix until soft peaks form. Spread a spoon full or two on each pie. Serve immediately.

In Dessert, Lunch & Dinner, Cocktails and Appetizers
6 Comments
← NewerOlder →

Search Posts


Featured Posts

Summary Block
This is example content. Double-click here and select a page to feature its content. Learn more
Featured
Jan 29, 2026
Cursus Amet
Jan 29, 2026
Jan 29, 2026
Jan 22, 2026
Pellentesque Risus Ridiculus
Jan 22, 2026
Jan 22, 2026
Jan 15, 2026
Porta
Jan 15, 2026
Jan 15, 2026
Jan 8, 2026
Etiam Ultricies
Jan 8, 2026
Jan 8, 2026
Jan 1, 2026
Vulputate Commodo Ligula
Jan 1, 2026
Jan 1, 2026
Dec 25, 2025
Elit Condimentum
Dec 25, 2025
Dec 25, 2025
Dec 18, 2025
Aenean eu leo Quam
Dec 18, 2025
Dec 18, 2025
Dec 11, 2025
Cursus Amet
Dec 11, 2025
Dec 11, 2025
Dec 4, 2025
Pellentesque Risus Ridiculus
Dec 4, 2025
Dec 4, 2025
Nov 27, 2025
Porta
Nov 27, 2025
Nov 27, 2025

Powered by Squarespace