Quantcast
  • Contact
  • Portfolio
  • Subscribe
  • Recipes
Menu

Set the Table Photography

photography
  • Contact
  • Portfolio
  • Subscribe
  • Recipes
×
Tomato-Salad-with-Halloumi-Fresh-Herbs-Set-the-Table.jpg

Heirloom Tomato & Halloumi Salad

Rachael White July 9, 2014

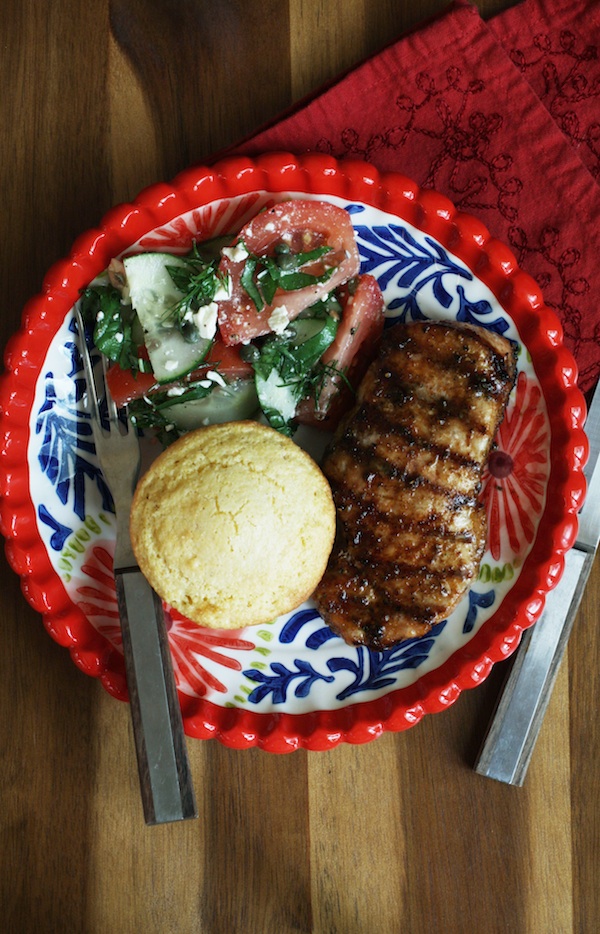
When Brad and I were living in Tokyo, I used to dream of summer when we would be able to come home and enjoy the best summer produce. I know it sounds strange. We were living in the food capitol of the universe, surrounded by amazing food stuffs every single day, and I was anxious to come home to farmer's markets. I guess that just speaks to how special this time of year is when it comes to eating fresh, whole foods. This heirloom tomato and halloumi salad is a perfect example of the kind of food I craved. Sweet, juicy, colorful tomatoes, salty cheese, and loads of fresh herbs simply cannot be beat. Well, the buttery salmon sashimi we bought at the local market always made me weak in the knees. So there's that.

Heirloom-Tomato-Halloumi-Salad-Set-the-Table.jpg

One year, we flew to San Francisco and stayed for a few days. It was our first time in this beautiful city and one of our first trips was to the Ferry Building Famer's Market. I immediately bought a giant heirloom tomato, some locally baked ciabatta, and locally made goat cheese. I tore off a piece of bread, slather it with goat cheese and used a plastic knife to cut a thick slice of tomato. Each and every bite was absolute heaven. Tomato juice dripped down my chin and I devoured that little sandwich like my life depended on it. Glorious.

That sandwich was the inspiration for this tomato salad with halloumi cheese and fresh herbs. This was my first time trying halloumi and I am officially obsessed. Just another reason why I've loved being part of the Go Sugar Free community. I keep learning about new and interesting foods that make my meals fulfilling without added sugar and, in this case, refined grains. The bright green herbs are all from my garden. I walked into the backyard to see what was ready to be cut and ended up with lemon thyme, basil and dill. You can do any combination of herbs you like. Oregano would be amazing.

Tomato-Halloumi-Salad-with-Fresh-Herbs-Set-the-Table.jpg

I finished the dish off with a drizzle of good olive oil, a light sprinkling of sea salt, and a bit of fresh ground black pepper. No sugar-laden salad dressings involved!

If you like this recipe, stay tuned because I'll be posting no sugar added/refined grain free recipes from now until August 11th. During that time, I hope to open your mind to exploring new ways to be kind to your body. After all, it's the only one you've got!

If you’re ready to learn more about Go Sugar Free, you can click here. If you decide to register, you'll be making a massive change in your life that can't do anything but help you become a better, healthier version of yourself.

If you’re interested in finding out more about Jacqueline’s philosophy but aren’t ready to commit to the GSF course, I urge you to get her eBook, 5 Easy Ways to Look Radiant Tomorrow Morning, and Don’t Waste Produce (DWP) Checklist (this is a HUGE help when it comes to no-waste meal planning and encouraging the consumption of more fresh, whole foods).

*This post contains affiliate links. All opinions are my own.

Heirloom Tomato & Halloumi Salad

Serves 2

Total time: 10 minutes

Ingredients

  • 2 medium heirloom tomatoes, thickly sliced
  • 1 teaspoon olive oil
  • 6 slices halloumi cheese
  • 1/3 cup fresh herbs like dill, basil, oregano and thyme
  • 1 tablespoon olive oil
  • sea salt
  • black pepper

Instructions

  1. Heat the 1 teaspoon olive oil in a small non-stick skillet over medium high heat.
  2. Add the halloumi slices and pan fry until golden brown. Flip and cook until the second side is golden brown as well.
  3. Arrange the tomato slices and warm cheese slices on a plate.
  4. Sprinkle with the fresh herbs, drizzle with the olive oil, and sprinkle with salt and pepper.
In Lunch & Dinner, No Added Sugar, Sides + Condiments, Vegetarian Tags Basil, cheese, halloumi, salad recipes, Summer Recipes, summer tomato recipes
2 Comments
Dry-Rubbed-Pork-Loin-Chops-Set-the-Table.jpg

Dry Rub Recipe + Grilled Boneless Pork Loin Chops

Rachael White July 2, 2014

We have been doing a lot of grilling this week. The temperatures climbed quite high in the beginning of the week making any sort of cooking in the kitchen completely miserable. Today is pleasantly cool which is a relief because I'm spending the entire day working on recipes for project I'm doing with United Noodles in Minneapolis. Lots of Japanese food happening today! But before I delve into a day of recipe testing, I want to share this perfect 4th of July recipe with you. It's really two recipes in one so it's twice as nice! If you're grilling this weekend, you're going to want this all purpose dry rub recipe that works for more than just pork loin chops. From fish and chicken to pork and beef you'll be rubbing everything with this flavorful, easy rub that you can make with spices from your pantry.

All-Purpose-Dry-Rub-Set-the-Table.jpg

I started making this rub a few years ago. Initially we only used it on chicken drumsticks but I quickly found that it tasted great on just about anything. You can also vary the recipe depending on your taste preferences. More heat? Add a little more chili powder. Smokier flavor? Add more cumin and use smoked paprika instead of regular. My favorite dried herb to use is oregano but you could easily substitute anything from dried thyme to basil or even rosemary. Then you just mix it all together and store it in an airtight container to use as you please!

Dry-Rub-Recipe-Set-the-Table.jpg
Easy-Grilling-Dry-Rub-Set-the-Table.jpg

Let's talk about pork chops for a minute. I tend to shy away from cooking pork chops just because they tend to dry out and have a flavor slightly resembling cardboard. Are you a little skiddish around pork chops too? Please tell me I'm not the only one. Luckily I have some good news: pork chops can be juicy, delicious and flavorful! There are two important steps to making a perfect grilled pork chop: 1) BRINE. Do not, under any circumstance, skip this step. It adds flavor and helps the chop retain its juices during grilling. 2) DRY RUB. Yep. That layer of flavorful seasoning is crucial and helps create a flavorful crust and locks in and enhances all that tasty pork flavor.

Dry-Rubbed-Grilled-Pork-Loin-Chops-Set-the-Table.jpg

I used boneless pork loin chops here but you could do this with bone-in pork chops as well. I made some simple cornbread muffins (from a box...gasp!) and a simple salad of sliced cucumbers, tomatoes, and a vibrant vinaigrette made with plenty of fresh basil, dill and lemon thyme. Oh, and lots of feta. Don't forget the feta.

Alright, enough talking. On to the recipe!

Dry Rub & Grilled Pork Chops

Serves 4

Total time: 30 minutes

Ingredients

For the dry rub:

  • 2 tablespoons brown sugar
  • 1 1/2 tablespoons kosher salt
  • 1 1/2 tablespoons cumin
  • 1 tablespoon paprika
  • 1 tablespoon dried oregano
  • 1 1/2 teaspoons chipotle chili powder
  • 1 1/2 teaspoons dried mustard powder
  • 1 tablespoon olive oil (for use just before rubbing)
  • 4 boneless pork loin chops about 1 1/2 inches thick
  • 2 tablespoons kosher salt
  • 1 tablespoon sugar
  • 2 quarts water

For the pork loin chops:

  1. Combine all the ingredients except the olive oil in a small bowl.
  2. If not using right away, transfer to an airtight container and store in a cool place (the fridge is great) for up to 3 months.
  3. Fill a large bowl with 2 quarts water.
  4. Add the salt and sugar and stir until dissolved.
  5. Place the pork loin chops in the bowl and let sit for 1 hour at room temperature.
  6. Remove the pork chops from the brine and pat dry with paper towels.
  7. Put 2 tablespoons of the dry rub in a small bowl with the 1 tablespoon olive oil.
  8. Use your fingers to massage the rub all over the pork loin chops. It may not seem like enough but a little goes a long way!
  9. Preheat a charcoal or gas grill to medium-high heat. If using charcoal, put your coals on one side of the grill leaving the other half as your cool side. If using gas, only light one side of the grill.
  10. While the grill preheats, make a tin foil tent large enough to cover the pork chops. Alternatively, you can use a roasting pan.
  11. Place the pork loin chops directly over the heat source on your grill. Grill for about 3-4 minutes per side or until you see nice grill marks.
  12. Move the chops to the cool side of the grill and cover with your foil tent. Allow the chops to cook for 10-15 minutes or until an instant read thermometer reads at least 145 degrees Fahrenheit.
  13. Serve with a fresh veggie salad and cornbread!


In Lunch & Dinner, Sides + Condiments Tags 4th of July Recipes, Condiment Recipes, Grilling Recipes, holiday recipes
1 Comment
The-Best-Macaroni-Cheese-Recipe-Set-the-Table.jpg

The Best Stovetop Mac & Cheese

Rachael White May 13, 2014

This is the best stovetop mac & cheese. It is made with real, creamy cheddar, salty parmesan and melty Emmantaler. This hearty bowl of pure comfort was exactly what I needed after the May snowstorm we experienced yesterday. And yes, I loved watching every snowflake fall. Seeing the wet, white snow pile up on the vibrantly green grass and leaves was beautiful but also quite confusing for someone who is not native to Colorado. The air is still very cold but I'm taking that as the perfect excuse for making macaroni and cheese before the weather is so hot that I can't stand it. That will happen all too quickly.

The-Best-Stovetop-Mac-Cheese-Set-the-Table.jpg

The sauce for this bowl of wonderfulness is made with a basic roux (light on the flour to avoid a grainy texture), evaporated milk (less likely to curdle), and 3 kinds of cheese. Here's the deal with the cheeses: I used sharp cheddar for its color and creamy flavor, Parmesan for its salty bite, and Emmentaler for its excellent melting quality. The combination was absolute perfection and, please don't judge me for this, was very similar to that stuff that comes in a foil-wrapped brick, melts like a dream, and has no actual cheese in it.

I call that a win.

Stovetop-Broccoli-Mac-Cheese-Set-the-Table.jpg

The Best Stovetop Macaroni & Cheese

Serves 4

Ingredients

  • 2 tablespoons unsalted butter
  • 2 teaspoons flour
  • 1 12 oz can evaporated milk
  • 4 oz sharp cheddar cheese, shredded
  • 1 oz emmentaler cheese, shredded
  • 1 oz parmesan cheese, grated
  • 1 teaspoon Dijon mustard
  • 2-3 drops hot sauce
  • 10 oz dried elbow macaroni
  • 2 cups broccoli florets

Instructions

  1. Begin by bringing a large pot of water to boil.
  2. Add the pasta and cook until just shy of al dente and add the broccoli to the pot with the pasta.
  3. Cook until the broccoli is bright green and crisp-tender, about 2 minutes.
  4. While the pasta water comes to a boil, melt the butter in a medium saucepan over medium heat. Whisk in the flour and cook, whisking constantly, until the flour turns a light golden color.
  5. Very slowly whisk in the evaporated milk.
  6. Add the mustard and hot sauce and bring to a simmer. Cook about 4 minutes until the sauce thickens.
  7. Remove the sauce from the heat and stir in the cheeses.
  8. Drain the pasta and broccoli and return them to the pot. Pour the cheese sauce over the pasta and fold it all together until you have a gorgeous, creamy pot of macaroni and cheese staring you in the face.
  9. Scoop into serving bowls and devour.

Notes

This macaroni and cheese keeps well in the refrigerator. Simply reheat for about 2 minutes in the microwave and enjoy!

The Best Stovetop Mac & Cheese | Set the Table #macandcheese #macaroniandcheese #kidfriendlymeals #recipe #dinnertonight #comfortfood
In Lunch & Dinner, Vegetarian Tags broccoli, cheese, easy dinner recipes, fast, Macaroni and Cheese, Pasta
4 Comments
grilled-ham-cheese-sandwich-sriracha-mayo9.jpg

Grilled Ham & Cheese + Sriracha-Lime Aioli

Rachael White April 22, 2014

After hosting Easter brunch this past weekend I was a little off my game. I made a simple grilled cheese sandwich for Riley's lunch today and burned it on one side. Things just didn't flow the way they normally do. I'm chalking it up to peeling too many eggs for my miso deviled eggs. It takes a toll on a person. I'm going to take it easy for a couple of days before delving back into serious cooking, most likely taking advantage of the days and days of leftover ham and cheesy hashbrowns we have in the refrigerator.

grilled-ham-and-cheese-sandwich5.jpg

My favorite way to use leftover ham (or turkey, or chicken, or anything else that makes even a little sense between two slices of bread) is a grilled cheese sandwich. Is there anything more classically comforting than a grilled ham & cheese sandwich? You just can't go wrong. Perfectly toasted, buttery bread surrounding gooey cheese, salty ham, and a smear of spicy Sriracha ailoi studded with lime zest. That is what's happening here. And it is amazing.

Let's talk about the aioli for a minute. I almost didn't call it aioli because it's not made in a traditional way. Instead, I made a healthier version with Greek yogurt. I found that at least a little mayonnaise was necessary to achieve that creaminess aioli is known for, but generally 2% or full-fat Greek yogurt makes an excellent substitute. Aioli is also typically made with a heavy hand of garlic, but since Sriracha is already so full of garlic flavor I decided not to add extra. In place of lemon juice? Lime zest. So, for those purists out there, I do realize this is not traditional aioli but we're just going to call it that for now.

grilled-ham-and-cheese-sandwich7.jpg

Grilled Ham & Cheese + Sriracha Aioli

Serves 1

Ingredients

  • 2 slices white or wheat bread
  • 2 slices sharp cheddar cheese
  • 2 slices smoked ham
  • 3 tablespoons unsalted butter, room temperature
  • 2 tablespoons Sriracha-lime aioli
  • 1/3 cup 2% or full-fat Greek yogurt
  • 1 tablespoon mayonnaise
  • 1 tablespoon Sriracha sauce
  • Zest of 1 lime

Instructions

  1. Begin by heating a cast iron or another heavy pan over medium low heat. I like cast iron because of the even heat and the picture perfect crust that forms on the outside of the bread.
  2. While the pan is heating, spread 1 tablespoon of the butter on one side of each slice of bread making sure the butter reaches all the way to the very edge.
  3. Melt the remaining butter in the heated pan and, once it has melted, place one slice of bread, buttered side down, in the pan and spoon 1 tablespoon of the Sriracha-Lime Aioli onto the non-buttered side.
  4. Place a layer of cheese on the bread, followed by a layer of ham, and another layer of cheese.
  5. Spread the remaining Sriracha-Lime Aioli on the remaining slice of bread (on the side without butter) and place on top of the sandwich. Press down on the sandwich slightly.
  6. Allow the sandwich to cook for about 5 minutes per side, watching the heat carefully and adjusting as necessary.
  7. Once the cheese is nicely melted and the bread is a deep golden color (mine looks especially dark because I used whole wheat bread) transfer it to a cutting board and let it sit for 2-3 minutes before cutting in half. Are you a triangles kind of person or a rectangles kind of person? I went with triangles.
In Lunch & Dinner, Sides + Condiments Tags aioli, easy dinner recipes, easy lunch recipes, grilled cheese month, grilled cheese sandwich, grilled ham & cheese sandwich, lime, Sriracha
1 Comment
Lemony-Quinoa-Salad-Set-the-Table.jpg

Quinoa Salad with Peas, Bacon & Golden Raisins

Rachael White March 26, 2014

Today I found some green, pointy hyacinth leaves coming up out of the soil in our backyard. They were in a place I had forgotten about completely. I carefully cleared away some of the debris that was covering the tender new leaves so I could more clearly see them, imagining what they would look like in each stage of growth, all the while relishing the feeling of dirt under my finger nails. Spring is such a lovely time of year, even when it takes its sweet time getting here.

Quinoa-Salad-with-Lemon-Herbs-Bacon-Set-the-Table.jpg

The weather may not be all that spring-like just yet, aside form a day or two here and there, but I'm starting to incorporate more seasonally appropriate food into our rotation. This quinoa salad, studded with bright green sweet peas, salty bacon, and sweet golden raisins is perfection. It was kind of an everything-but-the-kitchen-sink kind of concoction, but it turned out so well. I made a flavorful and bright dressing with lemon zest, lemon juice, olive oil, and lots of fresh herbs to bring even more freshness. It's been a delicious lunch this week and I know I'll be making various versions of it in the future.

Spring-Quinoa-Salad-Set-the-Table.jpg

I've been trying to incorporate more grains into my diet that aren't in the form of macaroni and cheese (the little man's favorite) or rice bowls (a family favorite). This is a step in the right direction, yes?

Another plus is that this is added sugar free! Perfect for anyone who has gone through (or plans to sign up for) this Go Sugar Free Course.

Just a reminder- you have 5 more days to register as an Early Bird for GSF. Click here if you're interested!

Spring-Quinoa-with-Bacon-Peas-Golden-Raisins-Set-the-Table.jpg

So, I'm going to continue watching my hyacinth (and tulips) grow and eventually bloom as a reminder that all good things come to those who wait. Spring included.

Want something you don't have to wait for? This recipe.

Quinoa Salad with Peas, Bacon & Golden Raisins

Ingredients

  • 1 cup quinoa
  • 1 cup fresh or frozen green peas
  • 2 lemons, zest and juice reserved
  • 1/4 cup olive oil
  • 2 tablespoons fresh flat leaf parsley, chopped
  • 2 tablespoons fresh basil, chopped
  • 1 tablespoon fresh dill, chopped
  • 1 tablespoon fresh chives, chopped
  • 4 slices thick cut bacon, cooked and crumbled
  • 1/3 cup golden raisins
  • 1/3 cup chopped pecans

Instructions

  1. Put 2 cups of water in a saucepan and bring to a boil.
  2. Add the quinoa and stir.
  3. Cover the pan, reduce heat so the water is just simmering, and cook until the quinoa is tender, about 15 minutes.
  4. Add the peas to the pan and stir with the quinoa. Cover and cook another 5 minutes.
  5. Transfer the quinoa to a large bowl.
  6. In a small bowl, combine the lemon zest, lemon juice, olive oil, parsley, basil, dill, and chives. Season with salt and pepper. Stir to combine.
  7. Pour the dressing over the quinoa. Add the bacon, raisins and chopped pecans and toss to coat.
  8. Serve warm, at room temp, or cold from the fridge.
In Lunch & Dinner, No Added Sugar Tags added sugar free, Bacon, healthy lunch recipe, no added sugar, Quinoa
Comment
Silky-Spiced-Carrot-Soup-Set-the-Table.jpg

Roasted Carrot Soup with Tillamook Greek Yogurt

Rachael White March 18, 2014

I'm learning that this time of year is a little crazy here in Colorado. One day it is a bright, sunny 70 degrees and the next brings piles of wet, heavy snow. I kind of love it. I'm a winter girl who loves being cozy in the house with something delicious cooking on the stove or in the oven. But I also get to the point where vitamin D is a necessity. And it must be in the form of beautiful, hot rays of real live sunshine.

Creamy-Carrot-Soup-with-Tillamook-Farmstyle-Greek-Yogurt-Set-the-Table.jpg

Spring in Colorado also means that crazy hot weather is not far behind. Last year it was far too warm to use the oven in our house. (We have a tiny swamp cooler that barely keeps half of the house at a comfortable temperature.) So, I'm trying to get all the oven time that I can under my belt before it's too much to bear. This means baking buttermilk drop biscuits, Irish soda bread, and roasting lots of vegetables. This soup was the result of a big sheet pan of carrots, onions, and garlic that I drizzled with honey and roasted for about an hour. Everything was perfectly soft and golden brown with a honey glaze that gave a subtle sweetness to offset the rich roasted flavor.

I simply took the roasted vegetables and tossed them in a pot with some chicken stock (just like I do for my Butternut Squash & Coconut Soup). After it all simmers together for about 10 minutes, I take my immersion blender and transform it into a creamy, luxurious soup that is perfect with a dollop of creamy Greek yogurt and a few fresh thyme leaves. It's just so. darn. easy.

Silky-Carrot-Soup-with-Tillamook-Farmstyle-Greek-Yogurt-Set-the-Table.jpg

Can we talk about Greek yogurt for just a moment? I love it. I eat it pretty much every day. So when I got the chance to get a first taste of Tillamook's new Farmstyle Greek Yogurt I was thrilled. I used the 0% Farmstyle Greek for topping this soup and it is creamy and rich and has no hint of being fat free. Check out my Instagram feed for more photos of the flavors I'm trying. They've all been such a treat! My favorite so far is...wait for it...CINNAMON HAZELNUT. Perfect.

Tillamook is a well-known brand. I probably don't have to tell you how delicious their cheese is...right? You've had it, right? RIGHT? If you haven't you're going to need to fix that. STAT. Since they are new to the Greek yogurt scene, here are some delicious details...

About Tillamook Farmstyle Greek Yogurt

·         Tillamook Farmstyle Greek Yogurt is made with no artificial flavors, no artificial colors, no artificial sweeteners, no high fructose corn syrup and with the highest quality milk from cows not treated with artificial growth hormones.

·         Tillamook Farmstyle Greek is a thick, creamy and less tart yogurt made with buttermilk cultures, while providing 14g of protein per serving.

·         To make their better tasting Greek distinctively ‘Farmstyle’, Tillamook slow churns farm fresh milk with seven active yogurt and buttermilk cultures.

·         Tillamook Farmstyle Greek Yogurt is made with fruits and nuts locally sourced from the Pacific Northwest

·         To find out where to buy Tillamook Farmstyle Greek Yogurt readers can use the handy ‘Where to Buy’ tool - http://www.tillamook.com/where-to-buy.html?product=yogurt&variety=all&size=all&zip=

Roasted Carrot Soup with Tillamook Greek Yogurt

Serves 6-8

Ingredients

  • 2 lbs carrots, peeled and cut into 1/2 inch rounds
  • 1 large yellow onion, cut into wedges
  • 1 head of garlic, cut in half crosswise
  • 1 teaspoon ground cumin
  • 1 teaspoon ground cinnamon
  • 1/8 teaspoon ground nutmeg
  • 2 tablespoons honey
  • 2 tablespoons olive oil
  • salt and pepper to taste
  • 6 cups low sodium chicken stock
  • 1 tablespoon fresh lemon juice
  • 1/2 cup plain Greek yogurt
  • 1 tablespoon fresh thyme leaves

Instructions

  1. Preheat the oven to 375 degrees Farenheit.
  2. Line a large rimmed baking sheet with aluminum foil.
  3. In a large bowl, toss the vegetables with the spices, honey, olive oil and a bit of salt and black pepper.
  4. Spread the vegetables onto the baking sheet in a single layer. If you need to, use two baking sheets so the veggies aren't crowded.
  5. Roast the veggies for 45 minutes-1 hour or until nicely softened and golden brown. Stir every 20 minutes to ensure even cooking and to avoid burning the honey.
  6. Take the garlic and squeeze the cloves out into a soup pot. (To make sure the garlic skin doesn't make it into the pot, squeeze the cloves into a separate bowl first, then transfer to the pot.)
  7. Add the rest of the vegetables and the stock to the pot and place over medium heat. Bring to a simmer and cook for 10 minutes.
  8. Use an immersion blender and blend until the soup is nice a smooth. Alternately, you can work in batches, pureeing the soup in a blender. Be very careful as hot liquids may explode out the top of the blender.
  9. Add the lemon juice. Taste and adjust seasonings as needed.
  10. Ladle the soup into serving bowls and top with a dollop of Greek yogurt and some thyme leaves.


In Lunch & Dinner, No Added Sugar, Vegetarian Tags Carrots, healthy, Soup, Spring, yogurt
4 Comments
← NewerOlder →

Search Posts


Featured Posts

Summary Block
This is example content. Double-click here and select a page to feature its content. Learn more
Featured
Jan 29, 2026
Cursus Amet
Jan 29, 2026
Jan 29, 2026
Jan 22, 2026
Pellentesque Risus Ridiculus
Jan 22, 2026
Jan 22, 2026
Jan 15, 2026
Porta
Jan 15, 2026
Jan 15, 2026
Jan 8, 2026
Etiam Ultricies
Jan 8, 2026
Jan 8, 2026
Jan 1, 2026
Vulputate Commodo Ligula
Jan 1, 2026
Jan 1, 2026
Dec 25, 2025
Elit Condimentum
Dec 25, 2025
Dec 25, 2025
Dec 18, 2025
Aenean eu leo Quam
Dec 18, 2025
Dec 18, 2025
Dec 11, 2025
Cursus Amet
Dec 11, 2025
Dec 11, 2025
Dec 4, 2025
Pellentesque Risus Ridiculus
Dec 4, 2025
Dec 4, 2025
Nov 27, 2025
Porta
Nov 27, 2025
Nov 27, 2025

Powered by Squarespace