Quantcast
  • Contact
  • Portfolio
  • Subscribe
  • Recipes
Menu

Set the Table Photography

photography
  • Contact
  • Portfolio
  • Subscribe
  • Recipes
×

Roasted Butternut Squash Risotto

Rachael White October 8, 2015

When we lived in Japan, Brad and I used to go grocery shopping nearly every day. We had a refrigerator the size of those tiny dorm room fridges so we couldn't fit too much in there. It didn't take long for us to realized that we needed to get used to walking to and from the grocery store on a daily basis. I really enjoyed having the freedom to decide what we would eat based solely on what I saw in the grocery store that afternoon. It forced me to think on my feet and helped me learn about new ingredients and cooking techniques. Plus, I was able to focus on seasonal produce and catch-of-the-day seafood. This time of year, hot pots would be nearly in season and kabocha squash and sweet potatoes were everywhere. Perhaps my favorite thing about our little Japanese market were the kitschy, artificial fall leaves on plastic branches that decorated the aisles.

It took me a while to realize that we couldn't operate on the same grocery shopping schedule here in the United States. With 2 kids and a husband who works long hours, I find that meal planning for the whole week and making just one shopping trip works best for us. However, we often end up with odds and ends in the cabinets and produce drawers: the last of a box of dry pasta, half an onion, a carton of chicken stock, and other bits and bobs sit around getting ignored. So, this week I challenged myself to cook our nightly dinners using only what we had in the pantry, freezer, and fridge that needed to be used up. This beautiful, vibrant risotto is one of my favorite ways to get creative with basic ingredients and helps use items that might otherwise end up in the trash.

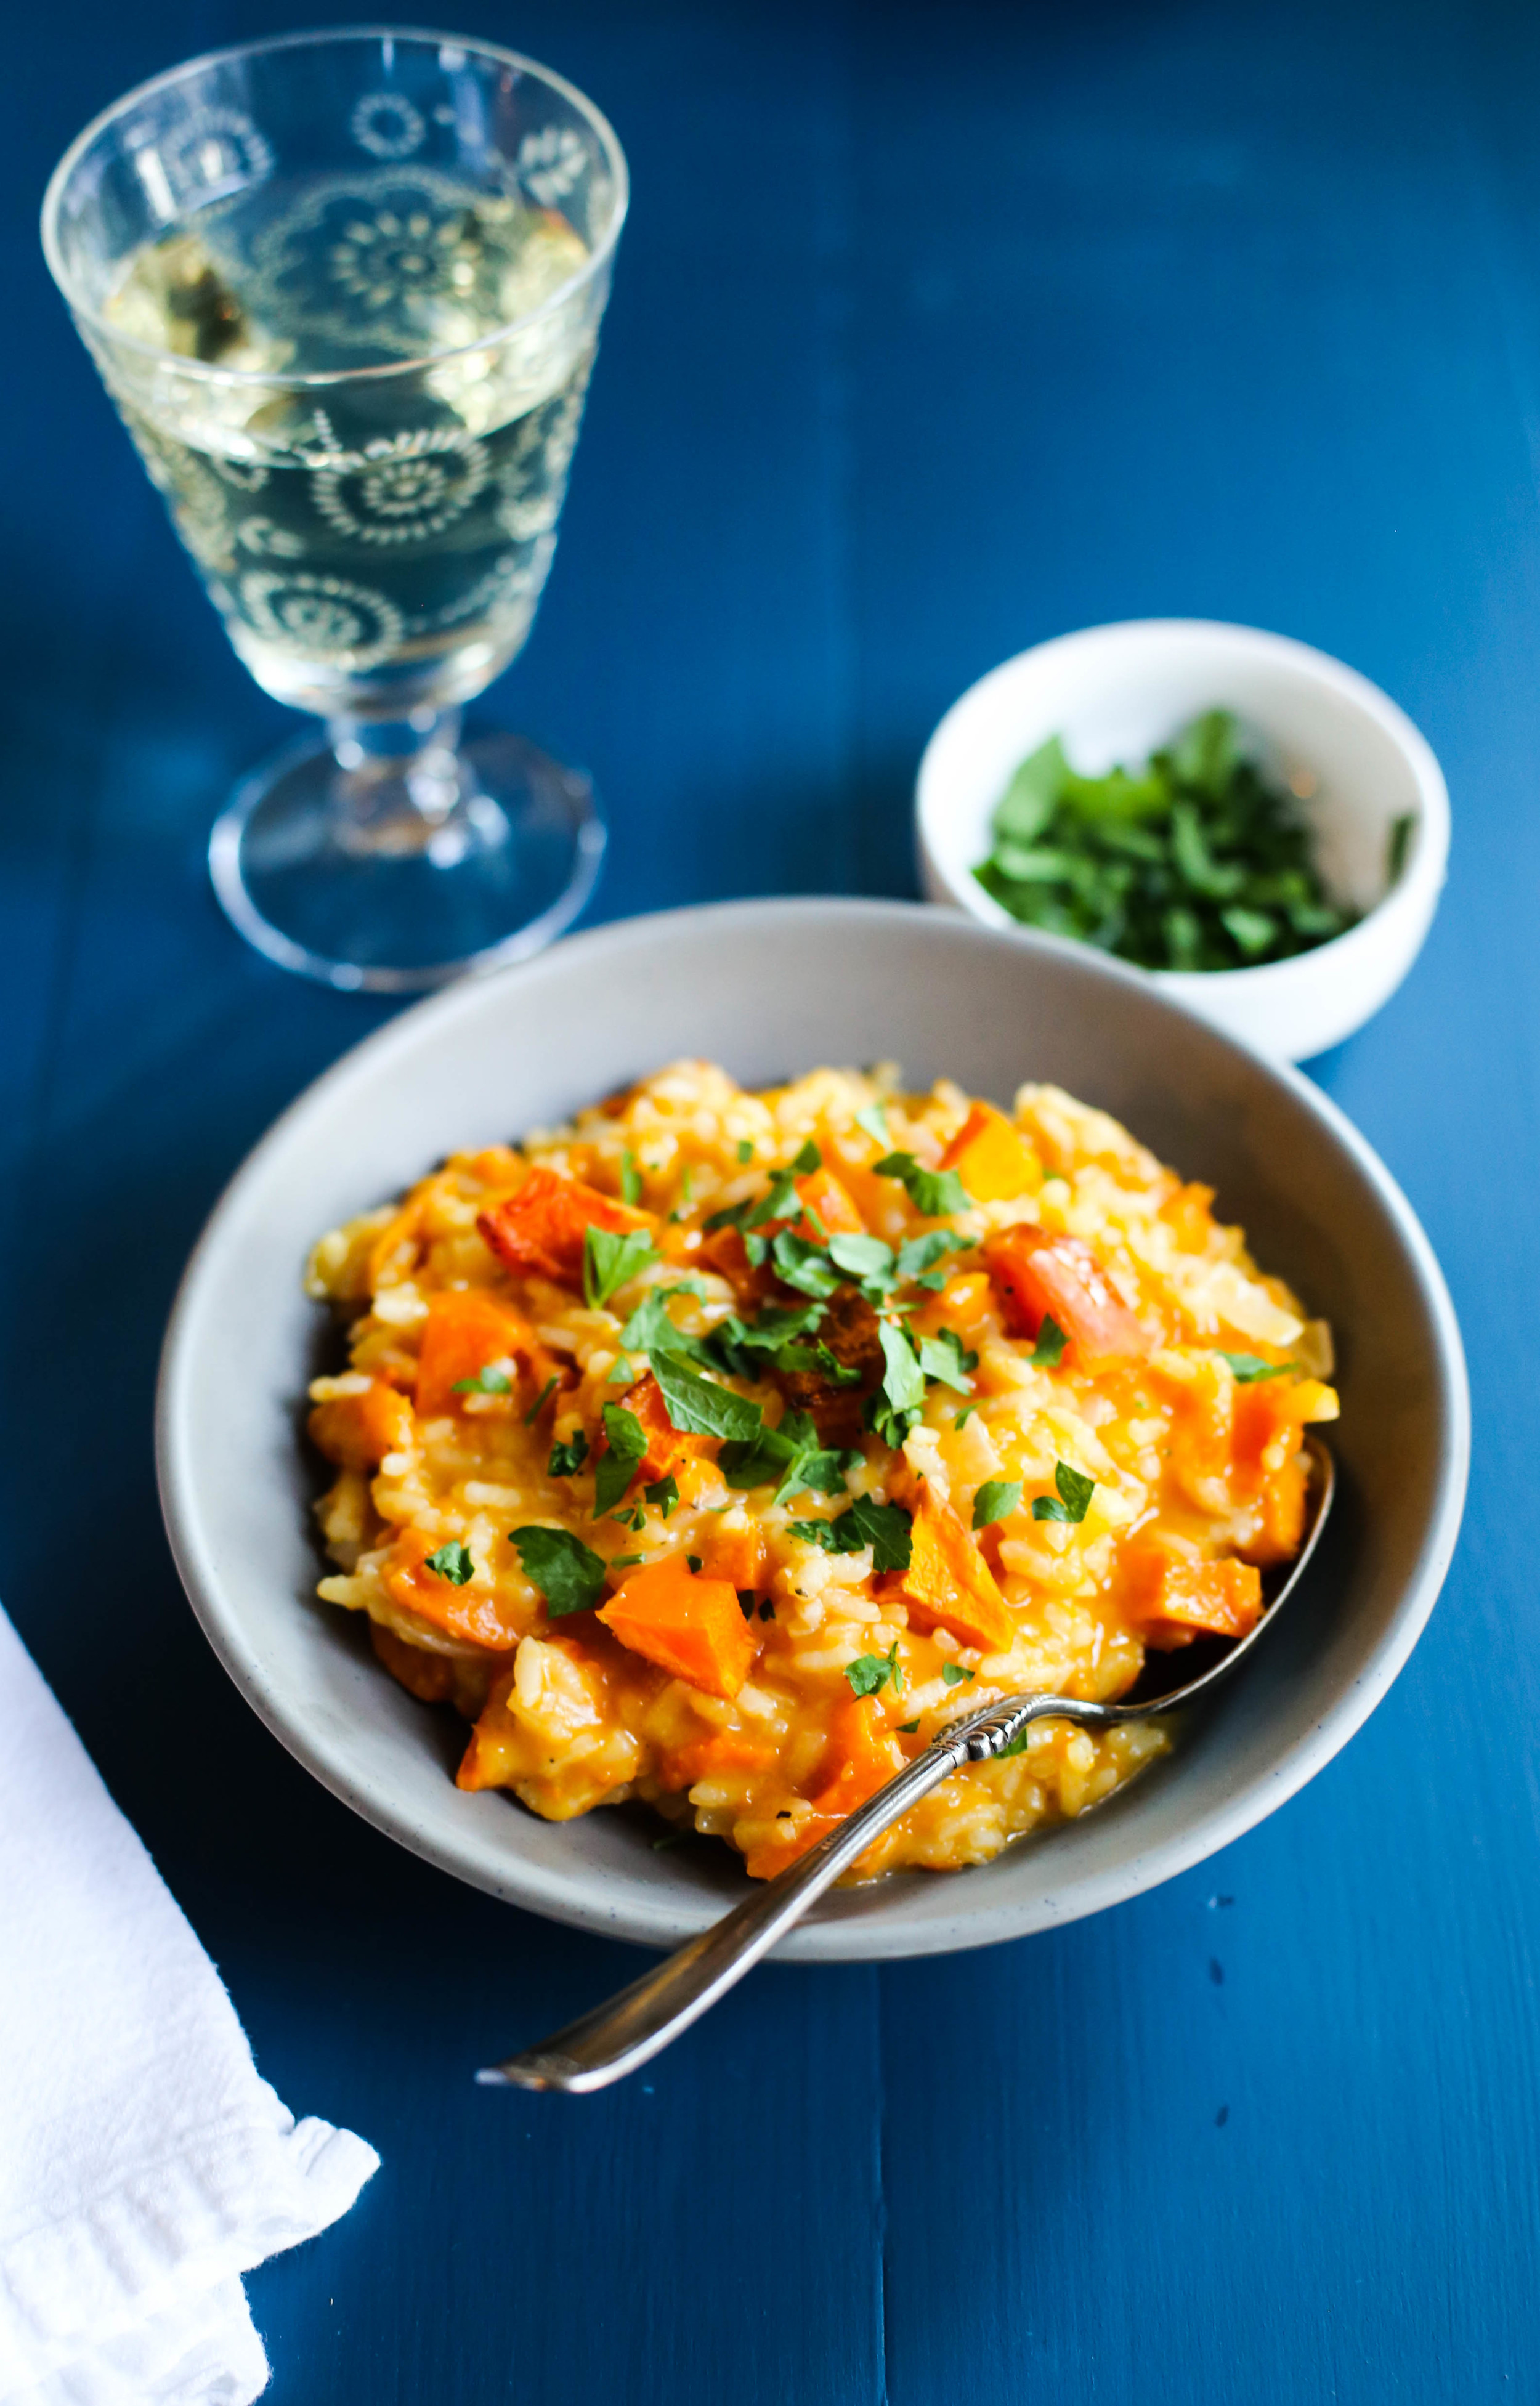
This risotto is creamy, full of comforting flavors, and perfect for a simple weeknight dinner. We topped our risotto with poached eggs and a couple drops of white truffle oil but that is totally optional. This bowl of goodness can stand on its own two feet without any fancy flourishes. And the leftovers? Yeah. Almost better than the original. I like risotto that has been reheated in a hot skillet until crispy in places and topped with a fried egg and a drizzle of hot sauce. Rice and eggs...I might have a little bit of an addiction.

Roasted Butternut Squash Risotto

Makes 6-8 Servings

  • 1 small butternut squash, peeled, seeded and cubed
  • 1 tablespoon + 1 teaspoon olive oil
  • course salt
  • 1 teaspoon unsalted butter
  • 1 large garlic clove, minced
  • 1/2 a medium yellow onion, chopped
  • 1/2 cup white wine
  • 1 cup arborio rice
  • 4 cups chicken stock, warmed
  • 1/3 cup grated pecorino romano cheese
  • 1/4 cup flat leaf parsley leaves, roughly chopped
  • salt and pepper to taste
  1. Preheat the oven to 425 degrees Fahrenheit. Arrange the butternut squash cubes in a single layer on a parchment lined, rimmed baking sheet. Toss with 1 tablespoon olive oil and sprinkle with salt. Bake for 25-30 minutes or until golden and tender.
  2. While the squash roasts, heat the remaining 1 teaspoon olive oil and the butter in a large skillet over medium-high heat. Add the chopped onion and the garlic and stir, cooking until softened, about 3-4 minutes.
  3. Stir the rice into the onion mixture and cook, stirring often until the rice begins to take on a slight golden color.
  4. Increase the heat slightly and stir in the white wine, scraping the bottom of the skillet. Bring the wine to a steady simmer.
  5. When the rice has absorbed the liquid, begin adding the stock 1/2 cup at a time, stirring the liquid into the rice until almost completely absorbed before adding the next 1/2 cup. Continue until the rice is tender but not mushy.
  6. When the squash is done, mash it roughly with a potato masher or a large fork. Stir the squash into the skillet with the risotto and stir until combined. Add the pecorino, season with salt and pepper, and sprinkle with the fresh parsley. Serve immediately.
In Entertaining, No Added Sugar, Lunch & Dinner Tags dinner party, fall recipe, roasted vegetables, easy dinner recipes, Rice
4 Comments

Cocktail Friday: Blackberry Vanilla Mocktail + VIDEO

Rachael White August 21, 2015

When Brad and I lived in Japan, we used to spend Friday nights enjoying Japanese beer, eating delicious Izakaya food (Japanese fried chicken FTW!) and doing pretty much anything we could to kick off the weekend in true 20-something, childless style. These days, with a 3 year old and 7 month old dictating our schedules and energy levels, we tend to lay low on the weekends. Friday nights involve pizza, sometime a movie, and falling asleep on the couch around 9:30pm. Yes. We are that exciting.

Despite the fact that our lifestyle, in a sense, has become much calmer and subdued when it comes to Friday nights, we still try to keep things fancy by making fun drinks from time to time. I love this Blackberry Vanilla Mocktail because it's delicious and kid-friendly but can easily double as an adults-only beverage. This beautiful drink also gave me some variety when I was pregnant, so if you have moms-to-be coming over for dinner, this is the perfect way to make sure they don't feel left out! 

And to show how simple this beautiful beverage is to make, check out my latest video with Penso Entertainment on the FoodieTV Youtube Channel! Don't forget to subscribe to the channel so you don't miss future videos!

Blackberry Vanilla Mocktail

Makes 2 drinks

  • 1/3 cup blackberries
  • juice of 1/2 a lemon
  • 1/2 teaspoon honey
  • seeds from 1/4 of a vanilla bean
  • Club soda
  • Mint and/or lemon slices for garnish
  1. In the bottom of a large glass or cocktail shaker, crush the blackberries with the lemon juice, honey and vanilla.
  2. Pour the mixture through a fine sieve set over a glass or liquid measuring cup.
  3. Fill two short glasses with ice and divide the juice between them. Top with club soda and garnish with mint leaves or lemon slices.


In Video, No Added Sugar, Cocktails and Appetizers Tags cocktail, mocktail, recipe
Comment

Kimchi, Grains + Greens Bowl

Rachael White July 29, 2015

Getting healthy, delicious food in my body has been challenging since welcoming baby Braden into the world. Breakfast is ALWAYS coffee and sometimes a bowl of Cheerios or, on really good days, a fried egg on top of avocado toast.  After a small snack mid-morning, making lunch for a picky 3-year-old, and managing double nap times, I find a few moments to sit down and realize that I haven't eaten lunch yet. Then the scrounging begins. And that typically means a downward spiral into finding anything that will give me a quick boost of energy.

I have my good days, but not enough of them.

I'm currently vacationing in Minnesota/spending tons of time with family/catching up with friends/introducing Braden to real food/having uninterrupted conversations with my husband/FINALLY get into a post-baby exercise routine/giving the blog some love/taking care of my body while my parents take care of me. All of these things have been good for my soul. It feels like I'm giving myself permission to take care of me. My hope is that by the time I return home, I will be able to develop better habits that will make me work smarter in all areas of my life.

Since food plays such a major role in how I feel, I'm trying to incorporate more simple, whole foods into my diet and removing lots of sugar. I've done this eating-less-sugar-thing before and been extremely happy with the results, both physically and emotionally. After 60 days, I felt amazing and made better choices all around for myself and my family. I'm definitely feeling like I need some help getting back on track, so I'm taking Jacqueline Smith's upcoming Go Sugar Free course for a second time.

One of the many things I LOVE about Jacqueline's course is that I have lifetime access to all of her resources. She shares information that she has selected thoughtfully and purposefully to help educate and empower her students. There are so many reasons why she is a woman I greatly admire. Her dedication and genuine passion for helping others Go Sugar Free is something I am in awe of on a daily basis.

Since becoming involved in GSF, I've become even more committed to providing recipes on Set the Table that are beautiful, delicious and healthy. Lucky for me, that means more creations like this Kimchi, Grains & Greens Bowl I'm sharing today! Whole grain bowls are so easy to throw together and I can always find new combinations that I love (and old standbys that are easy to whip up). This one is made with bulgur, a fast-cooking whole grain, is topped with locally made kale kimchi, homemade pickled radishes, a perfectly soft-boiled egg, and shredded chard from the garden.

Helloooooooo, lunch perfection!

Since this meal doesn't really require a "recipe", I'm providing a formula so you can come up with your own tasty creations based on what you have in your fridge. I promise you can't go wrong if you follow this guide and the countless combinations help keep things interesting. 

Here are the main components that will help you build the perfect whole grain bowl:  

Your grains could be bulgur, brown rice, quinoa, or farro. Your egg could be fried, poached or soft-boiled. You pickles could be cucumbers, radishes, or onions. Your fermented veggies could be sauerkraut or kimchi. There are so many delicious options, which is why this formula is so wonderful!

These bowls are always so gorgeous and taste as wonderful as they look, which makes it a million times easier to stick with a healthy menu on a daily basis. Some of the most beautiful recipes I've made, including this one, have been the result of all I've learned as a Go Sugar Free student and graduate. As with many things, learning never really stops with letting go of sugar, but that's part of what makes the process so meaningful, rewarding and worthwhile. I think this meal will be joining the list of new favorites that are sure to come out of this next course!

If you don't feel ready to make the commitment yet, feel free to follow me here for delicious recipes that will help you see how delicious going sugar free can be. In the meantime, get your hands on some kimchi and get this bowl of goodness in your belly ASAP!

*This post contains affiliate links.

In Lunch & Dinner, No Added Sugar, Vegetarian Tags Avocado, Heatlhy, Summer Recipes, chard, 20 minute meals, clean eating
Comment
coldbrewcoffee.jpg

DIY Cold Brew Coffee

Rachael White May 14, 2015

I've been making small changes to our home lately. Well, some changes are small and some are huge. We live in a 1,000 square foot house that can easily feel cramped between 2 adults, 2 kids and 1 large black lab. In an effort to be more comfortable in the space we have, and to make life simpler all around, I've been using the KonMari method of "tidying up". So far I am thrilled with the results and how using her little book has already made our home feel more open, clean, and full of only the things we love. In the spirit of making life easier and full of the things we love, I thought this Cold Brew Coffee recipe was a must-share.

That makes total sense, right? KonMari = coffee? Sure!

coldbrewcoffeerecipe.jpg

Speaking of tidying up and making a space feel new and open and full of things you love, what do you think of the new blog design? I'm loving it. It feels clean and comfortable and ready for lots of delicious recipes and stories and all of the things. In fact, I've added some new features like Mom Stuff and an updated Wine Bar page. Oh, and I updated the About page as well! It's just all so bright and shiny and new. You should make this coffee, get comfortable, and browse around and make yourself at home.

OK- back to the coffee.

Truth be told, I'm really more of a hot coffee drinker regardless of the weather. I don't know why that is. Maybe it's because I like to savor my coffee and when it is cold I always drink it wayyyyy too fast. Or maybe it has something to do with the fact that when I find something I like, I like to stick with it. Who knows. But there are a number of afternoons when I just need a little pick-me-up and this cold brew comes to the rescue. It's amazing over ice with chocolate almond milk (hellooooo iced mocha!) and I always love the classic iced latte kind of thing. Or you can go straight up coffee concentrate + water over ice.

Did I mention that this is a concentrate? Yep. Super strong so you can store it in the fridge in a reasonable sized container. I like to use the large mason jars, of which I have a million, that are lying around my kitchen needing a purpose.

coldpresscoffeeconcentrate.jpg

Brad LOVES iced coffee, so this is a nice, easy way for him to grab his caffeine and go when he leaves before the sun rises for work. Speaking of which, that guy works a lot. It can be so hard sometimes, but when he comes home at the end of the day and tells me about the things he has done, I almost burst with pride. He is good. I don't tell him that enough. And on that note, give your teachers and school administrators some extra positive vibes this time of year because it is tough for them and for their families. In fact, you should bring them a jar of this cold brew coffee!

PERFECT TEACHER GIFT!

icedcoffeerecipe.jpg

Important notes:

  • When you make this, be VERY CAREFUL when straining the coffee. It's safest to give it all a stir first so your coffee grounds don't all fall out at once leaving you with a massive mess of black grime all over your white kitchen cabinets and in the crevices of your wood floor. I heard this from a friend. ;)
  • The strength of your coffee will depend on the grind of your coffee beans. I tend to like stronger coffee, so I use espresso grind (finer). Also, the amount of time you let the coffee brew will make a difference in the strength as well.
  • Lastly, the quality of your coffee is important! The better and fresher your coffee, the better the final product will taste. In my opinion, it is worth the splurge on something really great because you will STILL be saving money since you aren't going to the coffee shop to give them $$$ for just one cup. This recipe yields at least 5 cups and doesn't even use an entire bag of coffee! Look at you, you money saver, you!


And now, finally, the recipe! Best enjoyed in a sunny spot with a straw and a good book.

DIY Cold Brew Coffee

  • 1 1/2-2 cups ground coffee
  • 8 cups water
  • fine mesh sieve or a couple layers of cheese cloth 
  • coffee filter
  1. Place the coffee grounds in the bottom of a large pitcher or bowl.
  2. Add the water and stir.
  3. Cover with plastic wrap and place in the refrigerator for 12-24 hours.
  4. Give the coffee and the grounds another stir (see note above for reasoning). Place the fine mesh sieve over another pitcher or bowl.
  5. Pour the coffee into the sieve. This will not remove all the grounds. Don't be alarmed.
  6. Now, clean out the sieve and line it with a coffee filter. Place it over another large bowl or pitcher and strain a second time.
  7. Transfer to a large mason jar (or two) or a pitcher and refrigerate.
  8. When ready to use, use 1 part coffee (I use about 1/2 cup of the coffee concentrate) to 1 part water or milk. Serve over ice.
In Cocktails and Appetizers, Breakfast & Brunch, No Added Sugar Tags recipe, coffee, beverages, summer recipes
2 Comments
Maple-Soy-Roasted-Almonds-Set-the-Table.jpg

Maple Soy Roasted Almonds

Rachael White January 20, 2015

Such a huge amount of planning goes into the weeks and months leading up to a baby's arrival. Most of the planning involves making sure baby has everything necessary to make it through those first few months. Somehow, the parents get lost in the shuffle. With baby #1, I did not do an awesome job of taking care of myself. I didn't eat enough, didn't sleep enough (although, who does with a newborn in the house) and because of that I wasn't able to take care of our new little one to the best of my ability. Yes, we were in a foreign country without family nearby to help us out, but the little things like having energy boosting snacks within arm's reach would have made a world of difference. Fortunately, I realized the importance of this seemingly small thing and was able to crawl out of the haze that had been the first month of motherhood. This time around, I tried to be as prepared as possible by making some healthy snacks that can easily be eaten one-handed (an important requirement when you have a newborn). There are big jars of Maple Soy Roasted Almonds in different rooms of the house right so I can grab a handful at any time.

This guy may only be a week old, but it hasn't taken long for me to appreciate having snacks like this at the ready.

IMG_1268.jpg

Side note: I'm hopelessly in love with this guy. He is the sweetest. Watching both boys together may break my heart a little simply because there is almost too much love happening.

IMG_1374.jpg
Roasted-Almonds-with-Maple-Soy-Glaze-Set-the-Table.jpg
Simple-Maple-Soy-Roasted-Almonds-Set-the-Table.jpg

These almonds are so easy to make and store well in an airtight container. They are a little fancier than eating plain almonds but they aren't overwhelmingly coated in the maple soy glaze. Sweet, salty, and crunchy snack-time perfection. Yes please!

Maple-Soy-Roasted-Almond-Recipe-Set-the-Table.jpg
Healthy-Maple-Soy-Roasted-Almonds-Set-the-Table.jpg

Maple Soy Roasted Almonds

Makes 3 cups

  • 3 cups raw almonds
  • 1/3 cup low-sodium soy sauce
  • 1/3 cup pure maple syrup
  • 2 teaspoons kosher salt
  1. Preheat the oven to 350 degrees Fahrenheit.
  2. Spread the almonds in a single layer on a large rimmed baking sheet.
  3. Roast the almonds for 8 minutes to lightly toast them. Meanwhile, stir the soy sauce and maple syrup together in a large bowl.
  4. Add the almonds to the bowl and toss to coat them in the sauce.
  5. Line the baking sheet with parchment or spray with cooking spray. Use a slotted spoon to scoop the almonds onto the baking sheet and spread in a single layer.
  6. Roast the almonds for 15 minutes, stirring once halfway through.
  7. Sprinkle the almonds with the salt and let them cool slightly for about 2-3 minutes, then transfer them to a large plate to cool completely before transferring to an airtight container.
In Kid Friendly, No Added Sugar, Vegetarian, Cocktails and Appetizers Tags almonds, easy appetizer recipe, healthy snacks, soy sauce
2 Comments
Simple-Grapefruit-Vodka-Soda-Set-the-Table.jpg

Cocktail Friday: Grapefruit Vodka Soda

Rachael White January 16, 2015

It seems like it has been 5 million years since I posted a cocktail here and I must say that I've missed it. Cocktail Friday was something I started back in my Tokyo Terrace days for a couple of reasons. First, I was really hoping to cut down on our budget for going out. Living in Tokyo, it was easy to blow through a good chunk of change between eating out at Izakayas, spending a few hours at Karaoke, and indulging in a little sushi (all of which go well with Umeshu Soda). We started having at-home happy hours on Friday evenings, which we would often invite our friends to join, which saved us some dough on drinks and apps. Sometimes we would go out afterwards, but a lot of the time we would just make it a stay-in kind of night. The second reason I started Cocktail Fridays was because I didn't know much about anything but wine and I wanted to expand my horizons. This was a great way to hold myself accountable when it came to learning about various spirits, mixers, etc. Fast forward to today and I still love taking classic cocktail recipes and making them new with the addition of new and unusual ingredients. This Grapefruit Vodka Soda is a perfect example.

Refreshing-Grapefruit-Vodka-Soda-Set-the-Table.jpg

I first made this cocktail for my sister, Rebecca, the vodka soda lover in the family, when she was visiting us a couple months ago. My cocktail ingredients were limited, since I hadn't been keeping things stocked during my pregnancy. However, I scrounged up a bottle of vodka from the freezer, grabbed a grapefruit that was hiding in the fridge, and cracked open a can of my very favorite sparkling water: pamplemousse (aka grapefruit) from La Croix. Yep. That's all I used to whip up a fresh, seasonal version of the classic vodka soda. Easy peasy, no?

Grapefruit-Vodka-Soda-Recipe-Set-the-Table.jpg

I may be 100,000% sleep deprived with our new little bundle of joy, but getting back into the routine of sharing a fresh and easy cocktail with you each and every week helps me feel more like myself. Plus, this is easily adaptable for those of us who need more mocktails in our lives. Just omit the vodka. Done and done. The grapefruit wedges are enough to make any old sparkling water feel more elegant and fun.

Cheers to that, I say. Cheers. To. That.

Grapefruit-Vodka-Soda-Set-the-Table.jpg

Grapefruit Vodka Soda

Makes 2 cocktails

  • 4 oz vodka
  • 4 oz pamplemousse sparkling water (or any variety you prefer)
  • 4 grapefruit wedges

Fill two short glasses with ice. Pour the vodka over the ice and the sparkling water over the vodka. Squeeze the juice from one grapefruit wedge and float it in the glass. Stir gently to combine and garnish with remaining grapefruit wedges. Enjoy!

In No Added Sugar, Cocktails and Appetizers Tags Cocktail Friday, cocktail recipes, grapefruit, vodka
5 Comments
← NewerOlder →

Search Posts


Featured Posts

Summary Block
This is example content. Double-click here and select a page to feature its content. Learn more
Featured
Nov 1, 2025
Cursus Amet
Nov 1, 2025
Nov 1, 2025
Oct 25, 2025
Pellentesque Risus Ridiculus
Oct 25, 2025
Oct 25, 2025
Oct 18, 2025
Porta
Oct 18, 2025
Oct 18, 2025
Oct 11, 2025
Etiam Ultricies
Oct 11, 2025
Oct 11, 2025
Oct 4, 2025
Vulputate Commodo Ligula
Oct 4, 2025
Oct 4, 2025
Sep 27, 2025
Elit Condimentum
Sep 27, 2025
Sep 27, 2025
Sep 20, 2025
Aenean eu leo Quam
Sep 20, 2025
Sep 20, 2025
Sep 13, 2025
Cursus Amet
Sep 13, 2025
Sep 13, 2025
Sep 6, 2025
Pellentesque Risus Ridiculus
Sep 6, 2025
Sep 6, 2025
Aug 30, 2025
Porta
Aug 30, 2025
Aug 30, 2025

Powered by Squarespace