Quantcast
  • Contact
  • Portfolio
  • Subscribe
  • Recipes
Menu

Set the Table Photography

photography
  • Contact
  • Portfolio
  • Subscribe
  • Recipes
×
Cherry Vanilla Sparkler

Cocktail Friday: Cherry Vanilla Sparkler

Rachael White May 17, 2013

How is it Friday already? And also, why did Friday take so long to get here?

It's been one of those weeks where time seemed to simultaneously fly by and slow down. I did manage to notice in the midst of it all that the trees have begun to take on that sort of peach-fuzz stage of green that they get in the spring. I feel like that is something I don't often take the time to notice. The branches that have been bare and gloomy looking all winter begin to look soft and just slightly green. The same way a peach is fuzzy and you can only just see the little hairs covering it's delicate skin. Even more wonderful than the soft green in the trees is that the same thing is happening to the foothills here in Colorado. From what I hear, this can be a short-lived sight so I'm going to soak it all in as much as I can.

Another part of spring and early summer that can easily pass by without proper appreciation is cherry season.

Cherries
Cherries

How anyone could miss these beauties is beyond me, but I'm sure it happens. Soon enough, food blogs will be lighting up with cherry recipes, like cherry clafoutis, giving plenty of inspiration for ways to use these ruby red treats. My favorite way to enjoy their sweet, juicy flavor is to put them in a big, lovely bowl and eat them just as they are. Perfect.

Cherry Vanilla Cocktail

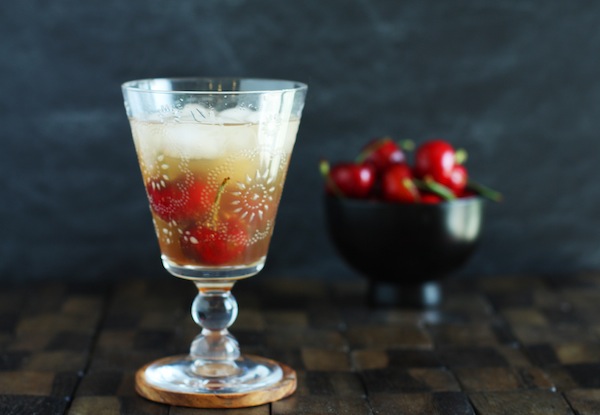
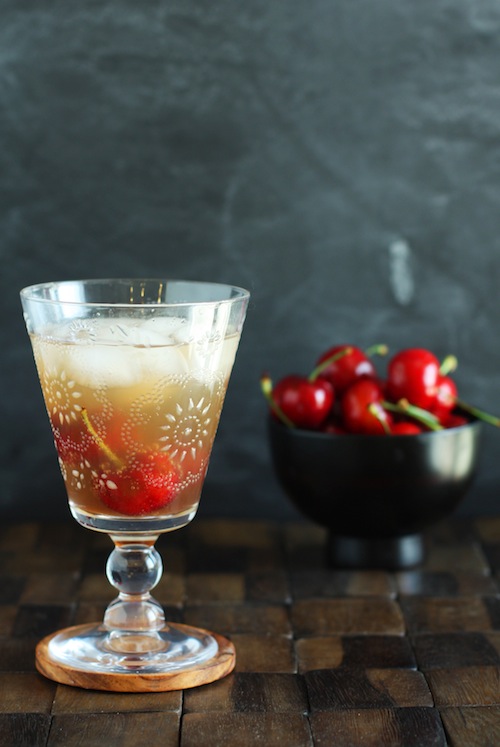
Still, it's fun to mix things up and I think this cocktail is a wonderful way to try something  new. Light and bubbly with the perfect combination of cherry and vanilla flavors, this saké based cocktail is sure to please. I actually pitted a few cherries and pressed them through a strainer to get my cherry juice for the cocktail pictured above, but a better way is to buy a small bottle of pure cherry juice (you can find it at most grocery stores- look for the unsweetened kind) using the garnish to showcase the fresh fruit.

If you don't have any saké on hand, you can use vodka instead.

Take a moment to enjoy spring, green leaves, and cherries! Cheers!

Cherry Vanilla Sparkler

Makes 1 cocktail

2 oz unsweetened cherry juice

2 oz saké (I used Junmai Ginjo)

1/8 teaspoon vanilla extract

club soda

In a cocktail shaker filled with ice, combine the cherry juice, saké and vanilla extract. Shake for about 30 seconds until thoroughly chilled. Pour into a cocktail glass filled with ice and top with club soda. Stir gently to combine. Enjoy!

In Cocktails and Appetizers
1 Comment
French Bread Pizza with basil

French Bread Pizza + Basil

Rachael White May 15, 2013

Growing up, my family and I enjoyed pizzas most Friday nights. We would gather in the TV room, my sister and I on the emerald green carpet and my parents on the two-person sofa, watching Family Matters, Boy Meets World and Step-by-Step. We would laugh until we cried, not always at the corny sitcoms but at the jokes we made with each other. I still love spending time with my parents and sister like that. I doubt that will ever change. My hope, deep in my heart, is that I can help create similar memories for my family. The kind of memories that make us all remember that we are blessed to be able to act like the crazy, weird people we are without shame. I think French bread pizza might be the answer.

Sprinkling Cheese
Sprinkling Cheese
Prepared French Bread Pizzas

This is one of the easiest meals that I routinely make for dinner. Lately, it has been appearing on the dinner table once a week, usually on the nights when I know Brad will be working late. Any time I see some nice French bread at the grocery store, I go ahead and buy it so I can put it in the freezer for the next French bread pizza night. Then there's shredded mozzarella cheese, which I try to keep around always, and pizza sauce. This may surprise some of you, but I use store-bought pizza sauce. Sometimes that's just the way to go. For sanity's sake.

French Bread Pizza
French Bread Pizza

From start to finish, these pizzas take barely 10 minutes to put together and there are hardly any dishes to clean up afterwards. One of my favorite things about meals like this is that they act like a blank canvas. You can add vegetables that need to be used up, like broccoli florets or baby spinach, or leftover roast chicken. You can be as creative or as simple as you like. The classic combination of sauce, mozzarella and fresh basil never gets old in my opinion, and I often sprinkle red pepper flakes on top of my pizza. Or hot sauce. Lots of delicious hot sauce.

Having friends over for dinner? Why not make a variety of toppings available so everyone can make their own French bread pizzas? Pizza and beer cannot be a bad thing for a party.

I've been thinking about why pizza nights are always so much fun and I think I know the answer. It's because no one has to spend a ton of time preparing food, doing dishes, or generally stressing over what to have for dinner. Everyone is relaxed and happy. I may not be right about many things, but I'm pretty sure I'm right about that.

French Bread Pizza + Basil


Makes 4 Servings

  • 1 loaf sourdough French bread
  • 1 cup pizza sauce
  • 1 1/2 cups shredded mozzarella cheese
  • 2 tablespoons olive oil
  • course salt
  • 1 garlic clove
  • fresh basil, chopped or cut into strips
  • red pepper flakes, to taste
  1. Begin by preheating the broiler.
  2. Cut the bread in half the short way, then cut each half again as though you were going to make a sandwich. Brush the cut sides with the olive oil and sprinkle with coarse salt. Place the bread on a baking sheet and put under the broiler until the bread is lightly golden. Rub the cut sides of the bread with the garlic clove.
  3. Next, spoon some pizza sauce on each piece of bread then sprinkle with the cheese. Return to the oven under the broiler and, watching closely, cook until the cheese is melted and bubbly.
  4. Sprinkle the cooked pizza with fresh basil and red pepper flakes. Serve and enjoy!


In Lunch & Dinner, Vegetarian Tags easy dinner recipes, french bread, pizza
5 Comments
Homemade Granola, Broiled Apricots, Yogurt

Homemade Granola + Broiled Apricots & Yogurt

Rachael White May 13, 2013

I didn't used to be a breakfast person. Back in high school, I used to leave the house with a travel mug full of coffee that had been mixed with hot cocoa powder. That's totally acceptable, right? Yeah. I don't think so either. Fast forward to today and I never skip breakfast. Never ever. And if I do, Brad says that I get "hangry" by about 11am. Hangry = hungry + angry.

Some days, it can be difficult to think of eating a morning meal, let alone finding the time to make something healthy. My default breakfast is typically 2 eggs topped with Tobasco sauce and a slice of whole wheat toast, but there are times when I need to mix thing up a little. Stepping out of a daily routine is important. Even if that means changing something as small as breakfast. This homemade granola is the perfect thing to have on hand when you want something quick and homemade in the mornings without any hassle.

Granola, Apricots, Yogurt

In case you need more convincing about homemade granola, here are some other great reasons to DIY: it is much cheaper than a lot of the really good stuff you can buy in the grocery store, it keeps for 2 weeks, and it only takes 30 minutes and one mixing bowl to make. Plus, you can create your own combination of flavors to fit what you love most. My granola is often made with whatever I have in the pantry that needs to be used up. Sweetened shredded coconut and walnuts were the ingredients of choice this time around, but you can add pecans, pumpkin seeds, sesame seeds, dried cranberries, raisins, candied ginger, dried pineapple...I could go on and on but I won't put you through that. You get the idea. Serve it with seasonal fruit, like these apricots that have been cut in half, brushed with a tiny bit of butter and broiled for a few minutes. Or you could go with some sliced strawberries. Or blueberries. Or cherries. Do you see where I'm going with this?

Homemade Granola
Homemade Granola

I love lots of cinnamon in my granola, so I've used a heavy hand in my recipe here. The warm flavor seems to transform this creamy, crunchy, juicy combination of flavors from just another yogurt and granola combination to something resembling a breakfast-style fruit crisp.

Here is what you need to do. Take the 30 minutes to make your own granola, sit down for 5 minutes in the morning to eat it at the table, and take note of how the rest of your day changes. A few quiet moments with your breakfast and a cup of coffee or tea can do wonders for how you will manage the craziness that ensues throughout the rest of your day.

Homemade Granola + Broiled Apricots and Yogurt

For the granola:

3 cups old fashioned rolled oats

1 cup sweetened shredded coconut

1/2 cup chopped walnuts

1 tablespoon ground cinnamon

2 tablespoons olive oil

2 tablespoons honey or pure maple syrup

generous pinch of salt

Preheat the oven to 325F. Stir all the ingredients together in a large bowl until the oats, nuts and coconut are well coated. Spread in an even layer on a baking sheet lined with parchment paper. Bake for 20-25 minutes or until the oats are lightly golden. Stir once or twice during cooking time.

Allow the granola to cool completely before transferring to an airtight container or large jar. Keeps for up to 2 weeks.

For the apricots:

Fresh apricots

1 teaspoon melted butter

Take one or two fresh apricots and cut them in half, removing the seed. Place them cut side up on a baking sheet and brush with a little melted butter. Place the baking sheet on the top rack of the oven under the broiler. Broil for 3-5 minutes or until the apricots are golden and bubbly on the top. Serve on a place with Greek yogurt and granola.

In Breakfast & Brunch, Vegetarian
4 Comments
Pimms Ginger Beer copy

Cocktail Friday: Pimms + Ginger Beer

Rachael White May 10, 2013

My grandmother has always been a believer in prayer. Any time anyone in the family lost something, she would say a prayer to St. Anthony.

St. Anthony, St. Anthony, please come around. Something's been lost and cannot be found.

Somehow, each and every time, whatever is missing turns up not long after saying this prayer. Personally, I think my grandma must have a special relationship with St. Anthony; some kind of deal, maybe. Because as no-fail as it is for her, I still seem to legitimately lose things that are never, ever found. Somewhere out there is a collection of cards, dollar bills, glasses, and ear buds never to be found again.

One thing that seemed to be lost until recently was a season called spring. But finally it seems that spring has arrived complete with thunderstorms, birds chirping, and fresh, green grass. I was reminded the other day of the spring festival that took place around this time at the school where we worked in Tokyo. Many countries were represented and served food and drinks like lamb from New Zealand to Caipirinhas from Brazil. We would stand outside and eat and drink and laugh, our shoulders and cheeks turning pink with the first sunburn of the season. It was always such fun and felt like a celebration of everything that had happened in the months leading up to that day.

The first time I attended the festival, I was introduced to Pimm's No. 1, a liqueur from England. It was served in clear plastic cups with loads of diced apples, cucumbers, and mint. The pleasant, refreshing flavor was something I didn't realize existed in the world of cocktails. When Pimm's wandered into my mind a few days ago, I new I needed to have a bottle in my at-home bar collection.

Mint Leaves
Mint Leaves

While I love the flavor and appearance of all the diced fruit that goes into a Pimm's Cup, I decided to simplify a bit. When you're making a cocktail for one, it seems like a lot of work to chop a bunch of stuff, doesn't it? Especially if it's been one of those weeks where the dog had to get the "cone of shame" because of a paw injury and the toddler has been practicing his climbing skills by dancing on the coffee table. And the cone-head dog always joins in. At the end of a week like that, you want something that requires little effort but has a big payback.

Pimm's Cocktail
Pimm's Cocktail

Yes, ginger beer is quite strong but in the proper proportions, it works well with Pimm's. The spicy ginger kick is actually really wonderful with the light fruit and herb flavor of the iced-tea colored liqueur. A little fresh mint and lime juice and you've got a daper drink indeed.

What are your go-to methods for retrieving something that is lost? I think St. Anthony came through when it came to the case of the Lost Spring, but I'm always looking for backup ideas for when I lose my keys. Or my glasses. Or whatever it may be.

Cheers!

Pimm's + Ginger Beer

2 oz. ginger beer

2 oz. Pimm's No. 1

1/2 oz. lime juice

4-5 large mint leaves, plus extra for garnish

Muddle the mint leaves and lime juice in the bottom of a cocktail shaker. Add the Pimm's and stir to combine. Strain into a short glass filled with ice. Top with the ginger beer and stir lightly to combine. Garnish with mint leaves and/or a lime wedge. Serve and enjoy!

In Cocktails and Appetizers
3 Comments
Japanese Asparagus with Black Sesame

Asparagus + Black Sesame

Rachael White May 8, 2013

I’ve heard stories from Brad and my in-laws about asparagus hunting in Iowa. Brad’s grandparents live there and have been known to pull their car over at the sight of the green asparagus stalks reaching upwards from the depths of a ditch. Unfortunately, I haven’t had the opportunity to partake in this activity but I love hearing about it. What is more wonderful than the idea of foraging for food because you found it growing where it naturally wants to be at the proper time of year without having traveled hundreds of miles to be wrapped in two thick rubber bands and placed in the produce department in a grocery store chain.

Asparagus & Black Sesame

Spring seems to have finally settled in for most of us, making this the perfect time to enjoy asparagus. There are so many wonderful asparagus recipes out there right now, so I wanted to bring something different to the table. This beautiful Japanese method of preparing asparagus results in a bright, flavorful dish that is as wonderful to eat as it is to look at. The bright green becomes more vibrant with the black specks of sesame seeds that coat each spear.

I love this recipe because of the flavor and appearance but also because it gives me an excuse to break out my suribachi. A suribachi is a Japanese mortar and pestle that has an unglazed, textured surface. Using a wooden pestle, the sesame seeds in this case are rubbed against the grooves in the bowl until they look like black sand. Then, mirin and soy sauce are added making the mixture look a lot like wet potting soil. Riley loves soil. Therefore, he was very interested in “helping” me get the black sesame mixture out of my suribachi using the bamboo brush.

Suribachi Helper
Suribachi Helper

This is a very easy way to prepare asparagus and works perfectly as a side dish to salmon and rice, or even topped with a fried egg. If you don't have any asparagus on hand, you could also prepare green beans using this method. Just as beautiful and tasty!

Asparagus with Black Sesame

Asparagus + Black Sesame

Recipe adapted from Elizabeth Andoh's Washoku: Recipes from the Japanese Home Kitchen

*Don't worry if you don't have a suribachi. You can use a food processor or spice grinder to grind the sesame seeds, then just transfer them to a small bowl and stir in the liquid ingredients.

  • 1 bunch of asparagus (thinner is better, but you can use whatever is available)
  • 2 tablespoons black sesame seeds
  • 2 teaspoons mirin
  • 2 teaspoons light soy sauce

Bring a large pot of salted water to a boil. While the water heats up, break the woody ends off of your asparagus by holding onto each end and bending it until it naturally breaks. The bottom portion is the woody stuff that you don't want to use. Next, cut the asparagus into 1 1/2 inch pieces on an angle. Put the asparagus tips in a separate pile. When your water is boiling, add the asparagus except for the tips. After one minute, add the tips and continue cooking for another minute.

Drain the asparagus and transfer to a bowl to cool to room temperature.

While the asparagus cools, toast the sesame seeds in a dry pan over medium high heat. Once you start to smell the nutty scent of the seeds, remove them from the heat and transfer them to a suribachi. Grind the seeds until some are still intact and others are completely ground. Add the mirin and soy sauce and continue to grind until the mixture resembles wet soil. If needed, add a touch of water.

Scrape the black sesame mixture into the bowl with the asparagus and toss gently to coat. Mount the asparagus on small plates and serve room temperature or cold.

In Lunch & Dinner, Vegetarian, Cocktails and Appetizers
4 Comments
Tomato & Goat Cheese Shortcake

Tomato Scallion Shortcakes + Whipped Goat Cheese

Rachael White May 6, 2013

My days are typically spent, as one might imagine, doing all sorts of mommy things. Stopping toddler from pulling place mats with stuff on them off the table. Stopping toddler from poking the dog in the eye. Stopping toddler from drinking dog water. Stopping toddler from reaching for my morning coffee. Having a dance party with said toddler to the tune of The Most Wonderful Thing About Tiggers. Singing You Are My Sunshine before nap time as toddler sings along with the sweetest sounding “doo” as he snuggles his blankie. Somewhere in there do laundry, cook, clean, photograph, write, and maintain some level of sanity.

Despite the overwhelming nature of parenting a tiny human, I adore all of these busy moments because they are fleeting. Riley goes through stages so quickly and I just know...I know...that one day I’ll be wishing I could experience all of these things again. Even the dog water part. Probably.

Tomato & Whipped Goat Cheese Shortcake

Even though I love these moments, it is the most fantastic feeling to sit down to a simple, adult meal. Sometimes this means sitting down with some of my favorite cookbooks in search of a meal that is easy, satisfying, and out of the ordinary. These tomato scallion shortcakes from Smitten Kitchen fit these requirements perfectly and are now a favorite in our house. Brad, who isn’t actually much of a tomato person, loved them. Riley, lucky boy that he is, got to taste the biscuits fresh out of the oven. They were “ho-T” in his words.

Tomato Shortcakes Smitten Kitchen

Let's just talk about the biscuits for a second: they were SO light and flaky I almost didn't know what to do with myself. As they baked, the tops became a lovely golden brown and they puffed up like a dream. I'm not sure that anything could be better and more comforting than a buttery, warm, flaky biscuit just out of the oven. And these were no exception.

Cherry and Pear Tomatoes

The tomatoes are dressed lightly with olive oil, vinegar (the recipe called for red wine vinegar, but I used Champagne vinegar because it's what I had), salt and pepper. Then, they are scooped onto half of a biscuit. Immediately the bread begins to absorb the lovely vinaigrette and tomato juices. Then, the tomatoes are topped with a light, creamy whipped goat cheese before being capped with the top half of the biscuit. Beautiful.

We enjoyed our shortcakes on the patio as the sun slowly sank, leaving the air crisp and cool. The sweet, juicy tomatoes with the creamy, tangy goat cheese and flaky biscuits created the perfect balance of textures and flavors. Add white wine and a nice salad and you’ve got a fantastic meal. It was the perfect way for us to end a very busy day/week.

I know I'll be making various versions of this recipe throughout the summer- adding basil to the tomatoes, using bunches of chives in the biscuits, or maybe even dill, and perhaps sprinkling a little crispy prosciutto over the top (Brad's current wish). I've been thinking about what a great first course this would be for a spring or summer dinner party, too. It's so easy,  wonderfully colorful and elegant.

Here's the deal: if you haven't already purchased Deb's cookbook, get on it! It is full of beautiful recipes like this one and will no doubt become a family favorite.

Have you tried any cookbook recipes lately that you can't wait to make again and again? I'd love to hear about them in the comments below! I'm always looking for new books to add to my collection, much to my husband's dismay...

Tomato Scallion Shortcakes with Whipped Goat Cheese

Recipe very slightly adapted from The Smitten Kitchen Cookbook

Scallion Biscuits

2 cups plus 2 tablespoons all-purpose flour

2 tablespoons baking powder

3/4 teaspoon table salt

5 tablespoons unsalted butter, frozen for about 30 minutes (I'll explain later...don't worry)

2 scallions, thinly sliced (I added more because, well, I love scallions)

1 cup whole milk

Tomato Salad

1 tablespoon olive oil

1 1/2 tablespoons champagne vinegar

1/8 teaspoon course salt

Freshly ground black pepper

1/2 pound cherry tomatoes in assorted colors (I used cherry and pear tomatoes)

Toppings

3 tablespoons whipping cream

4 ounces goat cheese, softened

Preheat the oven to 425 and line a baking sheet with parchment paper.

In a large bowl, whisk together the dry ingredients for your biscuits. Now, take your frozen butter and use a cheese grater to grate it into your dry ingredients. Use your fingers to evenly distribute the butter so the mixtures forms course crumbs. Stir in the sliced scallion(s), then add the milk and stir until the mixture is just evenly wet. Turn the dough onto a lightly floured surface and pat to 3/4 to 1 inch thickness. Use a round cutter, about 3" in diameter, and cut 6-8 biscuits. Place each biscuit on the prepared baking sheet. Bake for about 15 minutes or until the biscuits have turned goden brown on top.

While the biscuits are baking, combine the olive oil, vinegar, salt and pepper in a medium bowl. Cut the tomatoes into halves or quarters, depending on their size, and add them to the bowl tossing lightly to coat. Set aside.

In another bowl, whip the cream using an electric hand mixer until soft peaks form. Add the softened goat cheese and continue to beat the mixture until it is fluffy. Set aside.

When the biscuits are done, allow them to cool on the pan for 2 or 3 minutes until they are still warm but comfortable to handle. Cut each biscuit in half and put on a plate. Top the bottom half with a scoop of the tomatoes, then a dollop of the goat cheese and cover with the top half of the biscuit. Garnish with additional scallions if desired. Serve immediately!

In Lunch & Dinner, Vegetarian, Cocktails and Appetizers Tags biscuits, goat cheese, tomatoes, vegetarian
9 Comments
← NewerOlder →

Search Posts


Featured Posts

Summary Block
This is example content. Double-click here and select a page to feature its content. Learn more
Featured
Nov 12, 2025
Cursus Amet
Nov 12, 2025
Nov 12, 2025
Nov 5, 2025
Pellentesque Risus Ridiculus
Nov 5, 2025
Nov 5, 2025
Oct 29, 2025
Porta
Oct 29, 2025
Oct 29, 2025
Oct 22, 2025
Etiam Ultricies
Oct 22, 2025
Oct 22, 2025
Oct 15, 2025
Vulputate Commodo Ligula
Oct 15, 2025
Oct 15, 2025
Oct 8, 2025
Elit Condimentum
Oct 8, 2025
Oct 8, 2025
Oct 1, 2025
Aenean eu leo Quam
Oct 1, 2025
Oct 1, 2025
Sep 24, 2025
Cursus Amet
Sep 24, 2025
Sep 24, 2025
Sep 17, 2025
Pellentesque Risus Ridiculus
Sep 17, 2025
Sep 17, 2025
Sep 10, 2025
Porta
Sep 10, 2025
Sep 10, 2025

Powered by Squarespace