Quantcast
  • Contact
  • Portfolio
  • Subscribe
  • Recipes
Menu

Set the Table Photography

photography
  • Contact
  • Portfolio
  • Subscribe
  • Recipes
×

Cocktail Friday: The Toasted Pear

Rachael White October 2, 2015

Brad and I started dating in September of 2004. I had seen him around campus before but never had a conversation with him. We sang in the choir together, had a class together, and had likely crossed paths dozens of times in between. Early on in our relationship, we confessed that we were relieved the timing worked out the way it did. In our early college years, we were busy making bad dating choices, getting our hearts broken, and piecing them back together. But in September of 2004, one simple act, which could have meant nothing just months earlier, caused a spark between us. I was walking across campus, headed to the music hall, when a rogue frisbee landed at my feet. Not being much of a frisbee player, I wasn't entirely sure what to do, but I bravely picked up the disc and made a once-in-a-lifetime perfect toss (is that even what it's called?) to this tall, skinny guy with dreamy blue-green eyes and lashes that went on for days. As I went on my way, quietly rejoicing that I didn't make myself look like an idiot, Brad was apparently already sure he wanted to ask me out. I unknowingly made it difficult for him. He tried and tried without any luck because he couldn't get me to stand still long enough to get to the asking-out part of our little chats. And then one day, like a jerk, I asked him out by complete accident like it was no big deal. I didn't even do it on purpose. Brad was understandably frustrated, especially since it wasn't clear that I knew this was going to be a date. It wasn't until I was getting ready to meet up with him that I realized it felt like more than just hanging out with a friend. So, I showered, did my hair, spritzed on some perfume (let's be honest: it was probably some fruity-scented body spray) and headed out the door. We went and saw the show I Love You, You're Perfect, Now Change (the perfect first-date ice-breaker) and showed up wearing identical outfits: black shirts and jeans. Embarrassingly endearing? Then we enjoyed a late night snack at the campus café and when we parted ways, we were both sporting giddy grins because we hoped this was the beginning of something great. 

That was where it all started. And now, when autumn brings that crisp, cool, clean air that I love so much, I remember those early days of falling in love with Brad. We sipped cinnamon-scented hot cider together while working on our homework, took walks around our little college town, and nervously admitted, just weeks after we began seeing each other, that this was love.

image.jpg

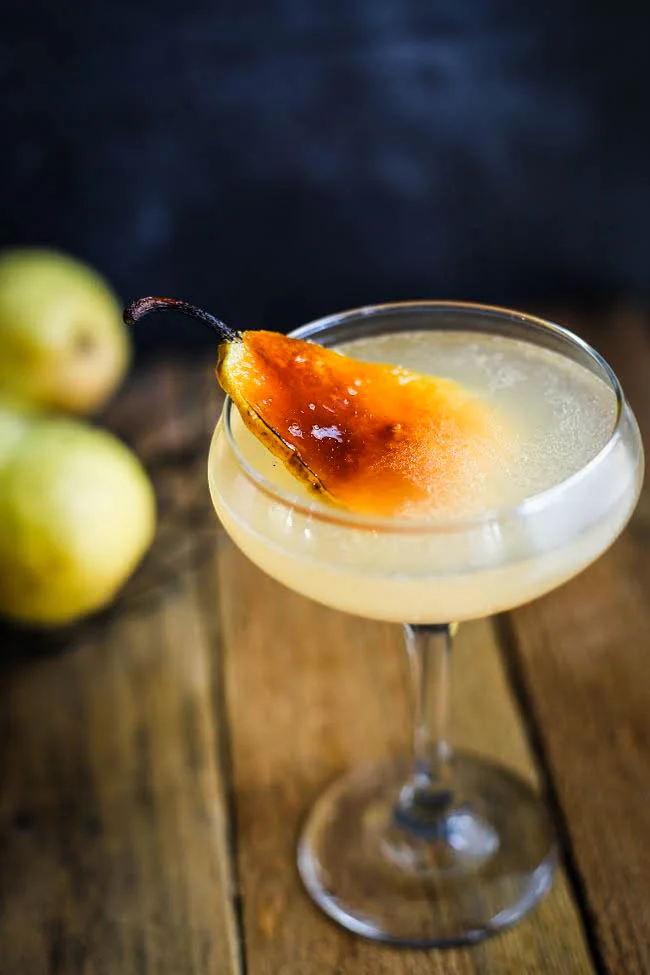
This year marks 10 years since Brad and I started dating and it seemed fitting to make a cocktail to celebrate the occasion. The Toasted Pear is simple and sweet with a hint of spice from classic fall flavors like cinnamon and clove. An elegant bruléed pear slice garnishes this playful fall cocktail, though you can use a plain pear slice if you don't have a torch.  

Toasted Pear Cocktail


If you can, sip this outside with crunchy leaves under your feet, sitting in front of a bonfire, or listening to your favorite fall music (I'm particularly fond of this right now). 

The Toasted Pear

Makes 2 Cocktails

For the Toasted Pear Simple Syrup:

  • 1 pear, cut into thick slices
  • 2 cinnamon sticks
  • 4 whole cloves
  • 1/4 cup sugar + 1 tablespoon
  • 1 cup water

For the cocktail:

  • 3 ounces rum
  • 1 1/2 ounces toasted pear simple syrup
  • 1/2 ounce fresh lemon juice
  • 2 slices of pear for garnish

For the Simple Syrup:

  1. To make the simple syrup, put the pear slices, cinnamon sticks, and cloves in a nonstick skillet over medium-high heat. Without disturbing the pear slices, toast them on one side for about 3 minutes or until they begin to turn golden brown. Flip and toast on the second side.
  2. Sprinkle 1/4 cup of the sugar over the pears and spices and stir until it begins to melt and caramelize just a bit. Carefully add the water and bring to a simmer, stirring until the sugar has dissolved. Continue to simmer for about 5 minutes or until the liquid reduces by about half.
  3. Pour the syrup through a strainer into a glass jar or liquid measuring cup. Set aside to cool.

For the cocktail:

  1. Begin by bruléeing the pear slices. Sprinkle with the remaining 1 tablespoon sugar. Using a torch, melt the sugar until it is golden and bubbly. Allow to cool slightly.
  2. While the slices cool, fill a cocktail shaker with ice. Add the rum, lemon juice and simple syrup and shake vigorously for 30 seconds. Pour into a cocktail glass and garnish with a bruléed pear slice.


In Entertaining, Cocktails and Appetizers Tags Cocktail Friday, cocktail recipes, rum cocktail, autumn cocktail
8 Comments

Breakfast Kimchi Fried Rice

Rachael White September 28, 2015

This past weekend, we had a little adventure. We spent a magical day in the mountains enjoying the stunning colors, fresh air, and some peace and quiet. Well, as much peace and quiet as possible with a 3 year old and an 8 month old in tow. Down near Denver, it was a miserable 90-ish degrees, which made me even more thankful to be in the cooler mountain air. Somehow, this state is missing the memo that fall has begun. Here's hoping things change soon, because this cold-weather-lover is READY!

Until the weather decides to concede and let go of summer, at least we know there is an escape merely an hour and a half away from our house. Caribou Ranch Open Space was the perfect spot to take an easy hike with the kiddos after browsing around the Boulder Farmer's Market and driving through the tiny town of Nederland. The whole experience made me realize we don't do nearly enough adventuring. When we lived in Japan, we were on a constant high because everything felt new. It's been a struggle reclaiming that feeling since returning to the U.S. but this little excursion was a step in the right direction.

By Sunday night, we were all exhausted and in need of some comfort food so I fired up the rice cooker and took out some Japanese curry from the freezer. It was a simple meal and, just like we did in Japan, we made extra rice. We rarely know what it will be used for, but it always turns into something delicious. This time around, the leftover rice became my breakfast in the form of Breakfast Kimchi Fried Rice. I'm calling it 'breakfast' because I added bacon and topped it with a fried egg, but in reality it can be used at any and all meals.

There are few things in life that can't be made better by fresh air, gorgeous views, and a bowl full of rice. This morning, as I made this for breakfast, I thought about how wonderful it was watching Riley run on the mountain trails, pretending to be the Lorax, while Braden gazed at bright yellow aspen leaves against the bright blue sky. As I fried my egg in sesame oil, I remembered walking through our neighborhood in Japan at dinner time, smelling that exact nutty scent from the streets. As the bacon sizzled in the pan, I recalled the woody, sweet smell of the sap from the Ponderosa pines. And as I took the first, spicy bite of the Kimchi fried rice, I realized how much I rely on food to bring me to all of my favorite places. That simple bowl was not only helping me begin my day with a full stomach, it was helping me bring those little pieces of my past back into focus alongside my present. .

Breakfast Kimchi Fried Rice

Makes 1 serving

  • 2 teaspoons toasted sesame oil
  • 1 egg
  • 1 slice of applewood smoked bacon, chopped
  • 1/2 cup cooked white rice, preferably day-old and cold
  • 2 tablespoons chopped kimchi
  • 1 small scallion, sliced diagonally
  1. Heat the sesame oil over medium heat in a large skillet.
  2. Add the egg and fry until the edges begin to crisp and turn golden. Cover the skillet and reduce the heat to low. Continue to cook the egg until the white is set and the yolk is still runny. Place the egg on a paper towel-lined plate and set aside.
  3. Return the heat under the skillet to medium and add the bacon. Cook until golden and crisp. Remove all but 1 teaspoon of oil/bacon fat from the pan.
  4. Increase the heat to medium-high, add the rice to the pan, sprinkle with a small pinch of salt, and cook, stirring occasionally, until the rice begins to crisp in places.
  5. Stir in the kimchi and half of the scallion and stir until heated through. Transfer to a shallow bowl or place, top with the egg and the remaining scallions and enjoy!
In Breakfast & Brunch Tags asian, breakfast, Eggs
4 Comments

Pumpkin Coconut Pancakes

Rachael White September 11, 2015

I clearly remember this time of year in Tokyo. A whisper of autumn was in the air amidst the hot, heavy humidity hovering over the city. People dabbed their faces with handkerchiefs to keep the dripping sweat in check but, because of a devotion to the seasonal calendar, began to wear light jackets and sweaters on their way to work in the morning. 

The intersection of summer and fall was pronounced if you looked for it. You could even see it in the food. In our last apartment (we lived in 3 different places during our 4 years in Japan) there was a yakiimo truck that would pass through the neighborhood selling roasted sweet potatoes. We could hear the strangely melancholy sound of the vendor calling out to anyone who would listen, “yakiiiiiiiimoooo”, as he made his way slowly through the streets.

The potatoes, wrapped in brown paper and served whole, would warm hands and fill tummies as people made their way home at the end of the day. I look for equally special signals at this time of the year in other places now. Here in Colorado, I have begun to identify this transition into autumn by the smell of roasted chiles and the explosion of all the pumpkin-y-things appearing in every grocery store and coffee shop and on every food blog in the land.

Some people try to resist, but I’m not going to. My favorite season only lasts a little while, so I’m going to take full advantage of all it has to offer.

So, here’s my pumpkin-y contribution. I made these pumpkin coconut pancakes last weekend - on one of those clear, crisp mornings - and they were absolute perfection on a plate.

About these pumpkin coconut pancakes:

This recipe is perfect for mornings when you want something a little more nourishing than a plain pancake. I love feeding these to my kids, too, because they get pumpkin (FULL of vitamins) but still the fun of a pancake breakfast. Here are a few other things you should know:

  • You can use whole wheat flour (my fav), all purpose flour, or a combo of both.

  • Depending on the flour you choose to use, you may need to add a bit more liquid to achieve the perfect batter consistency

  • Not all coconut milk is the same! Some cans of coconut milk have more liquid and some have more cream. Adjust your batter by adding more milk vs more coconut milk

  • If you don’t have pumpkin, you can also use mashed banana!

What you need to make Pumpkin Coconut Pancakes:

You’ll want to make sure you have the following ingredients before you get started:

  • whole wheat (or AP) flour

  • sugar

  • spices: ginger, cinnamon, cloves, nutmeg

  • salt

  • eggs

  • canned coconut milk

  • pumpkin puree

  • coconut oil, ghee, or butter

  • coconut flakes (optional)

  • maple syrup

I used a recipe I posted a while back as my guide but made changed it up by using whole wheat flour, coconut milk in place of regular milk and coconut oil in place of butter. Topped with toasted coconut flakes, these pumpkin spiced pancakes are the perfect way to usher in the cooler weeks while gently letting go of summer.

Pumpkin Coconut Pancakes

Ingredients

  • 1 1/4 cups whole wheat flour

  • 2 tablespoons sugar

  • 2 teaspoons baking powder

  • 1/2 teaspoon cinnamon

  • 1/2 teaspoon ground ginger

  • 1/2 teaspoon salt

  • 1/8 teaspoon nutmeg

  • pinch of ground cloves

  • 1 cup coconut milk, mixed well until smooth (light or full fat)

  • 1/4-1/2 cup milk or almond milk (see notes)

  • 6 tablespoons pumpkin puree

  • 2 tablespoons melted coconut oil, cooled + extra for cooking

  • 1 egg

  • 1 cup toasted, unsweetened coconut flakes

Instructions

  1. In a large bowl, whisk the dry ingredients together.

  2. Toss the white chocolate ships in with the dry ingredients using a spoon or spatula.

  3. In another smaller bowl, stir the coconut milk, milk, pumpkin, 2 tablespoons coconut oil and egg together.

  4. Gently stir the wet ingredients into the dry ingredients until just combined. The batter should be wet but lumpy.

  5. Heat a skillet over medium heat. Add some coconut oil and swirl it in the pan.

  6. Pour in 1/4 cup batter per pancake.

  7. Cook on the first side until the side facing up begins to dry out around the edges and little bubbles appear on the surface.

  8. Flip the pancake and allow it to cook for an additional 2-4 minutes until the second side is golden.

  9. Serve the pancakes sprinkled with toasted coconut flakes and drizzled with maple syrup.

In Breakfast & Brunch, Kid Friendly Tags pumpkin recipes, pumpkin, breakfast
12 Comments
Pueblo Chile Grilled Cheese Sandwich

Pueblo Chile Grilled Cheese with Strawberry Jam

Rachael White August 31, 2015

I'm slowly but surely recovering from sending my oldest baby to preschool last week (cue the tears...again). Each day brings new challenges and rewards, but we are making it through and figuring how routines that work for us. I have often heard parents talk about how their children seem to move at a glacial pace when they need to be somewhere on time. That has been a difficult thing for me and my rocky relationship with early morning wake-up calls. Still, we have made it on time every morning and that, as many people will tell you, is a big win for me. I could go on and on about how wonderful and difficult this transition has been, but I'll save that for my Mommy Stuff page. The last thing I'll say is this: on the first day of school, I came home, put the baby down for a nap, and made myself this delicious grilled cheese sandwich piled with Pueblo chiles from Colorado, my mom's homemade strawberry jam, and not TWO delicious slices Tillamook cheddar cheese. Comfort food central.

Something about melty cheese, my very favorite jam in the entire universe, and locally roasted, gently spicy Pueblo chiles sandwiched between buttery bread helped make everything slow down for a few brief moments. Grilled cheese sandwiches have magical healing power. Of this, I am certain. I am also certain that this feeling that time is moving too quickly will always be there, lurking in the shadows and making me feel like I'm in a car that's moving too fast and the breaks are broken. Realizing this fact may help me to hold on to the small moments and simple pleasures a little tighter. Or at least that's what I'm going to tell myself. 

While I figure all of that out, I believe another one of these sandwiches is necessary.


Pueblo Chile Grilled Cheese with Strawberry Jam

Serves 1

Ingredients

  • 2 slices white or wheat bread
  • 2 slices sharp cheddar cheese
  • 2 teaspoons strawberry jam
  • 1-2 small/medium sized roasted green chiles
  • 3 tablespoons unsalted butter, room temperature

Instructions

  1. Begin by heating a cast iron or another heavy pan over medium low heat. I like cast iron because of the even heat and the picture perfect crust that forms on the outside of the bread.
  2. While the pan is heating, peel and seed your chiles and cut off the stems.
  3. Spread 2 tablespoons of the butter on one side of each slice of bread making sure the butter reaches all the way to the very edge.
  4. Melt the remaining butter in the heated pan and, once it has melted, place one slice of bread, buttered side down, in the pan and place one slice of cheese on the bread.
  5. Place the chiles on top of the cheese, then place the second slice of cheese on top of the chiles.
  6. Spread the jam on the remaining slice of bread (on the side without butter) and place on top of the sandwich. Press down on slightly.
  7. Allow the sandwich to cook for about 5 minutes per side, watching the heat carefully and adjusting as necessary.
  8. Once the cheese is nicely melted and the bread is a deep golden color, transfer it to a cutting board and let it sit for 2-3 minutes before cutting in half.


In Lunch & Dinner Tags lunch, grilled cheese sandwich, colorado, how to roast hatch chiles, easy recipes, dinner
6 Comments

Cocktail Friday: Blackberry Vanilla Mocktail + VIDEO

Rachael White August 21, 2015

When Brad and I lived in Japan, we used to spend Friday nights enjoying Japanese beer, eating delicious Izakaya food (Japanese fried chicken FTW!) and doing pretty much anything we could to kick off the weekend in true 20-something, childless style. These days, with a 3 year old and 7 month old dictating our schedules and energy levels, we tend to lay low on the weekends. Friday nights involve pizza, sometime a movie, and falling asleep on the couch around 9:30pm. Yes. We are that exciting.

Despite the fact that our lifestyle, in a sense, has become much calmer and subdued when it comes to Friday nights, we still try to keep things fancy by making fun drinks from time to time. I love this Blackberry Vanilla Mocktail because it's delicious and kid-friendly but can easily double as an adults-only beverage. This beautiful drink also gave me some variety when I was pregnant, so if you have moms-to-be coming over for dinner, this is the perfect way to make sure they don't feel left out! 

And to show how simple this beautiful beverage is to make, check out my latest video with Penso Entertainment on the FoodieTV Youtube Channel! Don't forget to subscribe to the channel so you don't miss future videos!

Blackberry Vanilla Mocktail

Makes 2 drinks

  • 1/3 cup blackberries
  • juice of 1/2 a lemon
  • 1/2 teaspoon honey
  • seeds from 1/4 of a vanilla bean
  • Club soda
  • Mint and/or lemon slices for garnish
  1. In the bottom of a large glass or cocktail shaker, crush the blackberries with the lemon juice, honey and vanilla.
  2. Pour the mixture through a fine sieve set over a glass or liquid measuring cup.
  3. Fill two short glasses with ice and divide the juice between them. Top with club soda and garnish with mint leaves or lemon slices.


In Video, No Added Sugar, Cocktails and Appetizers Tags cocktail, mocktail, recipe
Comment

Kimchi, Grains + Greens Bowl

Rachael White July 29, 2015

Getting healthy, delicious food in my body has been challenging since welcoming baby Braden into the world. Breakfast is ALWAYS coffee and sometimes a bowl of Cheerios or, on really good days, a fried egg on top of avocado toast.  After a small snack mid-morning, making lunch for a picky 3-year-old, and managing double nap times, I find a few moments to sit down and realize that I haven't eaten lunch yet. Then the scrounging begins. And that typically means a downward spiral into finding anything that will give me a quick boost of energy.

I have my good days, but not enough of them.

I'm currently vacationing in Minnesota/spending tons of time with family/catching up with friends/introducing Braden to real food/having uninterrupted conversations with my husband/FINALLY get into a post-baby exercise routine/giving the blog some love/taking care of my body while my parents take care of me. All of these things have been good for my soul. It feels like I'm giving myself permission to take care of me. My hope is that by the time I return home, I will be able to develop better habits that will make me work smarter in all areas of my life.

Since food plays such a major role in how I feel, I'm trying to incorporate more simple, whole foods into my diet and removing lots of sugar. I've done this eating-less-sugar-thing before and been extremely happy with the results, both physically and emotionally. After 60 days, I felt amazing and made better choices all around for myself and my family. I'm definitely feeling like I need some help getting back on track, so I'm taking Jacqueline Smith's upcoming Go Sugar Free course for a second time.

One of the many things I LOVE about Jacqueline's course is that I have lifetime access to all of her resources. She shares information that she has selected thoughtfully and purposefully to help educate and empower her students. There are so many reasons why she is a woman I greatly admire. Her dedication and genuine passion for helping others Go Sugar Free is something I am in awe of on a daily basis.

Since becoming involved in GSF, I've become even more committed to providing recipes on Set the Table that are beautiful, delicious and healthy. Lucky for me, that means more creations like this Kimchi, Grains & Greens Bowl I'm sharing today! Whole grain bowls are so easy to throw together and I can always find new combinations that I love (and old standbys that are easy to whip up). This one is made with bulgur, a fast-cooking whole grain, is topped with locally made kale kimchi, homemade pickled radishes, a perfectly soft-boiled egg, and shredded chard from the garden.

Helloooooooo, lunch perfection!

Since this meal doesn't really require a "recipe", I'm providing a formula so you can come up with your own tasty creations based on what you have in your fridge. I promise you can't go wrong if you follow this guide and the countless combinations help keep things interesting. 

Here are the main components that will help you build the perfect whole grain bowl:  

Your grains could be bulgur, brown rice, quinoa, or farro. Your egg could be fried, poached or soft-boiled. You pickles could be cucumbers, radishes, or onions. Your fermented veggies could be sauerkraut or kimchi. There are so many delicious options, which is why this formula is so wonderful!

These bowls are always so gorgeous and taste as wonderful as they look, which makes it a million times easier to stick with a healthy menu on a daily basis. Some of the most beautiful recipes I've made, including this one, have been the result of all I've learned as a Go Sugar Free student and graduate. As with many things, learning never really stops with letting go of sugar, but that's part of what makes the process so meaningful, rewarding and worthwhile. I think this meal will be joining the list of new favorites that are sure to come out of this next course!

If you don't feel ready to make the commitment yet, feel free to follow me here for delicious recipes that will help you see how delicious going sugar free can be. In the meantime, get your hands on some kimchi and get this bowl of goodness in your belly ASAP!

*This post contains affiliate links.

In Lunch & Dinner, No Added Sugar, Vegetarian Tags Avocado, Heatlhy, Summer Recipes, chard, 20 minute meals, clean eating
Comment
← NewerOlder →

Search Posts


Featured Posts

Summary Block
This is example content. Double-click here and select a page to feature its content. Learn more
Featured
Nov 7, 2025
Cursus Amet
Nov 7, 2025
Nov 7, 2025
Oct 31, 2025
Pellentesque Risus Ridiculus
Oct 31, 2025
Oct 31, 2025
Oct 24, 2025
Porta
Oct 24, 2025
Oct 24, 2025
Oct 17, 2025
Etiam Ultricies
Oct 17, 2025
Oct 17, 2025
Oct 10, 2025
Vulputate Commodo Ligula
Oct 10, 2025
Oct 10, 2025
Oct 3, 2025
Elit Condimentum
Oct 3, 2025
Oct 3, 2025
Sep 26, 2025
Aenean eu leo Quam
Sep 26, 2025
Sep 26, 2025
Sep 19, 2025
Cursus Amet
Sep 19, 2025
Sep 19, 2025
Sep 12, 2025
Pellentesque Risus Ridiculus
Sep 12, 2025
Sep 12, 2025
Sep 5, 2025
Porta
Sep 5, 2025
Sep 5, 2025

Powered by Squarespace