Quantcast
  • Contact
  • Portfolio
  • Subscribe
  • Recipes
Menu

Set the Table Photography

photography
  • Contact
  • Portfolio
  • Subscribe
  • Recipes
×
Pumpkin-Pie-Latte-Set-the-Table.jpg

Homemade Pumpkin Pie Latte

Rachael White September 10, 2014

This morning I went to one of the few truly local, quality coffee shops in our neighborhood. They serve coffee that has been roasted in Boulder, all the employees are volunteers, their food is almost all made in-house, and the money they make goes to providing clean water to those in need in Africa. To make the whole thing even more wonderful, they have a killer Pumpkin Pie Latte made with ACTUAL PUMPKIN. It is my new fall obsession and I don’t know that I can ever go back to the run-of-the-mill “pumpkin” stuff. And just to be clear, I have been obsessed with the pumpkin latte concept since it began. I mean, completely and utterly obsessed to the point that I felt a palpable sadness when we lived in Tokyo and couldn’t get anything similar.

Homemade-Pumpkin-Pie-Latte-Set-the-Table.jpg

Aside from my obsession with their current seasonal latte flavor, this little coffee shop made me smile this morning thanks to the kindness of three people. The first was a fellow mom, sans-children, picking up some coffee before she started her day. She glanced at my growing belly and asked if I was expecting and the conversation continued from there. She told me about her two kids, we shared sympathies for rough mornings of tantrums and trips to the grocery store that leave us wondering why we do these things. Then we moved to those sweet moments that make it all worth it: there are the impossibly wonderful little kisses, the hugs that never last long enough, and the countless other ways kids remind us why we get into this whole parenting thing. It was a brief conversation, but it was comforting to me. As this fellow mom grabbed her coffee and prepared to carry on with her day, she wished me the best of luck and she meant it.

The next encounter was another customer who had just walked in to order his coffee with a friend. I was leaning against the door frame near the coffee-pick-up counter, absent-mindedly rubbing my belly, and he said, “That is the sweetest thing ever.” I smiled quietly to myself and realized that, yes, it is the sweetest thing ever. It was a little sad for me when I was no longer pregnant with my son because I missed that quiet connection. Of course, I developed a connection that is much stronger with him in the weeks and months that followed his birth, but there is nothing like the feeling when they are still inside.

As I grabbed my pumpkin pie latte from the counter, the barista, who I’d seen the day before, said the usual “have a great day”, but he followed it up with something I wasn’t expecting. He said, “It was really nice to see you two days in a row”.

Pumpkin-Latte-Recipe-Set-the-Table.jpg

None of these encounters lasted all that long, but each one of them made me love that little coffee shop and the people that frequent it. It made me appreciate the fact that finding a little local spot rather than a chain can absolutely change your outlook on what would otherwise be a normal, run-of-the-mill day.

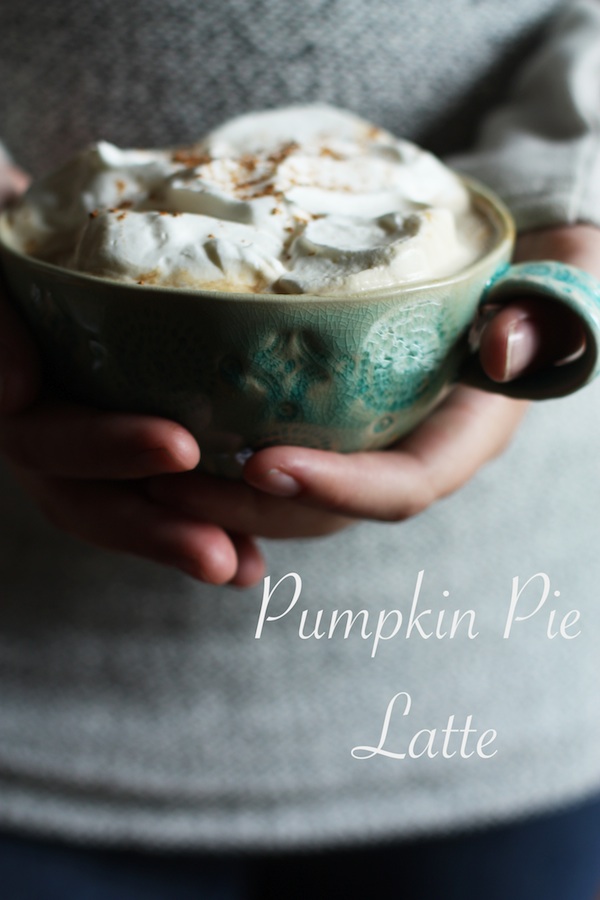
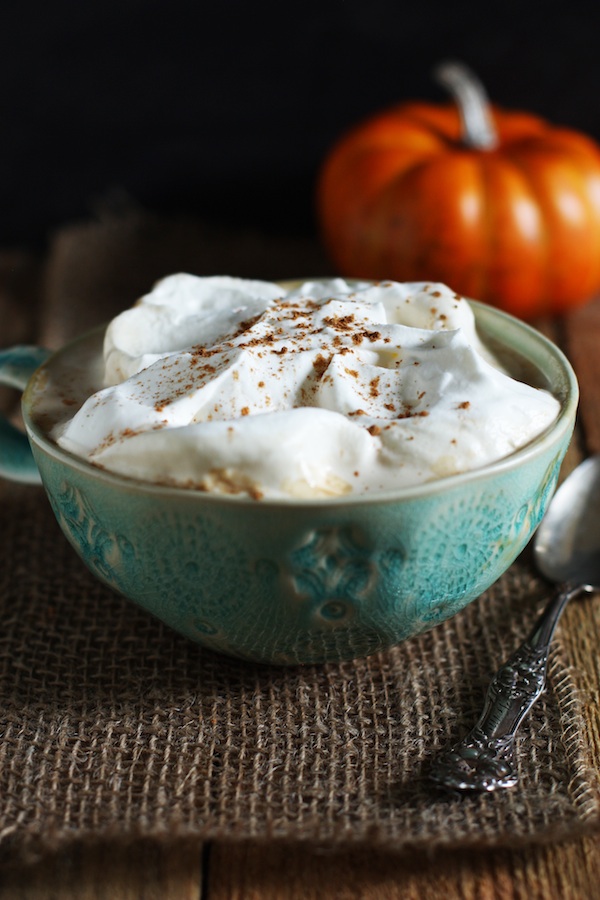
Today, I’m sharing my own version of a Pumpkin Pie Latte since I know the majority of you cannot come out to Old Towne Arvada and get one at my favorite little spot. And most of us cannot afford the $4 bill too often. I’d like to encourage you to make this for your friends. Share it with them and let the warm spices do their work to make them feel comforted and warm inside. And while you’re at it, take a moment to say something loving and kind to them.

Because loving one another can't hurt, right?

Homemade Pumpkin Pie Latte

Serves 1

Total time: 10 minutes

Ingredients

  • 1/2 cup pumpkin puree
  • 1 tablespoon pumpkin pie spice, plus extra for garnishing
  • 1/2 cup maple syrup
  • 6 oz whole milk (or 2%)
  • 2 oz espresso or very strongly brewed coffee
  • 2 tablespoons whipping cream, whipped and left unsweetened

Instructions

  1. In a small saucepan, combine the pumpkin and the pumpkin pie spice over medium heat.
  2. Stir with a spatula or wooden spoon until heated through. This lets the spices really bloom and makes the pumpkin have a more intense, less raw flavor.
  3. Add the maple syrup and stir for about 3 minutes until the mixture resembled a thick (but not too thick) syrup. This is a lot like making a simple syrup for cocktails.
  4. Meanwhile, put the milk in a glass measuring cup that is microwave safe and heat for about 1 minute and 30 seconds until steaming but not scorched.
  5. Add 1 or 2 tablespoons of the pumpkin syrup to the milk and whisk to combine.
  6. Add the espresso to a coffee mug and top with the milk/pumpkin mixture. Stir to combine.
  7. Top with a dollop of whipped cream and a sprinkle of pumpkin pie spice.
  8. Enjoy immediately!
In Breakfast & Brunch, Dessert, Entertaining, No Added Sugar, Vegetarian Tags coffee, fall recipe, pumpkin
18 Comments

Peach and Burrata Salad with Balsamic Reduction

Rachael White August 28, 2014

Yep. I'm just gonna put that juicy peach photo right in your face this morning. Because who doesn't want to see a Peach and Burrata Salad up close and personal?

My 18 lb box of peaches has dwindled to less than half of what I started with. It's a sad state of affairs, knowing this sweetness will be gone soon. Fortunately, I learned from last year's mistake and we have avoided being bombarded with fruit flies (is there anything more annoying?) by making sure we had plenty of room for the peaches in the fridge. Once they hit their perfect stage of ripeness, I piled them all in the fruit drawer and have been taking 1 (make that 2) our each and every day to enjoy. My final task is to make a couple jars of my peach and hatch chile salsaand my Grandma Della's Peach Cobbler. If I'm lucky, I may make one more batch of these Peach & Oat Muffins from last week.

Fresh-Peach-Spinach-Salad-with-Burrata-Set-the-Table.jpg

I spend a lot of time comparing my transition to life in Colorado to the first couple of years we spent in Japan. I LOVED living in Japan but not until the last 2, maybe 2 1/2 years. It was so strange and different and I didn't know what I was doing for those first couple of years that I just couldn't come around to it. However, once I figured out the rhythms of each season and had an idea what to expect, I was able to fall in love. I feel like I may be turning that corner here in Colorado, at long last. The current weather pattern, cool, crisp mornings, warm afternoons, and chilly nights, has won me over after weeks of weather that is too hot for my taste. Understanding that this refreshing time of year comes just after peach season is the kind of stuff I like to know about where I live. It's a strange quirk, perhaps, but at least I am aware of it. That makes change a little easier to deal with.

Peach-Burrata-Salad-with-Pecans-Set-the-Table.jpg

Speaking of change... Baby #2 is growing! I feel like I'm hungry every 30 minutes so I've been trying to fit in a lot of small, healthy snacks throughout the day. One of my favorites is a sliced peach, Greek yogurt, and a little sprinkle of muesli. Or a spoonful of natural peanut butter. Mmmmmmyes.

10624988_870958615383_2569301713981177036_n.jpg

Well, I'm off to enjoy a lovely, cool morning outside with this guy. He makes my heart happy in so many ways. And he loves peaches just as much (maybe even more) than I do!

10600460_869795566143_3049925383690205712_n.jpg

What are your favorite things about this time of year? This end-of-summer-beginning-of-fall time can be so lovely, don't you think?

Ponder that while you enjoy this easy, delicious, and healthy salad!

Peach and Burrata Salad with Balsamic Reduction

Serves 2

Total time: 15 minutes

Ingredients

  • 1/3 cup balsamic vinegar
  • 2 cups baby spinach leaves
  • 1 peach, sliced
  • 1/3 cup toasted pecan halves
  • 3 oz burrata cheese
  • 2 tablespoons olive oil
  • sea salt
  • black pepper

Instructions

  1. Begin by making the balsamic reduction by putting the vinegar in a small saucepan over medium heat. Bring to a simmer and reduce by half. Remove from the heat and allow to cool.
  2. Meanwhile, pile the spinach leaves on two plates and top with the peach slices, the pecans, and the cheese.
  3. Drizzle with some of the balsamic reduction and the olive oil.
  4. Sprinkle with salt and pepper to taste and serve.
In Lunch & Dinner, No Added Sugar, Vegetarian Tags Colorado peaches, healthy summer salad, salad, summer fruit recipe, vegetarian recipe
1 Comment
Healthy-Baked-Apples-Muesli-Crisp-Set-the-Table.jpg

Healthy Baked Apples with Muesli Crisp (+ an announcement!)

Rachael White August 13, 2014

I'm having a little love affair with breakfast. It's the first thing I think about when I wake up in the morning and I always want something hearty, sweet, and involving cinnamon in some way. These healthy baked apples with muesli crisp are the perfect solution. I'm going to eat them every day once apples are in season for real. It's gonna have to happen. With a dollop of creamy Greek yogurt sweetened with honey pleaseandthankyou.

It's good that I'm obsessed with something so wonderfully healthy because I seem to be putting on a little weight. Can you tell?

Pregnancy-Announcement-Set-the-Table.jpg

Yep! Baby #2 is growing in that there bump and it wants all the comfort food in the universe (seriously, all of it. send mashed potatoes and gravy). 

We are so happy and thankful to have had a relatively problem-free pregnancy so far and cannot wait to welcome a new little one into our family! Riley is beyond excited to be a big brother and I love it when he walks up to me to bury his face in my growing belly. Sometimes, in the sweetest little voice, he says "Hi baby" and I melt in a puddle on the floor.

Whew! I'm so relieved to get that out there.

Now I can bombard you with my woes about morning sickness and crampy legs and heartburn, right? No? Not so much? OK.

Let's get back to these baked apples...

Baked-Apples-with-Muesli-Crisp-Set-the-Table.jpg

Quite a while ago, the lovely folks at Seven Sundays in Minnesota sent me some of their delicious muesli and my love affair with this easy breakfast item began. I've eaten it soaked overnight, warmed, sprinkled over yogurt, and straight out of a bowl with milk. You really can't go wrong. I've decided that my favorite flavor is the Vanilla Cherry Pecan. Chewy dried cherries, buttery, crunchy pecans, and a hint of vanilla basically creates a perfect start to the day. And the perfect topping for baked apples.

Seven-Sundays-Muesli-Set-the-Table.jpg

I simply halved an apple and scooped out the core with a melon baller, then sprinkled each half with a little tiny bit of brown sugar (which it doesn't really need, to be honest) and topped that with the muesli. The dressed up apples baked for 30 minutes, concentrating their naturally sweet flavor and toasting the muesli to perfection. When they came out of the oven, I sprinkled a little cinnamon over the crisp and scooped a spoonful of creamy honey Greek yogurt in the middle of each apple. Heaven.

Red-Delicious-Apple-Set-the-Table.jpg
Healthy-Baked-Apples-Set-the-Table.jpg

So, I'm going to continue stuffing these in my face because there's not a whole lot to feel bad about here.

You must make these. You MUST.

Healthy Baked Apples with Muesli Crisp

Serves 2

Total time: 35 Minutes

Ingredients

  • 1 apple (red delicious was, well, delicious...but use whatever you can find)
  • 1 teaspoon unsalted butter
  • 1 teaspoon brown sugar (optional)
  • 1/3 cup muesli (I used Seven Sundays Vanilla Cherry Pecan)
  • 1/8 teaspoon ground cinnamon
  • 1/3 cup honey or vanilla Greek yogurt

Instructions

  1. Preheat the oven to 350 degrees Fahrenheit.
  2. Begin by halving the apples lengthwise and scooping out the core (plus a little extra) with a melon baller.
  3. Smear the butter evenly on each apple and sprinkle with the brown sugar.
  4. Top with the muesli and bake for 30 minutes or until the apples are just tender but not mushy and the topping is golden.
  5. Remove from the oven and transfer to serving plates.
  6. Dollop with the Greek yogurt and eat immediately.
In Breakfast & Brunch, Dessert, Kid Friendly, No Added Sugar, This & That, Vegetarian Tags apples, healthy breakfast recipe, healthy dessert, muesli
5 Comments

Cheesy Roasted Cauliflower Soup

Rachael White August 6, 2014

A simple, satisfying cauliflower soup made creamy and luxurious with a little cheese. This soup recipe is easy and makes a perfect lunch or light dinner!

Read More
In Lunch & Dinner, No Added Sugar, Vegetarian Tags cauliflower, easy lunch recipe, gluten free, no sugar addedhealthy recipes, soup recipe, vegetarian
12 Comments
Miso-Glazed-Broiled-Figs-Set-the-Table.jpg

Miso Broiled Figs

Rachael White August 2, 2014

I remember the first time I ate a fig. It was actually in Japan. Before that, the only figs I had tasted were inside of a cookie, so this was kind of a big deal. If you've never tasted one, I recommend tasting them fresh first. Just take a bite of the soft flesh and get to know the naturally beautiful sweetness as it sits on your tongue. After that, try it in all it's best forms: jam (duh), stuffed with goat cheese and wrapped in prosciutto, sliced on a grilled cheese sandwich, or simply broiled with a lovely miso glaze. Yes, Miso Broiled Figs are worth trying. They have the same salty-sweet combination you would get from wrapping them in prosciutto or bacon but it is slightly more subtle and takes a lot less work. I've decided that this just might be the perfect new addition to a cheese platter with a nice crisp glass of rosé.

Broiled-Figs-with-Miso-Glaze-Set-the-Table.jpg

This recipe was inspired by one of my favorite traditional Japanese dishes, nasu dengaku, or Miso Broiled Eggplant. The miso glaze is simple to mix together and not only works wonderfully on figs and eggplant, but can be used to glaze fish, chicken, pork, or beef. I like to make enough to use several times throughout the week. The only change I made to my miso glaze was to omit the mirin (making this another Go Sugar Free-friendly recipe) and replacing it with rice vinegar and a touch of water. Instead of sugar, I used raw, unfiltered honey but I think pure maple syrup would be lovely with the figs as well.

Miso-Glazed-Figs-Set-the-Table.jpg

Speaking of Go Sugar Free, there are only 5 more days left to register for the next course! Check out my post here for more information about my experience as a Go Sugar Free student/graduate and also:

If you’re ready to learn more about Go Sugar Free, you can click here. If you decide to register, you’ll be making a massive change in your life that can’t do anything but help you become a better, healthier version of yourself.

If you’re interested in finding out more about Jacqueline’s philosophy but aren’t ready to commit to the GSF course, I urge you to get her eBook, 5 Easy Ways to Look Radiant Tomorrow Morning, and Don’t Waste Produce (DWP) Checklist (this is a HUGE help when it comes to no-waste meal planning and encouraging the consumption of more fresh, whole foods).

*This post contains affiliate links. All opinions are my own.

Miso Broiled Figs

Serves 4-6 as an appetizer

Total time: 10 minutes

Ingredients

  • 8 medium to large figs, halved lengthwise
  • 1/4 cup white miso paste
  • 2 tablespoons raw, unfiltered honey (or maple syrup)
  • 2 tablespoons rice vinegar
  • 2 tablespoons water

Instructions

  1. Preheat the oven to 375 degrees Fahrenheit.
  2. Arrange the figs, cut side up, on a large baking sheet.
  3. Place the figs in the oven for 5 minutes. Remove from the oven and turn the broiler to low.
  4. Meanwhile, mix the miso paste, honey, vinegar and water together in a small, microwavable bowl. Whisk to combine and microwave for 1 minute. Whisk again until smooth.
  5. Use a brush to top each fig half with some of the miso glaze. You want enough for a thick coating because some of it will seep into the flesh of the figs and you want some left on top to create a nice, golden finish.
  6. Place the glazed figs under the broiler and let them brown for 2-3 minutes or until there are some deep golden spots in the glaze.
  7. Remove from the oven and let cool slightly before serving.
  8. Garnish with fresh herbs if desired.
In No Added Sugar, Vegetarian, Cocktails and Appetizers
2 Comments
Caprese-Pasta-Bake-Set-the-Table.jpg

Healthy Caprese Pasta Bake

Rachael White July 31, 2014

Hey there, caprese band wagon. I am on you.

Caprese is in all the places right now but it's for a good reason: it's delicious! Fresh tomatoes, creamy mozzarella and bright basil are a combination we seem to never tire of. It's a classic. This Healthy Caprese Pasta Bake is just another excuse to enjoy this trio of flavors in a complete, one pot (yep, ONE pot) meal. It all gets stirred together, baked, and served from just one dish. It's a dish-washing-haters miracle! And it's pasta. I could eat pasta all the time and be perfectly fine with that. Are you a GF person? Good news! I made this with brown rice pasta (I recommend Jovial) so you are A-OK! Not eating added sugar? I've got you covered! Have hungry, picky toddlers to feed? Check and done.

I cannot say too many good things about this dish because it really is that good and oh so easy you could make it any night of the week for your entire family.

Gluten-Free-Caprese-Pasta-Bake-Set-the-Table.jpg

OK- now that I have that out of my system we can move on for a moment.

If you follow me on facebook, twitter, or instagram you probably know that we spent the past 2 weeks on vacation in Minnesota with my family. It was a wonderful visit. We spent several days as lake bums up near Nisswa, MN. It was a perfect way to enjoy some quality time with my parents without the daily grind getting in the way. We swam (well, I mostly floated on one of those inflatable rafts), ate good food, played Yahtzee and Scrabble, and laughed until we cried. Riley made some new friends at the beach and learned to fish with his daddy. It was perfection.

When we arrived back in Denver on Tuesday it all felt like a dream; almost like we had never left our little house. As the post-vacation feelings settle in and the memories we made begin to pop in and out of my mind, I grow more and more grateful for the time we spent together. There is no shortage of love and that's the truth.

Healthy-Caprese-Pasta-Bake-Set-the-Table.jpg

OK- back to this pasta bake. The recipe is based on Jacqueline's Pasta Bake, which Jacqueline of Go Sugar Free shared here on the blog a few months ago. That dish has been a staple for our family for a few reasons but mostly because it's something super healthy that we all love. Can't ask for much more than that, right?

Registration is still going on for the next Go Sugar Free course and Jacqueline is also offering several slots for scholarships. That means, if you get one of the spots, you can take GSF for free! To enter, click here.

And normal registration is open for another week! Lindsay from Pinch of Yum did a great write-up on her experience (along with her husband Bjork) of living sugar free with Jaqueline's help. It is inspiring and, as she says, the experience was much easier than she thought it would be. And she's right.

So, if you're on the fence, or just need more information, here are some things you can do:

If you’re ready to learn more about Go Sugar Free, you can click here. If you decide to register, you’ll be making a massive change in your life that can’t do anything but help you become a better, healthier version of yourself.

If you’re interested in finding out more about Jacqueline’s philosophy but aren’t ready to commit to the GSF course, I urge you to get her eBook, 5 Easy Ways to Look Radiant Tomorrow Morning, and Don’t Waste Produce (DWP) Checklist (this is a HUGE help when it comes to no-waste meal planning and encouraging the consumption of more fresh, whole foods).

*This post contains affiliate links. All opinions are my own.

Healthy Caprese Pasta Bake

Serves 6

Total time: 40 minutes

Ingredients

  • 1 12 oz. box Jovial Brown Rice Pasta or whole grain pasta
  • 1 25 oz. jar of tomato basil pasta sauce
  • 1⁄2 cup filtered water
  • 1 large ball of fresh mozzarella, sliced
  • 2 teaspoons cold-pressed, unfiltered, extra virgin olive oil
  • 1 cup loosely packed fresh basil leaves, roughly chopped

Instructions

  1. Preheat the oven to 375 degrees Fahrenheit.
  2. In a large, deep baking dish, combine the pasta, tomato sauce and water. The pasta should be nearly covered by the sauce. Stir to combine.
  3. Bake for 10 minutes, remove the pasta from the oven and stir again. Return to the oven and cook for another 15 minutes. The pasta should be al dente at this point.
  4. Remove the pasta from the oven and turn the broiler on low.
  5. Top the pasta with the sliced mozzarella and place under the broiler, cooking until the cheese is brown and bubbly.
  6. Serve sprinkled with the basil leaves and drizzled with the olive oil.
In Kid Friendly, Lunch & Dinner, No Added Sugar, Vegetarian
5 Comments
← NewerOlder →

Search Posts


Featured Posts

Summary Block
This is example content. Double-click here and select a page to feature its content. Learn more
Featured
Dec 16, 2025
Cursus Amet
Dec 16, 2025
Dec 16, 2025
Dec 9, 2025
Pellentesque Risus Ridiculus
Dec 9, 2025
Dec 9, 2025
Dec 2, 2025
Porta
Dec 2, 2025
Dec 2, 2025
Nov 25, 2025
Etiam Ultricies
Nov 25, 2025
Nov 25, 2025
Nov 18, 2025
Vulputate Commodo Ligula
Nov 18, 2025
Nov 18, 2025
Nov 11, 2025
Elit Condimentum
Nov 11, 2025
Nov 11, 2025
Nov 4, 2025
Aenean eu leo Quam
Nov 4, 2025
Nov 4, 2025
Oct 28, 2025
Cursus Amet
Oct 28, 2025
Oct 28, 2025
Oct 21, 2025
Pellentesque Risus Ridiculus
Oct 21, 2025
Oct 21, 2025
Oct 14, 2025
Porta
Oct 14, 2025
Oct 14, 2025

Powered by Squarespace