Quantcast
  • Contact
  • Portfolio
  • Subscribe
  • Recipes
Menu

Set the Table Photography

photography
  • Contact
  • Portfolio
  • Subscribe
  • Recipes
×
Whole-Wheat-Peach-Muffins-Set-the-Table.jpg

Healthy Peach & Oat Muffins

Rachael White August 23, 2014

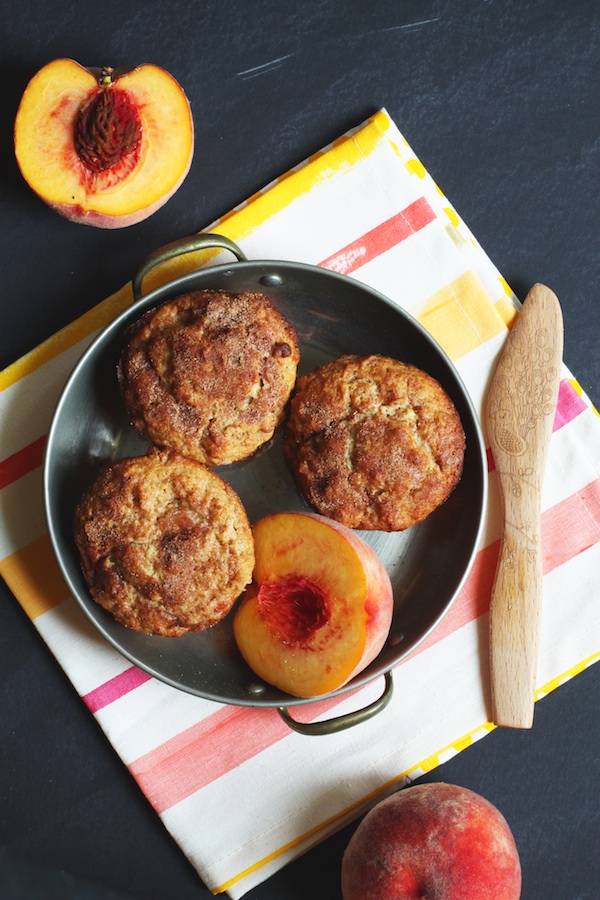
Peach season has arrived and I am SO EXCITED. I bought an 18 pound box of peaches from our church (all the proceeds go to our youth group which is so awesome) and they are absolutely perfect. I've been eating 2 of them pretty much every day- one with breakfast and one after dinner. As for the rest of the bunch, I'm finding new ways to showcase their perfect peach flavor without overcooking/over-sugaring them. Just the other day I was telling my mom how I find it a little sad to make something like jam out of such lovely tasting fruit. (Am I strange for feeling that way? Yes? Well OK then.) These healthy peach and oat muffins are just about the best thing ever. Healthy and with just a hint of what's around the corner (spoiler alert: it's FALL) thanks to a cinnamon-sugar coating on top.

Healthy-Peah-Muffins-Set-the-Table.jpg

These muffins came at a great time for me because I've been trying to work more whole grains into my diet. Specifically, I've been trying to add more wheat germ into my meals. Sprinkled on top of peanut butter toast: yum. Added to a peanut butter & banana smoothie: yum. Stirred into this muffin batter: winner. The wheat germ along with a healthy amount of rolled oats and whole wheat flower make me feel pretty good about eating one of these with my yogurt in the morning or as a midday snack with a little chamomile tea.

Whole-Grain-Peach-Muffins-Set-the-Table.jpg

Perhaps my favorite part about these peach muffins is that they allow the fruit to really show off. When you bite into the nutty bread of the muffin along with a juicy, sweet chunk of peach it's like a Ratatouille moment.

If that doesn't convince you to make these asap I'm not sure what will.

So get to it!

Healthy Peach & Oat Muffins

Serves 12

Total time: 28 minutes

Ingredients

  • 1/2 cup all-purpose flour
  • 1/2 cup whole wheat flour
  • 3/4 cup rolled oats (not instant)
  • 1/4 cup wheat germ
  • 1/3 cup light brown sugar
  • 1/2 teaspoon salt
  • 2 teaspoons baking powder
  • 1 cup low-fat Greek yogurt
  • 1 egg
  • 1/2 cup unsalted butter, melted and cooled
  • 1 cup diced peaches (washed but not peeled)
  • 1/4 cup sugar
  • 1 tablespoon cinnamon

Instructions

  1. Line a muffin tin with liners or spray with cooking spray and preheat the oven to 400 degrees Fahrenheit.
  2. In a large bowl, combine the flours, oats, wheat germ, sugar, salt and baking powder. Whisk to combine.
  3. In a small bowl, combine the yogurt, egg, and butter. Whisk until smooth.
  4. Pour the wet ingredients over the dry ingredients and mix until no flour is visible.
  5. Stir in the peaches and fold them into the batter with a spatula.
  6. Use an ice cream scoop or large spoon to scoop even amounts of the batter into the muffin tins.
  7. Sprinkle the tops with the cinnamon and sugar mixture.
  8. Bake 16-18 minutes or until a toothpick inserted into the center of the muffins comes out clean.
  9. Allow the muffins to cool on a wire rack for at least 10 minutes before eating.
In Breakfast & Brunch, Kid Friendly Tags Colorado peaches, easy baking, healthy breakfast recipe, summer baking, toddler friendly recipes
2 Comments
Lighter-Corn-Chowder-with-Hatch-Chiles-Set-the-Table.jpg

Healthy Slow-Cooker Corn Chowder with Hatch Chiles

Rachael White August 21, 2014

When we lived in Japan, there was something we called a "vegetable vending machine" just down the street from our apartment. It was made up of little cubbies that were always filled with vegetables that had been grown on the very same block. You had to take you yen- usually 50¥ or 100¥- and place it in the money slot on the door holding the produce you wanted. Once you paid, the door would unlock and you could take your reusable bag, plop the freshly picked vegetables in, and be on your merry way. I used to go see what was there, enjoying the short walk in our peaceful neighborhood, pondering what I would make for dinner that night. We don't have "veggie vending machines" here in Denver, but we are lucky enough to live just down the street from a couple markets that source local, Colorado-grown produce. The other day, I went to my favorite market with my mom to pick up some Hatch chiles and came across some beautiful ears of corn. The kernels were bright yellow, plump, and just begging to be added to a chowder recipe. So, slow-cooker corn chowder with hatch chiles was born! We may not have been able to experience the Japanese vending machine, but at least it conjures the memory.

Maybe I should start my own vegetable vending machine.

Maybe not.

Slow-Cooker-Corn-Hatch-Chile-Chowder-Set-the-Table.jpg

My slow-cooker has been a doing a lot of work lately so that I can have dinner on the table when my work day is done without adding extra dishes or too much time to my schedule. It was kind of amazing having the kitchen completely cleaned just as the soup finished cooking. This would be a perfect back-to-school recipe for those busy nights when you want something comforting but healthy for your family!

Light-Corn-Chowder-with-Hatch-Chiles-Set-the-Table.jpg

So...maybe it was the thoughts of Japan that took made me do this...but I used Japanese dashi in place of vegetable or chicken stock in this recipe. Dashi, the base for well-known miso soup, is made with smokey, dried fish flakes called katsuobushi. They have a smokey flavor that is reminiscent of bacon. And what is a common ingredient in chowder? BACON. So, I used dashi to not only add a lighter flavor but to cut out some of the fat bacon would add to the recipe. It was BRILLIANT. Of course, if you don't want to make dashi, or don't have the time, that's totally fine. I've given some suggestions in the notes below for alternatives. If you can take the 20 or so minutes it takes to make dashi, give it a try! Here's the recipe that I use:

Japanese Dashi Stock

Makes 4 cups

Ingredients

  • 4 1/2 cups water
  • 1 4 inch square piece of kombu
  • 1 loosely packed cup katsuobushi

Instructions

  1. Place the water in a 2 quart saucepan along with the kombu. Place the saucepan over a medium flame and heat until small bubbles just begin to rise to the surface.
  2. Remove the kombu and discard. Bring the water to a boil, scatter the katsuobushi over the water, and allow the flakes to simmer in the water for 2 or 3 minutes. Turn off the heat and allow some of the flakes to fall to the bottom of the pan (this should take about 2 minutes).
  3. Pour the liquid through a fine mesh strainer. Store in an airtight jar in the refrigerator for about 5 days or use immediately.

Notes

Dashi keeps for about a week in the refrigerator and can be used to flavor soups, sauces, and more. Think outside the box of Japanese recipes and see how you can use it in your everyday cooking!

And now, here is the recipe for my slow-cooker corn chowder with hatch chiles.

PS: If you can't find hatch chiles, you can use pablanos or another mildly spicy green chile. Just be sure to remove the seeds!

Healthy Slow-Cooker Corn Chowder with Hatch Chiles

Serves 6-8

Total time: 5 hours 10 minutes

Ingredients

  • 1 teaspoon olive oil
  • 1 yellow onion, diced
  • 2 large carrots, diced
  • 1 celery stalk, diced
  • 3 or 4 large hatch chiles, roasted, skin and seeds removed, diced
  • 1 lb red potatoes, scrubbed and cut into cubes
  • 4 cups dashi stock (vegetable or chicken stock are fine too...see note)
  • 2 cups fresh corn kernels from about 3-4 ears of corn
  • 1 1/2 cups low-fat buttermilk
  • 1/4 cup flour
  • 4 scallions, sliced
  • 1 teaspoon seasoned salt, plus more to taste

Instructions

  1. Heat the olive oil in a large, non-stick skillet over medium-high heat.
  2. Add the onion, carrots, celery, and hatch chiles to the pan and cook until the vegetables are just softened, about 4 or 5 minutes.
  3. Transfer the vegetable mixture to a 6 quart slow-cooker.
  4. Add the potatoes to the slow-cooker, along with the dashi. Cook on high heat for 4 hours or on high for 8 hours.
  5. Add the corn kernels to the pot and cook an additional 30 minutes.
  6. Whisk the buttermilk with the flour until very smooth and add to the soup. Allow to cook for 5-10 minutes until thickened slightly and heated through.
  7. Stir the scallions into the soup, season with seasoned salt, and serve immediately.

Notes

You can use vegetable stock or chicken stock instead of dashi, but you'll want to add at least one slice of smokey bacon when you cook the veggies to get that smokiness. For a little more flavor, you can also add shredded sharp cheddar cheese just before serving.

In Kid Friendly, Lunch & Dinner, No Added Sugar Tags Back-to-School recipes, healthy recipes, slow-cooker recipes, Soup, Summer Recipes, sweet corn
4 Comments
Healthy-Baked-Apples-Muesli-Crisp-Set-the-Table.jpg

Healthy Baked Apples with Muesli Crisp (+ an announcement!)

Rachael White August 13, 2014

I'm having a little love affair with breakfast. It's the first thing I think about when I wake up in the morning and I always want something hearty, sweet, and involving cinnamon in some way. These healthy baked apples with muesli crisp are the perfect solution. I'm going to eat them every day once apples are in season for real. It's gonna have to happen. With a dollop of creamy Greek yogurt sweetened with honey pleaseandthankyou.

It's good that I'm obsessed with something so wonderfully healthy because I seem to be putting on a little weight. Can you tell?

Pregnancy-Announcement-Set-the-Table.jpg

Yep! Baby #2 is growing in that there bump and it wants all the comfort food in the universe (seriously, all of it. send mashed potatoes and gravy). 

We are so happy and thankful to have had a relatively problem-free pregnancy so far and cannot wait to welcome a new little one into our family! Riley is beyond excited to be a big brother and I love it when he walks up to me to bury his face in my growing belly. Sometimes, in the sweetest little voice, he says "Hi baby" and I melt in a puddle on the floor.

Whew! I'm so relieved to get that out there.

Now I can bombard you with my woes about morning sickness and crampy legs and heartburn, right? No? Not so much? OK.

Let's get back to these baked apples...

Baked-Apples-with-Muesli-Crisp-Set-the-Table.jpg

Quite a while ago, the lovely folks at Seven Sundays in Minnesota sent me some of their delicious muesli and my love affair with this easy breakfast item began. I've eaten it soaked overnight, warmed, sprinkled over yogurt, and straight out of a bowl with milk. You really can't go wrong. I've decided that my favorite flavor is the Vanilla Cherry Pecan. Chewy dried cherries, buttery, crunchy pecans, and a hint of vanilla basically creates a perfect start to the day. And the perfect topping for baked apples.

Seven-Sundays-Muesli-Set-the-Table.jpg

I simply halved an apple and scooped out the core with a melon baller, then sprinkled each half with a little tiny bit of brown sugar (which it doesn't really need, to be honest) and topped that with the muesli. The dressed up apples baked for 30 minutes, concentrating their naturally sweet flavor and toasting the muesli to perfection. When they came out of the oven, I sprinkled a little cinnamon over the crisp and scooped a spoonful of creamy honey Greek yogurt in the middle of each apple. Heaven.

Red-Delicious-Apple-Set-the-Table.jpg
Healthy-Baked-Apples-Set-the-Table.jpg

So, I'm going to continue stuffing these in my face because there's not a whole lot to feel bad about here.

You must make these. You MUST.

Healthy Baked Apples with Muesli Crisp

Serves 2

Total time: 35 Minutes

Ingredients

  • 1 apple (red delicious was, well, delicious...but use whatever you can find)
  • 1 teaspoon unsalted butter
  • 1 teaspoon brown sugar (optional)
  • 1/3 cup muesli (I used Seven Sundays Vanilla Cherry Pecan)
  • 1/8 teaspoon ground cinnamon
  • 1/3 cup honey or vanilla Greek yogurt

Instructions

  1. Preheat the oven to 350 degrees Fahrenheit.
  2. Begin by halving the apples lengthwise and scooping out the core (plus a little extra) with a melon baller.
  3. Smear the butter evenly on each apple and sprinkle with the brown sugar.
  4. Top with the muesli and bake for 30 minutes or until the apples are just tender but not mushy and the topping is golden.
  5. Remove from the oven and transfer to serving plates.
  6. Dollop with the Greek yogurt and eat immediately.
In Breakfast & Brunch, Dessert, Kid Friendly, No Added Sugar, This & That, Vegetarian Tags apples, healthy breakfast recipe, healthy dessert, muesli
5 Comments
DIY-Hot-Dog-Bar-Set-the-Table.jpg

DIY Hot Dog Bar

Rachael White August 11, 2014

This DIY Hot Dog Bar is the perfect crowd please for your next party! I love how easy it is to put together and guests love being able to customize their hot dog with fun toppings.

Read More
In Entertaining, Kid Friendly, Lunch & Dinner Tags party food, summer entertaining, entertaining recipes
4 Comments
Caprese-Pasta-Bake-Set-the-Table.jpg

Healthy Caprese Pasta Bake

Rachael White July 31, 2014

Hey there, caprese band wagon. I am on you.

Caprese is in all the places right now but it's for a good reason: it's delicious! Fresh tomatoes, creamy mozzarella and bright basil are a combination we seem to never tire of. It's a classic. This Healthy Caprese Pasta Bake is just another excuse to enjoy this trio of flavors in a complete, one pot (yep, ONE pot) meal. It all gets stirred together, baked, and served from just one dish. It's a dish-washing-haters miracle! And it's pasta. I could eat pasta all the time and be perfectly fine with that. Are you a GF person? Good news! I made this with brown rice pasta (I recommend Jovial) so you are A-OK! Not eating added sugar? I've got you covered! Have hungry, picky toddlers to feed? Check and done.

I cannot say too many good things about this dish because it really is that good and oh so easy you could make it any night of the week for your entire family.

Gluten-Free-Caprese-Pasta-Bake-Set-the-Table.jpg

OK- now that I have that out of my system we can move on for a moment.

If you follow me on facebook, twitter, or instagram you probably know that we spent the past 2 weeks on vacation in Minnesota with my family. It was a wonderful visit. We spent several days as lake bums up near Nisswa, MN. It was a perfect way to enjoy some quality time with my parents without the daily grind getting in the way. We swam (well, I mostly floated on one of those inflatable rafts), ate good food, played Yahtzee and Scrabble, and laughed until we cried. Riley made some new friends at the beach and learned to fish with his daddy. It was perfection.

When we arrived back in Denver on Tuesday it all felt like a dream; almost like we had never left our little house. As the post-vacation feelings settle in and the memories we made begin to pop in and out of my mind, I grow more and more grateful for the time we spent together. There is no shortage of love and that's the truth.

Healthy-Caprese-Pasta-Bake-Set-the-Table.jpg

OK- back to this pasta bake. The recipe is based on Jacqueline's Pasta Bake, which Jacqueline of Go Sugar Free shared here on the blog a few months ago. That dish has been a staple for our family for a few reasons but mostly because it's something super healthy that we all love. Can't ask for much more than that, right?

Registration is still going on for the next Go Sugar Free course and Jacqueline is also offering several slots for scholarships. That means, if you get one of the spots, you can take GSF for free! To enter, click here.

And normal registration is open for another week! Lindsay from Pinch of Yum did a great write-up on her experience (along with her husband Bjork) of living sugar free with Jaqueline's help. It is inspiring and, as she says, the experience was much easier than she thought it would be. And she's right.

So, if you're on the fence, or just need more information, here are some things you can do:

If you’re ready to learn more about Go Sugar Free, you can click here. If you decide to register, you’ll be making a massive change in your life that can’t do anything but help you become a better, healthier version of yourself.

If you’re interested in finding out more about Jacqueline’s philosophy but aren’t ready to commit to the GSF course, I urge you to get her eBook, 5 Easy Ways to Look Radiant Tomorrow Morning, and Don’t Waste Produce (DWP) Checklist (this is a HUGE help when it comes to no-waste meal planning and encouraging the consumption of more fresh, whole foods).

*This post contains affiliate links. All opinions are my own.

Healthy Caprese Pasta Bake

Serves 6

Total time: 40 minutes

Ingredients

  • 1 12 oz. box Jovial Brown Rice Pasta or whole grain pasta
  • 1 25 oz. jar of tomato basil pasta sauce
  • 1⁄2 cup filtered water
  • 1 large ball of fresh mozzarella, sliced
  • 2 teaspoons cold-pressed, unfiltered, extra virgin olive oil
  • 1 cup loosely packed fresh basil leaves, roughly chopped

Instructions

  1. Preheat the oven to 375 degrees Fahrenheit.
  2. In a large, deep baking dish, combine the pasta, tomato sauce and water. The pasta should be nearly covered by the sauce. Stir to combine.
  3. Bake for 10 minutes, remove the pasta from the oven and stir again. Return to the oven and cook for another 15 minutes. The pasta should be al dente at this point.
  4. Remove the pasta from the oven and turn the broiler on low.
  5. Top the pasta with the sliced mozzarella and place under the broiler, cooking until the cheese is brown and bubbly.
  6. Serve sprinkled with the basil leaves and drizzled with the olive oil.
In Kid Friendly, Lunch & Dinner, No Added Sugar, Vegetarian
5 Comments
← Newer

Search Posts


Featured Posts

Summary Block
This is example content. Double-click here and select a page to feature its content. Learn more
Featured
Aug 5, 2025
Cursus Amet
Aug 5, 2025
Aug 5, 2025
Jul 29, 2025
Pellentesque Risus Ridiculus
Jul 29, 2025
Jul 29, 2025
Jul 22, 2025
Porta
Jul 22, 2025
Jul 22, 2025
Jul 15, 2025
Etiam Ultricies
Jul 15, 2025
Jul 15, 2025
Jul 8, 2025
Vulputate Commodo Ligula
Jul 8, 2025
Jul 8, 2025
Jul 1, 2025
Elit Condimentum
Jul 1, 2025
Jul 1, 2025
Jun 24, 2025
Aenean eu leo Quam
Jun 24, 2025
Jun 24, 2025
Jun 17, 2025
Cursus Amet
Jun 17, 2025
Jun 17, 2025
Jun 10, 2025
Pellentesque Risus Ridiculus
Jun 10, 2025
Jun 10, 2025
Jun 3, 2025
Porta
Jun 3, 2025
Jun 3, 2025

Powered by Squarespace