

Blueberry Irish Scones are perfect with a hot cup of coffee!
Read More
Baked Chocolate Banana Doughnuts
When Brad and I lived in Tokyo, we used to walk down a steep hill that led from our apartment to a narrow street. The first time we walked down this street it felt like we had gone back in time. Well, it felt that way until we saw a small dog with a hot pink mohawk. Many people who aren't familiar with the area likely miss this street with it's many restaurants and shops. Our favorite ramen shop was there, along with a little underground bistro called Vanilla Bean and an amazing doughnut shop called Hara Donuts. Stopping at the doughnut shop became a bit of a habit. We discovered very early on that it was well worth it to wait for the freshest doughnuts because they had the most amazingly crispy crust surrounding a soft, airy, subtly sweet inside.
I often find myself craving those walks, those doughnuts, and a cup of coffee on a lazy Saturday morning.

While I did not recreate the classic Hara Donut (which is soy based and healthy, as far as doughnuts are concerned), I did make these baked chocolate banana beauties. Riley helped. He's getting really good at "dumping" and mixing dry ingredients. It's also really fun hearing him say the word "ingredients" and to witness his growing interest in cooking. Actually, I have to give him credit for this recipe because it was his idea in the first place. One morning he just said, "Mommy, I want to make chocolate doughnuts with banana!"
Who was I to say no to a request like that?


The doughnuts themselves are refined sugar free, but the glaze (which is optional...kind of) is not. I just couldn't resist adding the glaze and some fun sprinkles! #sorrynotsorry

I haven't found a place to walk that I love quite as much as the one from our Tokyo apartment to the train station, but I'm still on the lookout. Until then, I'll be enjoying these with my coffee every once in a while.
Baked Chocolate Banana Doughnuts
- 1 cup whole wheat flour
- 1/4 cup unsweetened cocoa powder
- 1/2 teaspoon baking powder
- pinch of salt
- 1/4 cup pure maple syrup
- 1/2 cup milk
- 4 tablespoons unsalted butter, melted and cooled
- 1/3 cup mashed banana
- 1 teaspoon vanilla extract
For the Glaze:
- 1 cup powdered sugar
- 1/4 cup unsweetened cocoa powder
- 1/4 teaspoon salt
- 1/4 cup milk
- Sprinkles
- Preheat the oven to 350 degrees F.
- Combine the dry ingredients in a medium bowl.
- In a small bowl, combine the wet ingredients, including the smashed banana.
- Pour the wet ingredients into the dry ingredients and mix until combined.
- Spoon the batter into a doughnut pan that has been lightly buttered or sprayed with cooking spray.
- Bake the doughnuts for 12-15 minutes.
- Meanwhile, combine the ingredients for the glaze and stir until there are no lumps. (For an extra smooth glaze, sift the dry ingredients together first.)
- Remove the doughnuts from the oven and cool completely before dipping in the glaze and decorating with sprinkles.
- After dipping the doughnuts in the glaze, set them on a rack set over a baking sheet to sprinkle. Let the glaze dry.
- EAT.

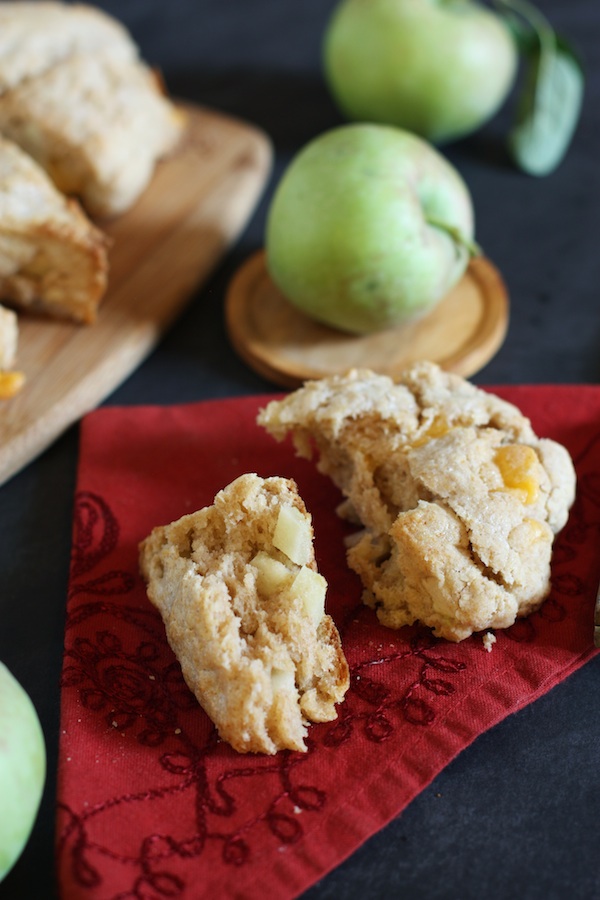
Apple Cheddar Scones + Tillamook Trip
Apple Cheddar Scones? Yes. They are amazing. The sweet, tart green apple and gooey, warm pockets of sharp cheddar are a match made in heaven. My husband always asks me where I get the inspiration for my recipes. For this particular recipe, the inspiration came from a brief visit to Oregon when I was lucky enough to attend an event hosted by Tillamook with a group of fellow food bloggers. We spent a lot of time eating cheese and ice cream together and this pregnant lady was very happy about all of that. I think I filled my calcium quota for the next 3 months. Aside from eating all of the things, we also learned a lot about how their company works. We met some of their key employees who work to make sure the products they put out on the shelves are of the highest quality. We were able to soak in the beauty that is the Oregon coast. And perhaps most importantly, we were able to make a personal connection with a company that has truly proven itself over and over again throughout the years. I didn't really have one specific company I looked to for cheese, ice cream, or yogurt, but now I do.

Seriously. So. Much. Cheeeeeeeese.
I'm convinced a huge reason for the balanced flavor and consistent quality of Tillamook's cheese is thanks to this guy:

This is Dale. He has been working at Tillamook for 45 years. Yep. You read that correctly. FORTY-FIVE YEARS. He knows what he is doing and takes his cheese very seriously. That's my kind of guy.
We were also able to visit Jill who is the Product Quality Manager. All I have to say is this: if I'm ever in a taste-testing competition I don't want to be up against her. Her taste buds are seriously talented. Yes, that's absolutely possible.
After our tour at the factory, we headed to the coast where we got to check out our room at the Inn at Cape Kawanda. If Brad and I get a chance to take a parents only vacation any time soon I want it to happen here. The rooms have gorgeous views of the ocean that are enchanting (perhaps more so) despite the heavy fog that settled over the area while we were there.

That night, we enjoyed a pretty amazing dinner on the ocean. And by dinner I mean I filled myself up on the incredible appetizers and didn't have room for an actual dinner. I mean, look at these oysters. Those plus a cheese plate, some amazing fritters, and clam chowder were enough to send me over the edge.


Of course, I had plenty of room for dessert: Tillabars. Oh man. Enjoying one of those while sitting around a campfire with a group of talented women who I grew to greatly admire with a pretty incredible ocean backdrop was just about perfect.
The following day, I woke up early to sit on the balcony, drink some coffee, and enjoy my last look at the view from my room. It was lovely.

Then, we visited one of the Tillamook dairy farms and spent some time with a lot of these ladies:

They were super curious, especially when my baby bump got close enough to the fence. It is possible that I flew home that night with a big, muddy cow nose print on my shirt directly over my belly button.
Here's the deal: running a dairy farm, or any farm for that matter, is a lot of work. The family who ran this particular farm were incredible. They love the cows and are full of knowledge about how to take care of their cows starting at birth. I am still in total awe of their dedication and ability to dedicate their lives to these animals.
Needless to say, I fell in love with Oregon thanks to this Tillamook Blogger Summit.
And I fell even more in love with their cheese.
And yogurt.
And ice cream.
When I came home, I went straight to Costco and bought a huge block of Tillamook Sharp Cheddar and got to work using it in any way I could imagine. These scones are my favorite thing so far. They are full of fall flavor thanks to the apples and a little sprinkle of nutmeg with pockets of gooey, melty cheese in each bite.

Tillamook sharp cheddar is really the best choice for cheese in this recipe. The sharpness is key. No mild or medium cheddar here, folks!
Apple Cheddar Scones
Serves 8
Total time: 20 minutes
Ingredients
- 2 cups all-purpose flour
- 1 tablespoon baking powder
- 3 tablespoons sugar
- 1/2 teaspoon salt
- 5 tablespoons chilled, unsalted butter cut into 1/4 inch cubes
- 1 granny smith apple, peeled and cut into 1/4 inch cubes
- 8 oz sharp cheddar cheese, cut into 1/4 inch cubes
- 1 cup heavy cream
Instructions
- Preheat the oven to 425 degrees Fahrenheit.
- In a large bowl, whisk together the flour, baking powder, sugar, and salt.
- Scatter the butter over the flour mixture and use your hands to work it into the dry ingredients until it resembles wet sand with some pieces remaining pea-sized.
- Stir in the apple and cheese cubes and mix to coat them.
- Stir in the heavy cream with a fork until the mixture is just combined.
- Turn the dough onto a work surface and knead together until there are no dry spots and the dough just comes together.
- Pat into a circle about 8 inches in diameter.
- Cut into 8 triangles and place on a parchment lined baking sheet.
- Bake for about 13 minutes or until golden brown on top.
Notes
This recipe is based on the cream scones recipe from Cook's Illustrated: Baking. If you don't own that book, GET IT NOW.

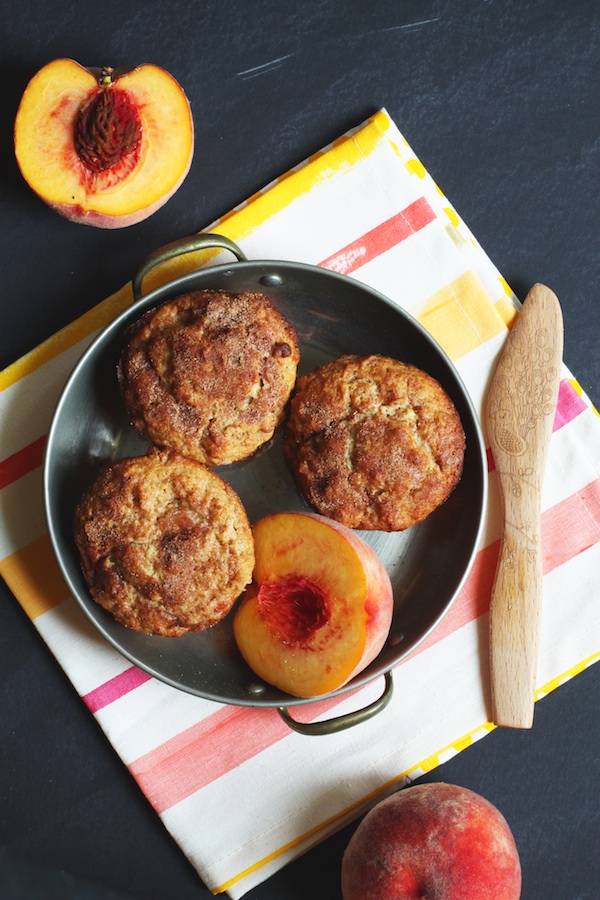
Healthy Peach & Oat Muffins
Peach season has arrived and I am SO EXCITED. I bought an 18 pound box of peaches from our church (all the proceeds go to our youth group which is so awesome) and they are absolutely perfect. I've been eating 2 of them pretty much every day- one with breakfast and one after dinner. As for the rest of the bunch, I'm finding new ways to showcase their perfect peach flavor without overcooking/over-sugaring them. Just the other day I was telling my mom how I find it a little sad to make something like jam out of such lovely tasting fruit. (Am I strange for feeling that way? Yes? Well OK then.) These healthy peach and oat muffins are just about the best thing ever. Healthy and with just a hint of what's around the corner (spoiler alert: it's FALL) thanks to a cinnamon-sugar coating on top.
These muffins came at a great time for me because I've been trying to work more whole grains into my diet. Specifically, I've been trying to add more wheat germ into my meals. Sprinkled on top of peanut butter toast: yum. Added to a peanut butter & banana smoothie: yum. Stirred into this muffin batter: winner. The wheat germ along with a healthy amount of rolled oats and whole wheat flower make me feel pretty good about eating one of these with my yogurt in the morning or as a midday snack with a little chamomile tea.

Perhaps my favorite part about these peach muffins is that they allow the fruit to really show off. When you bite into the nutty bread of the muffin along with a juicy, sweet chunk of peach it's like a Ratatouille moment.
If that doesn't convince you to make these asap I'm not sure what will.
So get to it!
Healthy Peach & Oat Muffins
Serves 12
Total time: 28 minutes
Ingredients
- 1/2 cup all-purpose flour
- 1/2 cup whole wheat flour
- 3/4 cup rolled oats (not instant)
- 1/4 cup wheat germ
- 1/3 cup light brown sugar
- 1/2 teaspoon salt
- 2 teaspoons baking powder
- 1 cup low-fat Greek yogurt
- 1 egg
- 1/2 cup unsalted butter, melted and cooled
- 1 cup diced peaches (washed but not peeled)
- 1/4 cup sugar
- 1 tablespoon cinnamon
Instructions
- Line a muffin tin with liners or spray with cooking spray and preheat the oven to 400 degrees Fahrenheit.
- In a large bowl, combine the flours, oats, wheat germ, sugar, salt and baking powder. Whisk to combine.
- In a small bowl, combine the yogurt, egg, and butter. Whisk until smooth.
- Pour the wet ingredients over the dry ingredients and mix until no flour is visible.
- Stir in the peaches and fold them into the batter with a spatula.
- Use an ice cream scoop or large spoon to scoop even amounts of the batter into the muffin tins.
- Sprinkle the tops with the cinnamon and sugar mixture.
- Bake 16-18 minutes or until a toothpick inserted into the center of the muffins comes out clean.
- Allow the muffins to cool on a wire rack for at least 10 minutes before eating.

Easy Cream Biscuits
I've developed a bit of an obsession with cream biscuits. Truthfully, I didn't love eating them when I was kid the way the rest of my family did. Whenever we went to Tennessee to visit my grandparents, we would wake up to the smell of freshly baked biscuits at 4:30am. My grandpa's internal clock was a little off. By the time we were all awake and ready to eat, it was at least 8am (maybe later during those sleepy teenage years) and the biscuits were freezing cold. I can't recall a time when I actually got to eat one of my grandfather's biscuits just out of the oven.

While my experience with biscuits as a kid may not have been the greatest, mostly because I was too lazy and didn't know what I was missing, I still have this need to eat a good biscuit every now and then. I've really loved making cream biscuits the most because I usually have all the ingredients on hand and I don't have to mess with butter. For a self-proclaimed non-baker like myself that is a relief. After a lot of practice, I've gotten pretty good at making cream biscuits that rise like a charm and have a flaky, rich crumb.
And I get to eat them hot out of the oven.

My favorite way to enjoy a freshly baked biscuit is with a slather of my mom's homemade strawberry jam. Or, if I don't happen to have anything that good, I go with a good store bought strawberry or raspberry preserve. Simple, delicious comfort food at its best. I may not use bacon grease in my biscuits the way my grandpa did, but I think about him every time I cut the biscuits out. I'm relatively sure he's peaking over my shoulder trying to convince me to do it his way, which also means using an entire stick of room temperature butter mixed with jam as the main course.
True story. That was his favorite snack.
Food should remind us of people and places that make us happy. Biscuits take me to Cookeville, Tennessee with my sweet grandparents, my giggly little sister, and lazy days spent climbing trees and tying June bugs to a string and taking them for a walk.
Easy Cream Biscuits
Makes 6-8 biscuits
Total time: 20 minutes
Ingredients
- 2 cups all-purpose flour
- 2 1/2 teaspoons baking powder
- 1 teaspoon salt
- 1 teaspoon sugar
- 1 1/2 cups heavy cream
Instructions
- Preheat the oven to 425 degrees Fahrenheit and line a baking sheet with parchment paper.
- In a large bowl, whisk flour, baking powder, salt, and sugar together.
- Add the cream and stir just until the dough comes together. (It will be ragged at first but will smooth out as the dough is kneaded.)
- Turn dough onto a lightly floured surface and gently knead until the dough is mostly smooth. Pat into a 3/4-inch-thick round.
- Using a circular biscuit cutter cut out 3 or 4 rounds and place them on your prepared baking sheet. Bring the scraps together and pat out to 3/4 inches again. Repeat until all the dough is used. You should end up with 6-8 biscuits, depending on the size of your cutter.
- Bake the biscuits for 15 minutes or until golden brown on top.
Notes
I've noticed that here in Denver (high altitude) I have to adjust the amount of cream I use. Sometimes it inches nearer to 2 cups and sometimes 1 1/2 is plenty. Pay attention to what the dough is telling you. It should be ragged, which means it will be a bit wet and sticky but not so much that it sticks to your hands. And it shouldn't be so dry that you can't knead it into a smooth dough.