Quantcast
  • Contact
  • Portfolio
  • Subscribe
  • Recipes
Menu

Set the Table Photography

photography
  • Contact
  • Portfolio
  • Subscribe
  • Recipes
×

Baked Chocolate Banana Doughnuts

Rachael White May 29, 2015

When Brad and I lived in Tokyo, we used to walk down a steep hill that led from our apartment to a narrow street. The first time we walked down this street it felt like we had gone back in time. Well, it felt that way until we saw a small dog with a hot pink mohawk. Many people who aren't familiar with the area likely miss this street with it's many restaurants and shops. Our favorite ramen shop was there, along with a little underground bistro called Vanilla Bean and an amazing doughnut shop called Hara Donuts. Stopping at the doughnut shop became a bit of a habit. We discovered very early on that it was well worth it to wait for the freshest doughnuts because they had the most amazingly crispy crust surrounding a soft, airy, subtly sweet inside.

I often find myself craving those walks, those doughnuts, and a cup of coffee on a lazy Saturday morning.

While I did not recreate the classic Hara Donut (which is soy based and healthy, as far as doughnuts are concerned), I did make these baked chocolate banana beauties. Riley helped. He's getting really good at "dumping" and mixing dry ingredients. It's also really fun hearing him say the word "ingredients" and to witness his growing interest in cooking. Actually, I have to give him credit for this recipe because it was his idea in the first place. One morning he just said, "Mommy, I want to make chocolate doughnuts with banana!"

Who was I to say no to a request like that? 

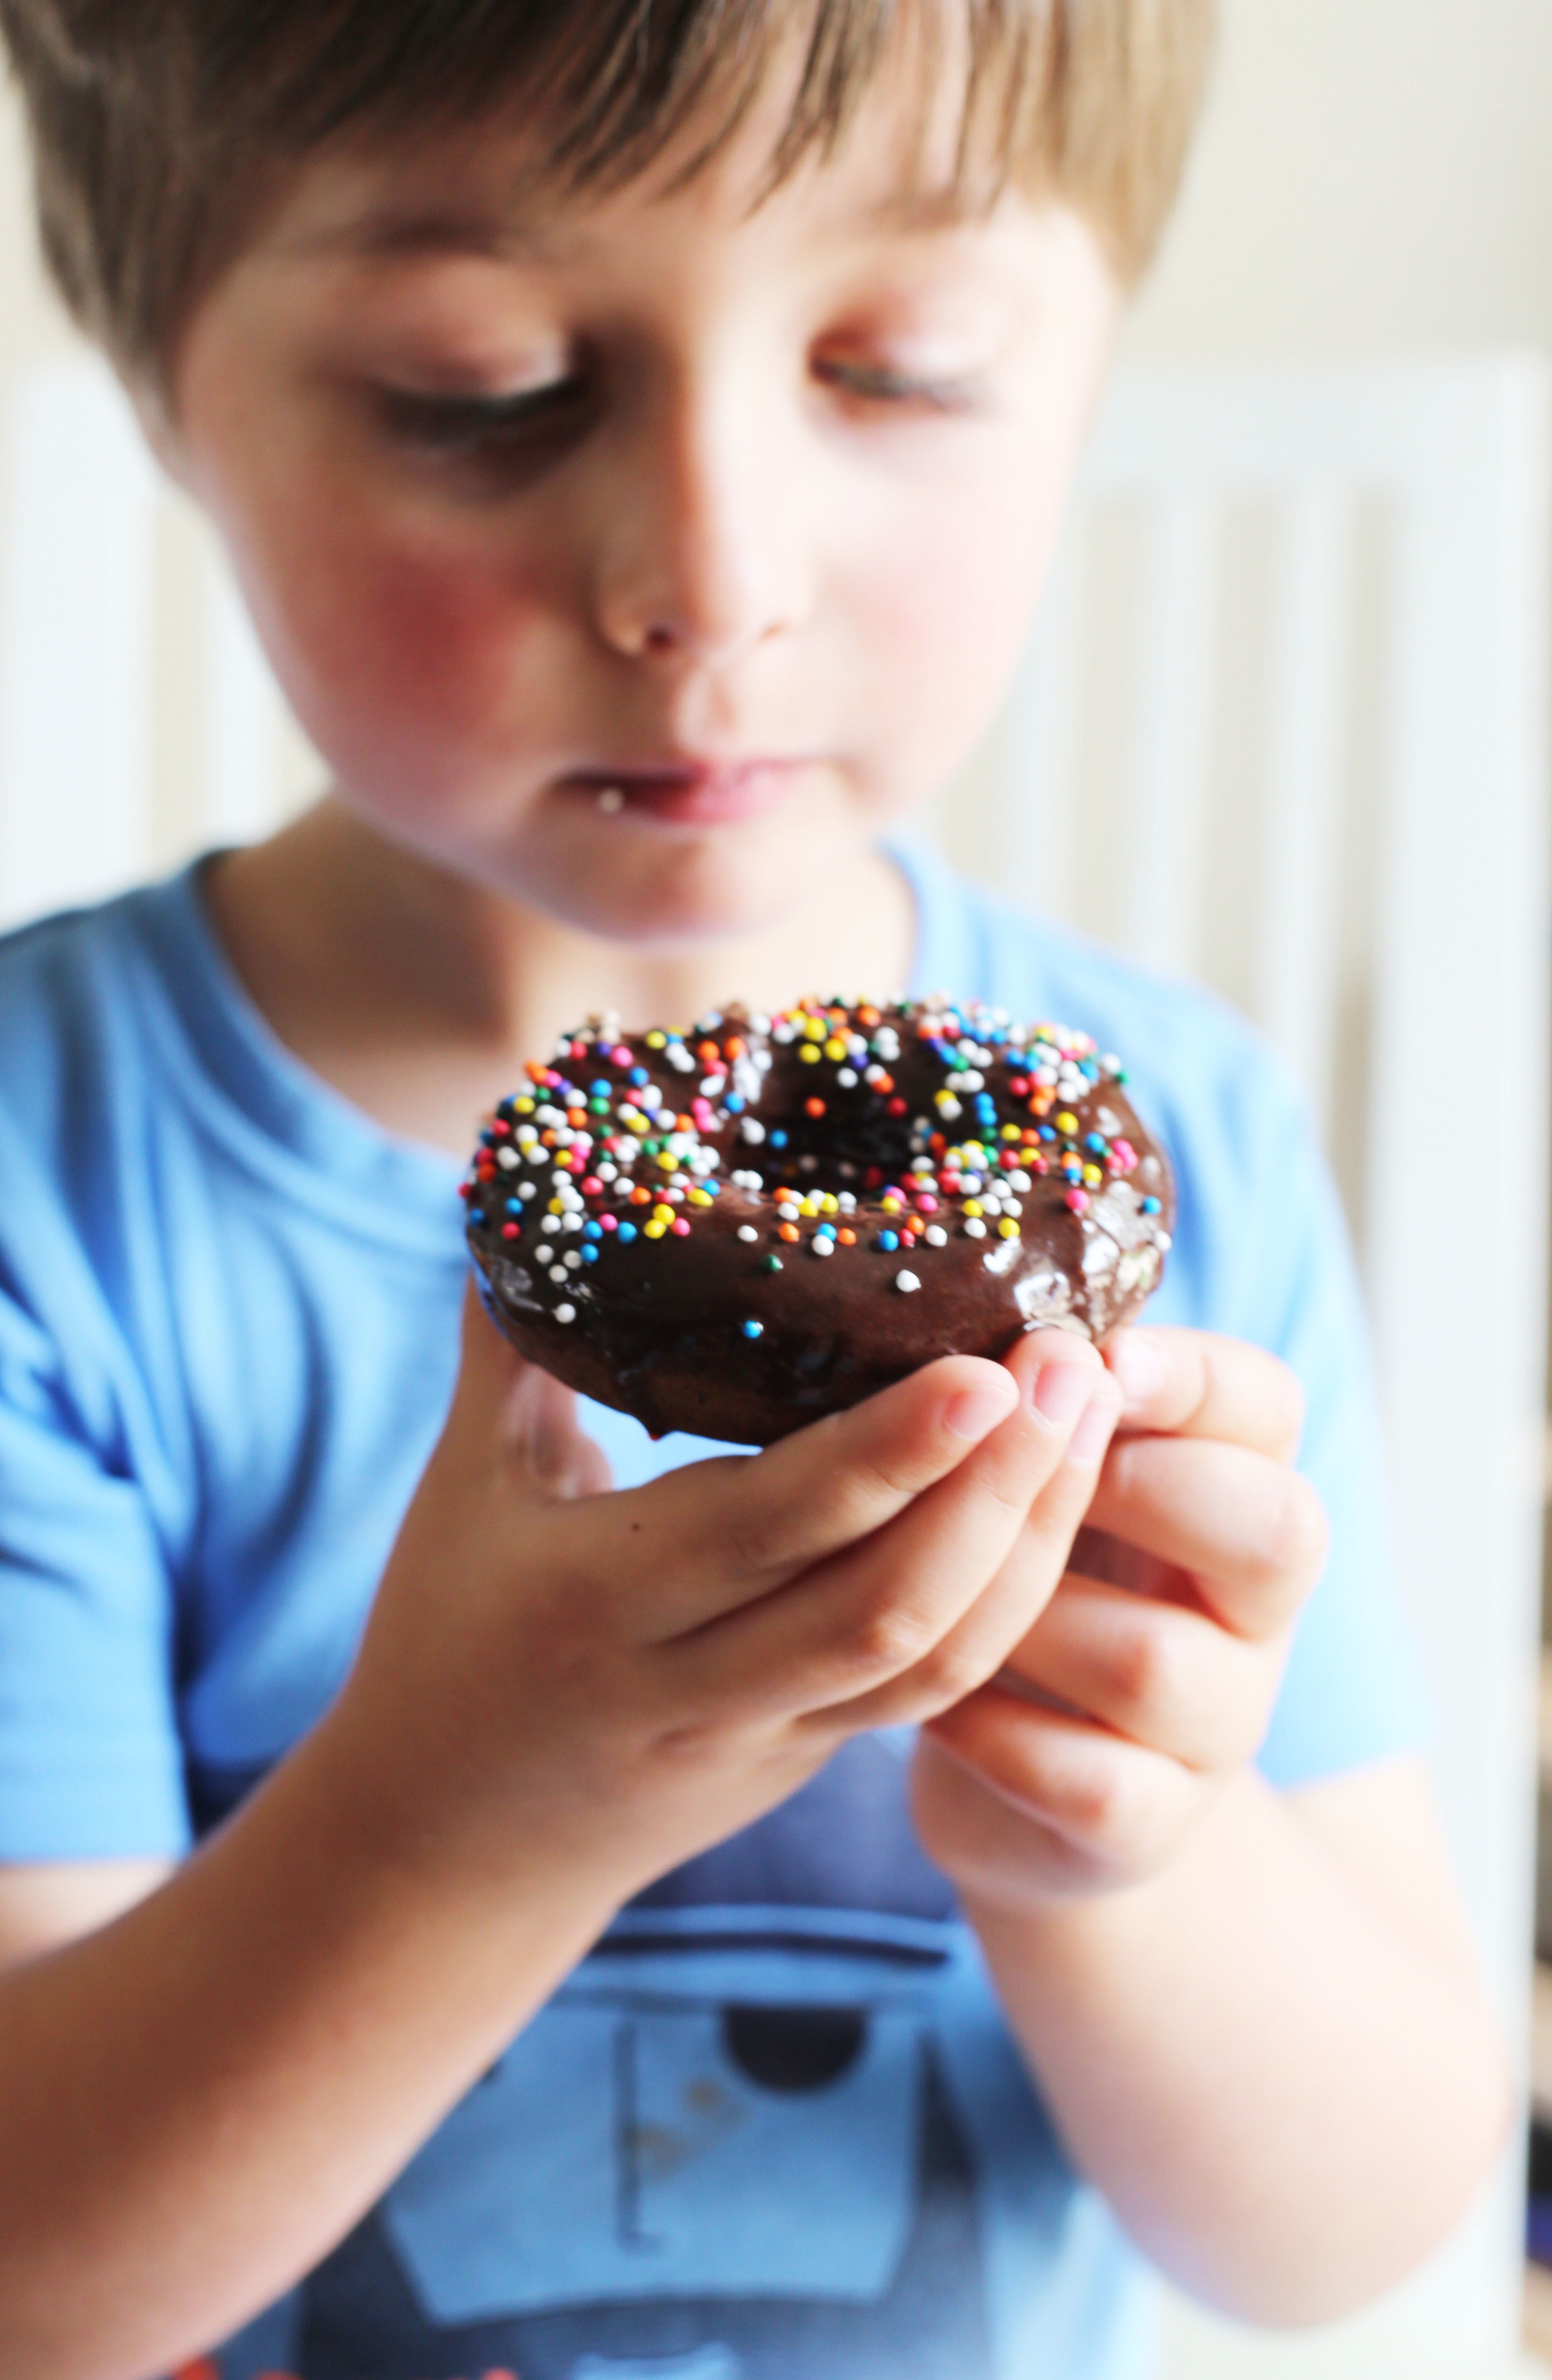
The doughnuts themselves are refined sugar free, but the glaze (which is optional...kind of) is not. I just couldn't resist adding the glaze and some fun sprinkles! #sorrynotsorry

I haven't found a place to walk that I love quite as much as the one from our Tokyo apartment to the train station, but I'm still on the lookout. Until then, I'll be enjoying these with my coffee every once in a while.

Baked Chocolate Banana Doughnuts

  • 1 cup whole wheat flour
  • 1/4 cup unsweetened cocoa powder
  • 1/2 teaspoon baking powder
  • pinch of salt
  • 1/4 cup pure maple syrup
  • 1/2 cup milk
  • 4 tablespoons unsalted butter, melted and cooled
  • 1/3 cup mashed banana
  • 1 teaspoon vanilla extract

For the Glaze:

  • 1 cup powdered sugar
  • 1/4 cup unsweetened cocoa powder
  • 1/4 teaspoon salt
  • 1/4 cup milk
  • Sprinkles
  1. Preheat the oven to 350 degrees F.
  2. Combine the dry ingredients in a medium bowl.
  3. In a small bowl, combine the wet ingredients, including the smashed banana.
  4. Pour the wet ingredients into the dry ingredients and mix until combined.
  5. Spoon the batter into a doughnut pan that has been lightly buttered or sprayed with cooking spray.
  6. Bake the doughnuts for 12-15 minutes.
  7. Meanwhile, combine the ingredients for the glaze and stir until there are no lumps. (For an extra smooth glaze, sift the dry ingredients together first.) 
  8. Remove the doughnuts from the oven and cool completely before dipping in the glaze and decorating with sprinkles.
  9. After dipping the doughnuts in the glaze, set them on a rack set over a baking sheet to sprinkle. Let the glaze dry. 
  10. EAT.
In Kid Friendly, Breakfast & Brunch Tags easy baking, breakfast, healthy dessert, kid friendly, healthy doughnut recipe
11 Comments
coldbrewcoffee.jpg

DIY Cold Brew Coffee

Rachael White May 14, 2015

I've been making small changes to our home lately. Well, some changes are small and some are huge. We live in a 1,000 square foot house that can easily feel cramped between 2 adults, 2 kids and 1 large black lab. In an effort to be more comfortable in the space we have, and to make life simpler all around, I've been using the KonMari method of "tidying up". So far I am thrilled with the results and how using her little book has already made our home feel more open, clean, and full of only the things we love. In the spirit of making life easier and full of the things we love, I thought this Cold Brew Coffee recipe was a must-share.

That makes total sense, right? KonMari = coffee? Sure!

coldbrewcoffeerecipe.jpg

Speaking of tidying up and making a space feel new and open and full of things you love, what do you think of the new blog design? I'm loving it. It feels clean and comfortable and ready for lots of delicious recipes and stories and all of the things. In fact, I've added some new features like Mom Stuff and an updated Wine Bar page. Oh, and I updated the About page as well! It's just all so bright and shiny and new. You should make this coffee, get comfortable, and browse around and make yourself at home.

OK- back to the coffee.

Truth be told, I'm really more of a hot coffee drinker regardless of the weather. I don't know why that is. Maybe it's because I like to savor my coffee and when it is cold I always drink it wayyyyy too fast. Or maybe it has something to do with the fact that when I find something I like, I like to stick with it. Who knows. But there are a number of afternoons when I just need a little pick-me-up and this cold brew comes to the rescue. It's amazing over ice with chocolate almond milk (hellooooo iced mocha!) and I always love the classic iced latte kind of thing. Or you can go straight up coffee concentrate + water over ice.

Did I mention that this is a concentrate? Yep. Super strong so you can store it in the fridge in a reasonable sized container. I like to use the large mason jars, of which I have a million, that are lying around my kitchen needing a purpose.

coldpresscoffeeconcentrate.jpg

Brad LOVES iced coffee, so this is a nice, easy way for him to grab his caffeine and go when he leaves before the sun rises for work. Speaking of which, that guy works a lot. It can be so hard sometimes, but when he comes home at the end of the day and tells me about the things he has done, I almost burst with pride. He is good. I don't tell him that enough. And on that note, give your teachers and school administrators some extra positive vibes this time of year because it is tough for them and for their families. In fact, you should bring them a jar of this cold brew coffee!

PERFECT TEACHER GIFT!

icedcoffeerecipe.jpg

Important notes:

  • When you make this, be VERY CAREFUL when straining the coffee. It's safest to give it all a stir first so your coffee grounds don't all fall out at once leaving you with a massive mess of black grime all over your white kitchen cabinets and in the crevices of your wood floor. I heard this from a friend. ;)
  • The strength of your coffee will depend on the grind of your coffee beans. I tend to like stronger coffee, so I use espresso grind (finer). Also, the amount of time you let the coffee brew will make a difference in the strength as well.
  • Lastly, the quality of your coffee is important! The better and fresher your coffee, the better the final product will taste. In my opinion, it is worth the splurge on something really great because you will STILL be saving money since you aren't going to the coffee shop to give them $$$ for just one cup. This recipe yields at least 5 cups and doesn't even use an entire bag of coffee! Look at you, you money saver, you!


And now, finally, the recipe! Best enjoyed in a sunny spot with a straw and a good book.

DIY Cold Brew Coffee

  • 1 1/2-2 cups ground coffee
  • 8 cups water
  • fine mesh sieve or a couple layers of cheese cloth 
  • coffee filter
  1. Place the coffee grounds in the bottom of a large pitcher or bowl.
  2. Add the water and stir.
  3. Cover with plastic wrap and place in the refrigerator for 12-24 hours.
  4. Give the coffee and the grounds another stir (see note above for reasoning). Place the fine mesh sieve over another pitcher or bowl.
  5. Pour the coffee into the sieve. This will not remove all the grounds. Don't be alarmed.
  6. Now, clean out the sieve and line it with a coffee filter. Place it over another large bowl or pitcher and strain a second time.
  7. Transfer to a large mason jar (or two) or a pitcher and refrigerate.
  8. When ready to use, use 1 part coffee (I use about 1/2 cup of the coffee concentrate) to 1 part water or milk. Serve over ice.
In Cocktails and Appetizers, Breakfast & Brunch, No Added Sugar Tags recipe, coffee, beverages, summer recipes
2 Comments
French-75-with-Broiled-Citrus-Set-the-Table.jpg

French 75 + Broiled Citrus (Set the Table turns 2!)

Rachael White March 6, 2015

Set the Table turns 2 today! Actually, this is my 6th year of blogging but my 2nd blogging in this space. It all started so innocently as a way to communicated with my family and friends. I had no idea what I was getting myself into. I think it's safe to say that food blogging has become something I can't live without. It has connected me with so many wonderful people and has helped me to connect with passions I didn't know I had. Much of the joy I feel for this crazy fun (and sometimes ridiculously difficult) thing I've been sucked into is thanks to all of you. Readers and fellow bloggers bring a smile to my face each and every day and I feel so blessed by that not-so-little gift. Because when it comes right down to it, I think all we can ask for is to have people in our lives who give us a reason to smile and help empower us to do what we love. So I'd like to raise a glass (preferably filled with this bubbly, fun French 75) to 2 years of Set the Table.

Broiled-Citrus-Cocktail-Set-the-Table.jpg

I have to be honest and say that I almost missed my blogiversary entirely. The past few weeks have been a little ridiculous. Riley got the flu and was sicker than I've ever seen him. Braden came down with RSV and consequently was sent to the NICU with bronchiolitis. I had a sinus infection that still hasn't quite left me alone. And now Riley has a double ear infection. As if life with a new baby weren't challenging enough, the big guy upstairs decided to give us a bit more to struggle through. We are all doing fine but I won't lie- there were times when I couldn't imagine how we would ever climb out of that hole. Fortunately, we had a lot of help with food, laundry, and keeping our spirits as high as possible thanks to our amazing family and church family. Without their help, I'm quite certain I would be crying under the covers right now. Community is important, people. Don't ever forget that.

Broiled-Citrus-Set-the-Table.jpg

I've mostly been taking baby steps to get back into my usual routines. I find that the more I introduce my 'old' habits into our new life as a family of 4, the better I feel. Putting together this blog post is a perfect example. I may not have everything figured out, but little things like this help ground me and remind me that I am more than the spit up on my ratty old t-shirt and the pile of dirty dishes in the sink. I love being a mom and wouldn't change it for the world, but to be the best mom I can be I need to stay connected to who I am apart from that.

Thanks for being patient with me while I figured out how to make that happen after so many unexpected bumps in the road.

Winter-Citrus-Cocktail-Set-the-Table.jpg

This French 75, garnished with broiled citrus slices, is so beautiful and fresh that it will bring you out of your dark winter haze in no time at all. The playful bubbles paired with the deep flavor of broiled citrus (if you haven't tried broiling citrus you need to get on that now) make the perfect cocktail for this awkward transition between winter and spring. Spring is coming, you know. I promise. This cocktail might help it come a little faster...

Broiled-Citrus-Champagne-Cocktail-Set-the-Table.jpg

Here's to another year, more new recipes, and even more new friendships from Set the Table! 

French 75 + Broiled Citrus

Makes 1 cocktail

2 oz gin

4 oz chilled champagne

1/2 oz broiled lemon juice (instructions below)

broiled citrus slice

In a champagne flute, add the gin and lemon juice. Top with the champagne and garnish with a citrus slice. Enjoy!

Broiled Citrus

1 lemon, sliced

1 orange, sliced

1 orange cut in half

1 1/2 teaspoons granulated sugar

Arrange the slices on a parchment lined, rimmed baking sheet. Sprinkle the citrus slices and orange halves with the sugar and place under the broiler and cook until caramelized, about 5-7 minutes. Keep a close eye on them so they don't burn!

In Cocktails and Appetizers Tags champagne cocktail, gin cocktail recipe, winter citrus recipe
6 Comments
Nancy-Drew-Blondies-Set-the-Table.jpg

Hand Made Baking: Nancy Drew Blondies

Rachael White February 9, 2015

We are three weeks into this whole we-have-two-kids life. It has both flown by and moved in slow motion. (Trust me, that is totally possible.) While we certainly experience difficult moments each and every day, this has proven to be easier on us than the first time around. Perhaps it has something to do with the fact that we were prepared for all the sleep deprivation, the constant nursing, and the general upheaval of life as we knew it. Whatever the reason, I'm relieved that this little bundle has slid relatively easily into our lives. Riley is being an amazing big brother. He brings little gifts to Braden throughout the day, including his favorite blankie, and doesn't get upset (yet) when his baby brother is crying and inconsolable.

3-wks-old_03.jpg

Another bonus has been that my healing post-Cesarian section has been rather speedy. Could it be that these Nancy Drew Blondies, which I baked and handed out to the nurses at the hospital, had a hand in all of this? I'm going to say yes. At the very least, this little treat brought a smile to the team of nurses that took care of us during our hospital stay. I wanted to make them feel comforted and appreciated because I knew they would make me feel the same way. This recipe from my friend Kamran's book, Hand Made Baking, did not let me down!

IMG_1626.jpg
Kamran-Siddiqis-Nancy-Drew-Blondies-Set-the-Table.jpg

Kamran was one of the first food bloggers I really connected with when I started this crazy gig several years ago. I've always admired his grace, both in his craft and his character. He is a wildly talented person with so many good things, recipes and otherwise, to share with the world. When I received his book in the mail and read the dedication he wrote to me (yes, I'm going to humble-brag about that) I immediately teared up. Seeing someone you care about and respect have success like his is such a wonderful thing. One look inside the pages of his book and you can see the immense care and passion he has poured into every photo and recipe.

Kamran, you've just begun what I'm sure will be an incredible career. I'm humbled and honored to be even a small part of your journey. Thank you.

Blondies-from-Handmade-Baking-Set-the-Table.jpg

If you are looking for a Valentine's Day gift for your partner, a friend, or yourself, I think Hand Made Baking is perfection. I've made several recipes, all of which have been flawless, and have no doubt that if you baked any of the wonderful items from this book for your Valentine, you'd win.

Blondie-Recipe-Set-the-Table.jpg

If you'd like to purchase the book, click here. You won't regret it!

Nancy Drew Blondies from Hand Made Baking by Kamran Siddiqi

Makes 16-36 blondies

  • 6 tablespoons unsalted butter
  • 1 cup packed light brown sugar (or muscovado sugar)
  • 1 1/2 teaspoons pure vanilla extract
  • 1/4 teaspoon salt
  • 1 large egg, cold
  • 1 cup whole wheat pastry flour or all-purpose flour
  • 1/2 cup white chocolate chips
  • 1/2 cup milk chocolate chips (or dark, which is what I used)
  • 1/3 cup walnuts, lightly toasted and chopped (or pecans, which is what I used)

Place a rack in the upper third of the oven. Preheat to 350 degrees. Line an 8 inch square baking pan with parchment paper (or aluminum foil), leaving an overhang around each side.

In a medium saucepan, melt the butter over low heat. Remove the pan from the heat and use a wooden spoon to mix in the brown sugar, vanilla, and salt until smooth. Quickly stir in the egg. Add the flour, white chocolate chips, milk (or dark) chocolate chips, and walnuts (or pecans). Stir everything until just incorporated. Transfer the batter to the prepared pan and spread in an even layer.

Bake for 25-30 minutes until golden and set in the middle.

Allow to cool completely in the pan before lifting the ends of the parchment paper to transfer the blondies to a cutting board. Cut into 16, 25, or 36 squares, depending on which size you prefer. I went for close to 25.

In Dessert Tags baking, book review, chocolate, dessert
2 Comments
Maple-Soy-Roasted-Almonds-Set-the-Table.jpg

Maple Soy Roasted Almonds

Rachael White January 20, 2015

Such a huge amount of planning goes into the weeks and months leading up to a baby's arrival. Most of the planning involves making sure baby has everything necessary to make it through those first few months. Somehow, the parents get lost in the shuffle. With baby #1, I did not do an awesome job of taking care of myself. I didn't eat enough, didn't sleep enough (although, who does with a newborn in the house) and because of that I wasn't able to take care of our new little one to the best of my ability. Yes, we were in a foreign country without family nearby to help us out, but the little things like having energy boosting snacks within arm's reach would have made a world of difference. Fortunately, I realized the importance of this seemingly small thing and was able to crawl out of the haze that had been the first month of motherhood. This time around, I tried to be as prepared as possible by making some healthy snacks that can easily be eaten one-handed (an important requirement when you have a newborn). There are big jars of Maple Soy Roasted Almonds in different rooms of the house right so I can grab a handful at any time.

This guy may only be a week old, but it hasn't taken long for me to appreciate having snacks like this at the ready.

IMG_1268.jpg

Side note: I'm hopelessly in love with this guy. He is the sweetest. Watching both boys together may break my heart a little simply because there is almost too much love happening.

IMG_1374.jpg
Roasted-Almonds-with-Maple-Soy-Glaze-Set-the-Table.jpg
Simple-Maple-Soy-Roasted-Almonds-Set-the-Table.jpg

These almonds are so easy to make and store well in an airtight container. They are a little fancier than eating plain almonds but they aren't overwhelmingly coated in the maple soy glaze. Sweet, salty, and crunchy snack-time perfection. Yes please!

Maple-Soy-Roasted-Almond-Recipe-Set-the-Table.jpg
Healthy-Maple-Soy-Roasted-Almonds-Set-the-Table.jpg

Maple Soy Roasted Almonds

Makes 3 cups

  • 3 cups raw almonds
  • 1/3 cup low-sodium soy sauce
  • 1/3 cup pure maple syrup
  • 2 teaspoons kosher salt
  1. Preheat the oven to 350 degrees Fahrenheit.
  2. Spread the almonds in a single layer on a large rimmed baking sheet.
  3. Roast the almonds for 8 minutes to lightly toast them. Meanwhile, stir the soy sauce and maple syrup together in a large bowl.
  4. Add the almonds to the bowl and toss to coat them in the sauce.
  5. Line the baking sheet with parchment or spray with cooking spray. Use a slotted spoon to scoop the almonds onto the baking sheet and spread in a single layer.
  6. Roast the almonds for 15 minutes, stirring once halfway through.
  7. Sprinkle the almonds with the salt and let them cool slightly for about 2-3 minutes, then transfer them to a large plate to cool completely before transferring to an airtight container.
In Kid Friendly, No Added Sugar, Vegetarian, Cocktails and Appetizers Tags almonds, easy appetizer recipe, healthy snacks, soy sauce
2 Comments
Simple-Grapefruit-Vodka-Soda-Set-the-Table.jpg

Cocktail Friday: Grapefruit Vodka Soda

Rachael White January 16, 2015

It seems like it has been 5 million years since I posted a cocktail here and I must say that I've missed it. Cocktail Friday was something I started back in my Tokyo Terrace days for a couple of reasons. First, I was really hoping to cut down on our budget for going out. Living in Tokyo, it was easy to blow through a good chunk of change between eating out at Izakayas, spending a few hours at Karaoke, and indulging in a little sushi (all of which go well with Umeshu Soda). We started having at-home happy hours on Friday evenings, which we would often invite our friends to join, which saved us some dough on drinks and apps. Sometimes we would go out afterwards, but a lot of the time we would just make it a stay-in kind of night. The second reason I started Cocktail Fridays was because I didn't know much about anything but wine and I wanted to expand my horizons. This was a great way to hold myself accountable when it came to learning about various spirits, mixers, etc. Fast forward to today and I still love taking classic cocktail recipes and making them new with the addition of new and unusual ingredients. This Grapefruit Vodka Soda is a perfect example.

Refreshing-Grapefruit-Vodka-Soda-Set-the-Table.jpg

I first made this cocktail for my sister, Rebecca, the vodka soda lover in the family, when she was visiting us a couple months ago. My cocktail ingredients were limited, since I hadn't been keeping things stocked during my pregnancy. However, I scrounged up a bottle of vodka from the freezer, grabbed a grapefruit that was hiding in the fridge, and cracked open a can of my very favorite sparkling water: pamplemousse (aka grapefruit) from La Croix. Yep. That's all I used to whip up a fresh, seasonal version of the classic vodka soda. Easy peasy, no?

Grapefruit-Vodka-Soda-Recipe-Set-the-Table.jpg

I may be 100,000% sleep deprived with our new little bundle of joy, but getting back into the routine of sharing a fresh and easy cocktail with you each and every week helps me feel more like myself. Plus, this is easily adaptable for those of us who need more mocktails in our lives. Just omit the vodka. Done and done. The grapefruit wedges are enough to make any old sparkling water feel more elegant and fun.

Cheers to that, I say. Cheers. To. That.

Grapefruit-Vodka-Soda-Set-the-Table.jpg

Grapefruit Vodka Soda

Makes 2 cocktails

  • 4 oz vodka
  • 4 oz pamplemousse sparkling water (or any variety you prefer)
  • 4 grapefruit wedges

Fill two short glasses with ice. Pour the vodka over the ice and the sparkling water over the vodka. Squeeze the juice from one grapefruit wedge and float it in the glass. Stir gently to combine and garnish with remaining grapefruit wedges. Enjoy!

In No Added Sugar, Cocktails and Appetizers Tags Cocktail Friday, cocktail recipes, grapefruit, vodka
5 Comments
← NewerOlder →

Search Posts


Featured Posts

Summary Block
This is example content. Double-click here and select a page to feature its content. Learn more
Featured
Nov 9, 2025
Cursus Amet
Nov 9, 2025
Nov 9, 2025
Nov 2, 2025
Pellentesque Risus Ridiculus
Nov 2, 2025
Nov 2, 2025
Oct 26, 2025
Porta
Oct 26, 2025
Oct 26, 2025
Oct 19, 2025
Etiam Ultricies
Oct 19, 2025
Oct 19, 2025
Oct 12, 2025
Vulputate Commodo Ligula
Oct 12, 2025
Oct 12, 2025
Oct 5, 2025
Elit Condimentum
Oct 5, 2025
Oct 5, 2025
Sep 28, 2025
Aenean eu leo Quam
Sep 28, 2025
Sep 28, 2025
Sep 21, 2025
Cursus Amet
Sep 21, 2025
Sep 21, 2025
Sep 14, 2025
Pellentesque Risus Ridiculus
Sep 14, 2025
Sep 14, 2025
Sep 7, 2025
Porta
Sep 7, 2025
Sep 7, 2025

Powered by Squarespace