Quantcast
  • Contact
  • Portfolio
  • Subscribe
  • Recipes
Menu

Set the Table Photography

photography
  • Contact
  • Portfolio
  • Subscribe
  • Recipes
×
Grandma Della
Grandma Della

Grandma Della + Fried Apples

Rachael White September 17, 2013
Bowl of Fried Apples :: Set the Table

When I was a kid, summers always meant a road trip to Tennessee. We would make a leisurely drive from Minnesota, stopping to see some interesting places along the way. When we finally made it to Cookeville, we would set up camp at my grandma and grandpa’s small red brick home. My sister and I slept on the pullout sofa in the family room where we would inevitably be woken up around 5:30am (sometimes earlier) by my grandfather. He would be banging pots and pans around in the kitchen, preparing to make gravy and biscuits which sat, getting cold, until we finally decided to get up and join the rest of the world. Occasionally, grandpa would turn on the TV, which was in our room, if he really wanted us to get up already.

My grandma also made biscuits and gravy, but I have more memories of the dinner she would make for us all on Sundays. Stewed beans, boiled potatoes, fried chicken, banana pudding, thick slices of juicy red tomato from the garden, fried apples...it was quite a spread. Everyone would come over and fill themselves up with her Tennessee soul food. We certainly did not go hungry. I wish I had spent more time learning from both my grandpa and grandma about food. Not just recipes, but what they really thought about it; what they cooked and why. And I would likely ask my grandpa what in the world was going through his head when he would eat butter stirred with homemade jam using nothing but a spoon.

Fall Apples :: Set the Table
Apple Towers :: Set the Table

My grandmother passed away yesterday. It wasn’t exactly unexpected. She had been experiencing all kinds of ‘failures’. Heart failure was most likely what ended her life. I was able to visit her a couple weeks ago, knowing it would likely be the last time we would see each other here on earth. It was a bittersweet trip, revisiting places from my childhood and remembering the days when both of my grandparents were alive. The day I left Tennessee, I knew that I would be saying goodbye to my grandma for the last time. I think she knew it, too.

First time seeing an ultrasound picture :: Set the Table

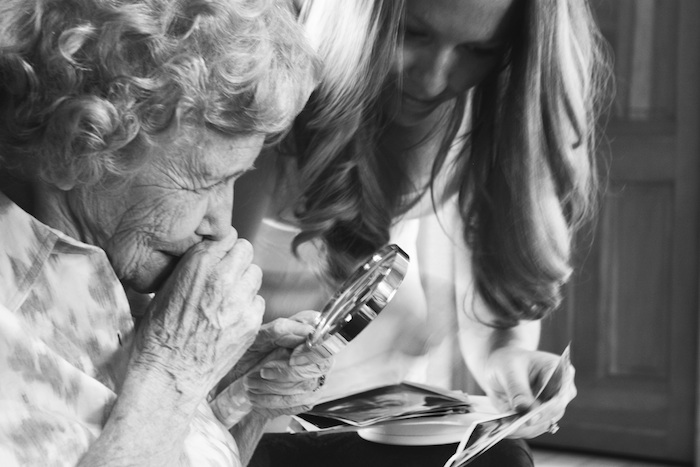
Fortunately, I have only good memories of her to take with me now that she's gone. The photo above, for example, is my grandma seeing an ultrasound photo for the first time. I was about 5 months pregnant with Riley and she couldn't stop looking and smiling her small, delicate smile. I loved sharing that moment with her.

Della's Fried Apples :: Set the Table

She was a true Southern Belle with the sweetest voice and Southern drawl you’ve ever heard. Della was delicate on the outside but we all knew she was stronger than any of us would ever be on the inside. I’m grateful for the memories I have of her and I know now that much of my love of cooking food for others stemmed from her. The picture at the top of this post will always hang in my kitchen. No matter where we are, she will be there reminding me that this "cooking thing" goes beyond blogs and recipes and food photography. It goes back to a time before strict recipes when the point was to nourish and comfort those around the table.

Southern Style Fried Apples :: Set the Table

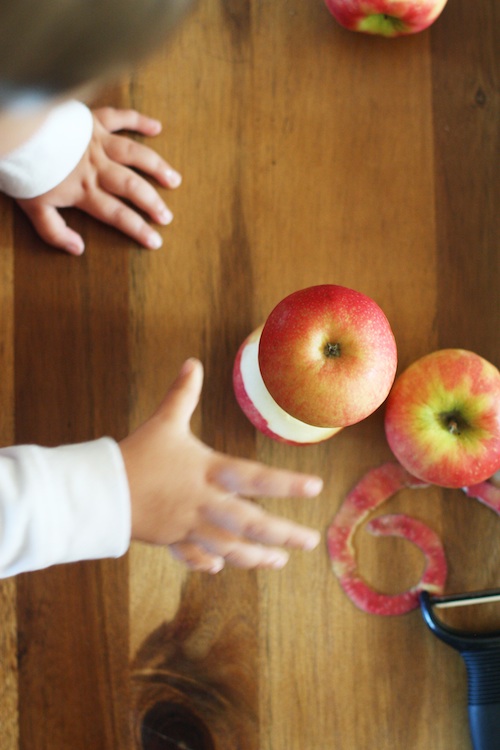
All I've wanted to do for the past 2 days is eat her food. All I could handle was making fried apples. Grandma made them all the time and so did my mom when I was growing up. As soon as the apples hit the melted butter in the pan, the aroma brought me back to my grandparents' Tennessee house. I could remember the way the air felt, thick with summer humidity, and the sound of grandma's little voice that was only barely above a whisper at all times.

Fried Apples

Ingredients

  • 4 or 5 apples, peeled, cored and cut into slices 1/2 inch thick
  • 1 tablespoon unsalted butter
  • 1 tablespoon oil (I used walnut oil, but you can use canola or another vegetable oil)
  • 3 tablespoons sugar

Instructions

  1. Melt the butter with the oil in a large skillet over medium-high heat (stainless works best, but cast iron would also be fine). Add the apples and cover until they begin to soften, about 5 or 6 minutes.
  2. Uncover and sprinkle the sugar over the apples. Stir to coat. Flatten the apples in an even layer and leave, uncovered, to caramelize on one side. Do not stir for about 5 minutes, watching to make sure they aren't cooking too quickly.
  3. Use a large spatula to flip the apples and caramelize the other side. Continue cooking until the apples have a nice brown color and are soft, about 5-8 minutes more, adjusting heat as necessary.
  4. Serve warm alone or with vanilla ice cream. These are also delicious with grilled pork.
In Dessert, Sides + Condiments, This & That, Vegetarian Tags apple recipe, fall apple recipe, fried apples, Southern cooking
10 Comments
Rainbow-Chard-Set-the-Table.jpg

Baked Eggs, Rainbow Chard + Yogurt

Rachael White September 10, 2013

Rainbow chard has been the most surprising thing I've grown this summer. I've cut it down and frozen a good portion to use in soups and stews this winter and it just keeps growing back with a greater yield each time. I basically have chard coming out of my ears. As a result, I've been scouring my cookbooks looking for new ways to feature greens in simple dishes that I can have for a quick, healthy lunch. This recipe for baked eggs came from Plenty by Yotam Ottolenghi and it has changed everything. About lunch, that is.

Baked-Eggs-with-Chard-Yogurt-Set-the-Table.jpg

Most days, lunch consists of odds and ends from the refrigerator. That's not always terrible, but sitting down to a proper meal like this one is infinitely more fulfilling. Taking a few quite minutes to enjoy delicious, nourishing food is something I take for granted and really shouldn't. This meal reminded me of that, with it's comforting flavors and luxurious textures.

Swiss-Chard-Set-the-Table.jpg

One of the greatest parts about this meal is how easy it is. The greens (I used rainbow chard but you can use anything- Ottolenghi calls for arugula) are simply sauteed in olive oil, then the eggs are tucked into the greens and baked until just set. The magic really happens with the addition of garlicky yogurt and melted butter infused with chili flakes and paprika. It is truly a perfectly balanced, delicious meal.

Homegrown-Rainbow-Chard-Set-the-Table.jpg

Baked Eggs, Rainbow Chard & Yogurt

Ingredients

  • 4 cups rainbow chard or greens of your choice
  • 2 tablespoons olive oil
  • salt
  • 4 eggs
  • 3/4 cup Greek yogurt
  • 1 garlic clove, crushed
  • 4 tablespoons unsalted butter
  • 1/2 teaspoon red pepper flakes
  • 1/2 teaspoon smoked paprika
  • 6 sage leaves, shredded

Instructions

  1. Preheat the oven to 300 degrees F.
  2. Heat the oil in a large pan over medium heat. Add the chard and saute until wilted and most of the liquid evaporates.
  3. Transfer the chard to an ovenproof dish or skillet and make 4 holes for the eggs.
  4. Break an egg into each hole.
  5. Bake for about 15 minutes or until the whites are set. Watch them carefully because the eggs will go from not done to over done very quickly.
  6. Meanwhile, combine the yogurt, garlic and some salt. Set aside.
  7. Melt the butter in a small saucepan and add the red pepper flakes and smoked paprika.
  8. Cook until the butter is infused with a nice red color and just begins to foam.
  9. Add a pinch of salt and the sage. Remove from the heat.
  10. Remove the eggs from the oven and top with a dollop of yogurt and drizzle with butter.

*Recipe barely adapted from Yotam Ottolenghi

In Breakfast & Brunch, Lunch & Dinner, No Added Sugar, Vegetarian Tags breakfast, Brunch, dinner, Eggs, lunch, meatless meals, rainbow chard, swiss chard, vegetarian, yogurt
4 Comments
Tomato Paste Recipe :: Set the Table

Homemade Tomato Paste

Rachael White September 9, 2013

During my brief trip to Tennessee a week ago, my mom and I talked a lot about her childhood. I love it when she tells me stories about what she did as a barefoot little girl running through the forests. One of my favorite things she told me about was her moss carpet rooms. She would go out into the woods and find a space in the middle of a few trees. Then, she would search the forest for pieces of moss and she would lay them down, making a moss carpet. That was her play area. She told me that her mother taught her how to do it. I can picture that so clearly in my mind- my mom, just a little girl with dirt on her knees and curls around her face, picking up pieces of moss with her little hands and following her mother's instructions. I'm sure each step was passed on in my grandma's gentlest tone of voice.

Here is my grandmother. I adore this photo. I adore her.

Grandma Della
Grandma Della

Another story my mom told me was about the huge number of canned tomatoes that were always in the pantry. She said my grandfather would come home, break open a jar and sit down with a fork. He would finish the jar in one sitting. Can you imagine having an entire pantry filled with things you grew and were able to enjoy year round? It seems like kind of a dream these days. Instead, we crowd the grocery stores and empty the shelves of things we know nothing about. We don't know who grew them, who canned them, who processed them...we just accept that they are readily available.

Homegrown Roma Tomatoes :: Set the Table

I'm certainly not saying convenience isn't a valuable part of life, but wouldn't it be nice to know where more of your food came from from beginning to end? I think so.

With this idea in mind, I made my own tomato paste the other day. It didn't yield the number of cans my grandparents had in their pantry, but it is something I will use when the weather starts to cool down. And I know exactly where the tomatoes came from. Actually, I can see where they came from by looking out my kitchen window. I love that.

Tomato Harvest :: Set the Table

Homemade Tomato Paste

Recipe barely adapted from Saveur http://www.saveur.com/article/Recipes/Homemade-Tomato-Paste

Ingredients

  • 5 lbs roma or plum tomatoes
  • 1/4 cup olive oil, plus 2 tablespoons
  • kosher salt to taste

Instructions

  1. Roughly chop the tomatoes and set aside. Heat 1/4 cup of the olive oil in a large skillet. Add the tomatoes and cook until softened, about 8 minutes. Season lightly with salt. You can season the paste again later if you'd like.
  2. Transfer the tomatoes to a fine mesh strainer set over a large bowl. Use a whisk and press the tomatoes through the strainer by using a stirring moment. This will strain the pulp and juice of the tomatoes, leaving the seeds and skin behind. If the tomatoes don't fit in your strainer all at once, strain them in batches. You can also use a food mill, but I don't have one and thought maybe you didn't either. Hence the strainer method.
  3. Heat your oven to 300 degrees Farenheit. Rub a large sheet pan with 1" sides with 2 tablespoons olive oil. Pour the strained tomatoes onto the sheet pan. It will seem like a lot of liquid but it will reduce down significantly. Bake, stirring occasionally with a spatula, for about 3 hours. The color will deepen and much of the liquid will reduce. After the initial 3 hours, reduce the heat to 250 degrees F and cook another 25 minutes or so until the color is a deep red.
  4. Store the paste in an airtight container for one month or freeze for up to 6 months. I put mine in ice cube trays, allowed it to freeze, then transferred it to a ziploc bag.
In No Added Sugar, Sides + Condiments, Vegetarian Tags plum tomatoes, tomato recipe, roma tomatoes, tomato paste recipe, homemade tomato paste
10 Comments
Sour-Cream-Ice-Cream-Recipe-Set-the-Table.jpg

Sour Cream + Caramel Swirl Ice Cream

Rachael White September 4, 2013

I started an Etsy Shop this week. It was a little scary just putting my photography out there like that. But I'm glad I did. It's fun to see it all out there in the world. And the response has been so positive, which has helped immensely. So THANK YOU! While I was setting up my shop, I had very helpful conversations with my dad about all the little details. He would ask me questions about this and that, asking if I'd looked up various things to help calculate costs, etc. Of course, my answer was often, "Oh, I should probably do that." Thank God for that man and his patience with me.

Ice-Cream-Ingredients-Set-the-Table.jpg

Speaking of my dad, he is the biggest ice cream fan I know. In another life, I'm 100% sure he would own an old-timey ice cream parlor where he would serve classic flavors and perfect malts and chat with the locals all day. It would be wonderful. If I were to open an ice cream shop, it would be filled with crazy flavor combinations like brown sugar miso. That's just one of the many ways my dad and I are different.

Homemade-Ice-Cream-Recipe-Set-the-Table.jpg
Sour-Cream-Ice-Cream-Ingredients-Set-the-Table1.jpg

I made this sour cream ice cream to serve on top of a peach cobbler I made for Labor Day. It was nice, but a little too sweet the first time around. The second time around, I altered the recipe by reducing the sugar and it came out perfectly. Rich, creamy, tart, and just what the doctor ordered when you need just a little bite of something sweet after dinner. The tartness is lovely with the swirls of nutty caramel. Next time I am going to try salted caramel- it'll be dreamy.

Sour-Cream-Caramel-Swirl-Ice-Cream-Set-the-Table.jpg
Sour-Cream-Ice-Cream.jpg

It is still about a million degrees here in Denver (my kitchen is, anyway) so the last thing I want to do is turn on a stove. This ice cream is perfect for days when you can't bear the heat because it has no eggs, which means no need to turn on a burner. When you have eggs, they need to be heated to a specific temperature so they are safe to eat. Here, you need only mix the ingredients together and give them a whiz in your ice cream machine. Good to go!

Sour Cream & Caramel Swirl Ice Cream

Ingredients

  • 12 oz sour cream
  • 1 cup whole milk
  • 1/2 cup sugar
  • 2 tablespoons lemon juice
  • pinch of salt
  • 1/3 cup caramel sauce

Instructions

  1. In a large bowl, stir the sour cream, whole milk, sugar, lemon juice and salt together. Chill the mixture in the fridge for at least 1 hour and up to 8. Freeze in your ice cream maker according to the manufacturer's instructions.
  2. Layer 1/2 the ice cream in a loaf pan or other freezer safe container. Drizzle half of the caramel over the ice cream. Top the with the remaining ice cream and drizzle with the rest of the caramel. Place in the freezer until hard, about 6 hours.
In Dessert, Vegetarian Tags caramel, easy ice cream recipe, homemade ice cream, ice cream recipe, sour cream ice cream
1 Comment
Peach & Hatch Chile Salsa :: Set the Table

Peach + Hatch Chile Salsa

Rachael White August 21, 2013

It's been hot the last few days. Like, so hot that the idea of even moving makes me want to cry a little. And yet, in the midst of all the crazy hot weather, I somehow find the will to turn on my oven. My husband is pretty convinced that I am completely nuts. I actually stayed up really late last night working on some baking because I thought, for some reason, it might be easier. Instead, I picked the one night that it barely cooled off at all. So now I'm just hot and tired. Such is life I guess, right?

Stovetop Roasted Hatch Chiles :: Set the Table

On the plus side, all of my crazy heat-inducing food adventures have lead me to this moment. This moment when I get to share with you the joy of roasted hatch chiles. Last summer, I noticed lots of roadside stands with wooden signs out front that said "Roasted Hatch Chiles". First of all, I had no idea what a Hatch Chile was. Second, I kept wondering why they were such a big deal. So when I saw the pile of Hatch Chiles inside the front door of my grocery store I jumped on the chance to figure out what on earth was going on with these things.

How to Roast Hatch Chiles :: Set the Table

I roasted my chiles on the stove top in a cast-iron skillet. It worked well because I wasn't roasting a large amount and it helped keep the heat down in my kitchen. Yes, it still got hot. But not nearly as hot as cranking up a 450 degree oven would have made it. Roasting chiles on the stove is really simple. Just place them in a heavy skillet (no need for oil or anything) over high heat and let them char and blister. You may want to press down on them with tongs or a wooden spoon to ensure more even roasting. Once the first side is nice and toasty, flip them over and roast the other side. Done and done!

Peach Salsa with Hatch Chiles :: Set the Table

My conclusion is this: Hatch Chiles are delicious. They have a nice amount of spice- not too much and not too little- that works perfectly with things like salsa, chili, and probably countless other recipes. I'm pretty excited to expand my Hatch Chile recipe base. If this hot weather continues I'll be doing that by purchasing pre-roasted chiles because I CAN'T TAKE IT.

Also, I need and air conditioner.

Peach Salsa with Cilantro & Hatch Chiles :: Set the Table

I'd be remiss if I didn't take a moment to share how delicious Colorado peaches are. I'm obsessed. So is Riley. We are peach eating fools. Fortunately, I can prolong the peach enjoyment by making things like this salsa. The sweet peaches with the heat of the roasted chiles is perfection.

I love this salsa with chips but it would also make a great accompaniment to grilled fish or meat. You could even put it on a sandwich. Yep. I totally went there.

Moral of the story: make the salsa. If you can get Hatch chiles, get them. Lots of them. Roast them, freeze them, can them...whatever. Just get on it.

I'll be sitting in a tub of ice until cooler temperatures arrive, just in case you're wondering where I am.

Peach + Hatch Chile Salsa


Yield: Four 8 oz jars


*Note on handling chiles: Use rubber gloves or ziploc bags on your hands to avoid getting the stingy oils from chile peppers in your eyes, nose, etc. Wash your hands very well after handling, with or without protection on your hands. If you do happen to get burned on your skin, milk is a neutralizer and works like a dream if you soak a cotton ball and place it on the area. For eyes, rinse well with water.


Ingredients

  • 4 large peaches, skin on, chopped
  • 3 cloves of garlic, roughly chopped
  • 1/2 an onion (about 1/2 cup total) chopped
  • 1/3 cup cilantro leaves
  • 1 tablespoon grated fresh ginger
  • 1/4 cup fresh lime juice
  • 2 of 3 roasted Hatch Chiles, skin and seeds removed, roughly chopped (for how to roast them, see above in the post itself)
  • salt and pepper

Instructions

  1. Place all the ingredients in the bowl of a food processor. Pulse 4 or 5 times to just combine everything. Don't over mix or the salsa will be more like soup. You still want nice texture.
  2. Season as needed with salt and pepper and extra lime juice, if desired.
  3. Transfer to jars and store in the refrigerator.


In Vegetarian, Cocktails and Appetizers Tags Colorado peaches, how to roast hatch chiles, peach and hatch chile recipe, peach recipe, peach salsa recipe, peaches
5 Comments
Heirloom Tomato Galette Recipe :: Set the Table

Heirloom Tomato Galette

Rachael White August 18, 2013

Last night I sat with Riley at the coffee table and colored with crayons. He scribbled and mostly wasn't watching what he was doing but somehow managed to make 98% of his markings on paper and not the table. I sat there drawing a picture of Elmo, thinking about how relaxing that moment was. There was a pivotal moment after dinner when I was faced with a fork in the road. One direction lead me to a kitchen full of dirty dishes, while the other lead to crayons. I chose crayons because the dishes will always be there. But Riley will not always be 20 months old with a bunch of crayons saying, "Mama, sit!"

Homegrown Tomatoes & Basil :: Set the Table

I think gardening has taught me something: not everything can happen right this very second. This is something many of us forget with our smart phones and fully stocked grocery stores. But pulling a tomato off a plant in your own back yard after waiting for weeks or months for the perfect color and size is infinitely more fulfilling.

Heirloom Tomato Galette :: Set the Table

Yesterday, I took one of my homegrown tomatoes and sliced it thinly, layered it over homemade ricotta cheese, and wrapped it all up in a flaky whole wheat crust. Just before we ate, I picked some fresh basil from the garden and sprinkled it over the top. It was so perfectly satisfying and just what a summer dish should be. The colors were gorgeous, the flavors were bright and clean, and the ingredients were simple and few.

So, we ate our tomato galette and then colored with crayons. It was the perfect end to a lovely summer weekend.

Heirloom Tomato Galette


Ingredients

  • 1/2 cup all-purpose flour
  • 1/2 cup whole wheat pastry flour
  • 1/2 teaspoon salt
  • 5T unsalted butter, placed in the freezer for 30 minutes-1 hour
  • 1/4 cup ice water
  • 1 egg white, lightly beaten
  • 1 medium heirloom tomato, thinly sliced
  • 1/3 cup ricotta cheese
  • 1 egg, lightly beaten
  • 1 recipe whole wheat pastry dough
  • chopped fresh basil for garnish

Instructions

  1. In a large bowl, combine the flour, salt, and butter. If you froze the butter (which I highly recommend) use a medium-large sized cheese grater (not a microplane) to grate it into the mixing bowl.
  2. Using your fingers, combine the dry ingredients with the butter until the mixture resembles small crumbs.
  3. Using a tablespoon, slowly add the ice water 1 scoop at a time. Do this until the mixture holds together well and is not dry or crumbling.
  4. Gently knead the dough until it comes together completely. Gather the dough into a disk and wrap with plastic wrap. Place in the refrigerator for half an hour and up to 2 hours.
  5. Preheat the oven to 425 degrees F.
  6. On a lightly floured surface, roll out the dough in a circle that is about 10 inches in diameter. In a small bowl, combine the ricotta with the egg. Season with a little salt and pepper. Spread the ricotta mixture in the center of the dough, leaving a boarder of about 2 inches. Layer the tomato slices over the ricotta. Gently fold the edges of the dough over the outer edge of the tomato slices, pressing lightly to seal. Brush the top of the crust with a little heavy cream.
  7. Bake for 20-25 minutes or until the crust is golden brown and the tomatoes look just barely cooked. Sprinkle with the basil and serve.
In Lunch & Dinner, Vegetarian, Cocktails and Appetizers Tags Basil, heirloom tomatoes, ricotta, savory galette, tomato recipe
8 Comments
← NewerOlder →

Search Posts


Featured Posts

Summary Block
This is example content. Double-click here and select a page to feature its content. Learn more
Featured
Mar 16, 2026
Cursus Amet
Mar 16, 2026
Mar 16, 2026
Mar 9, 2026
Pellentesque Risus Ridiculus
Mar 9, 2026
Mar 9, 2026
Mar 2, 2026
Porta
Mar 2, 2026
Mar 2, 2026
Feb 23, 2026
Etiam Ultricies
Feb 23, 2026
Feb 23, 2026
Feb 16, 2026
Vulputate Commodo Ligula
Feb 16, 2026
Feb 16, 2026
Feb 9, 2026
Elit Condimentum
Feb 9, 2026
Feb 9, 2026
Feb 2, 2026
Aenean eu leo Quam
Feb 2, 2026
Feb 2, 2026
Jan 26, 2026
Cursus Amet
Jan 26, 2026
Jan 26, 2026
Jan 19, 2026
Pellentesque Risus Ridiculus
Jan 19, 2026
Jan 19, 2026
Jan 12, 2026
Porta
Jan 12, 2026
Jan 12, 2026

Powered by Squarespace